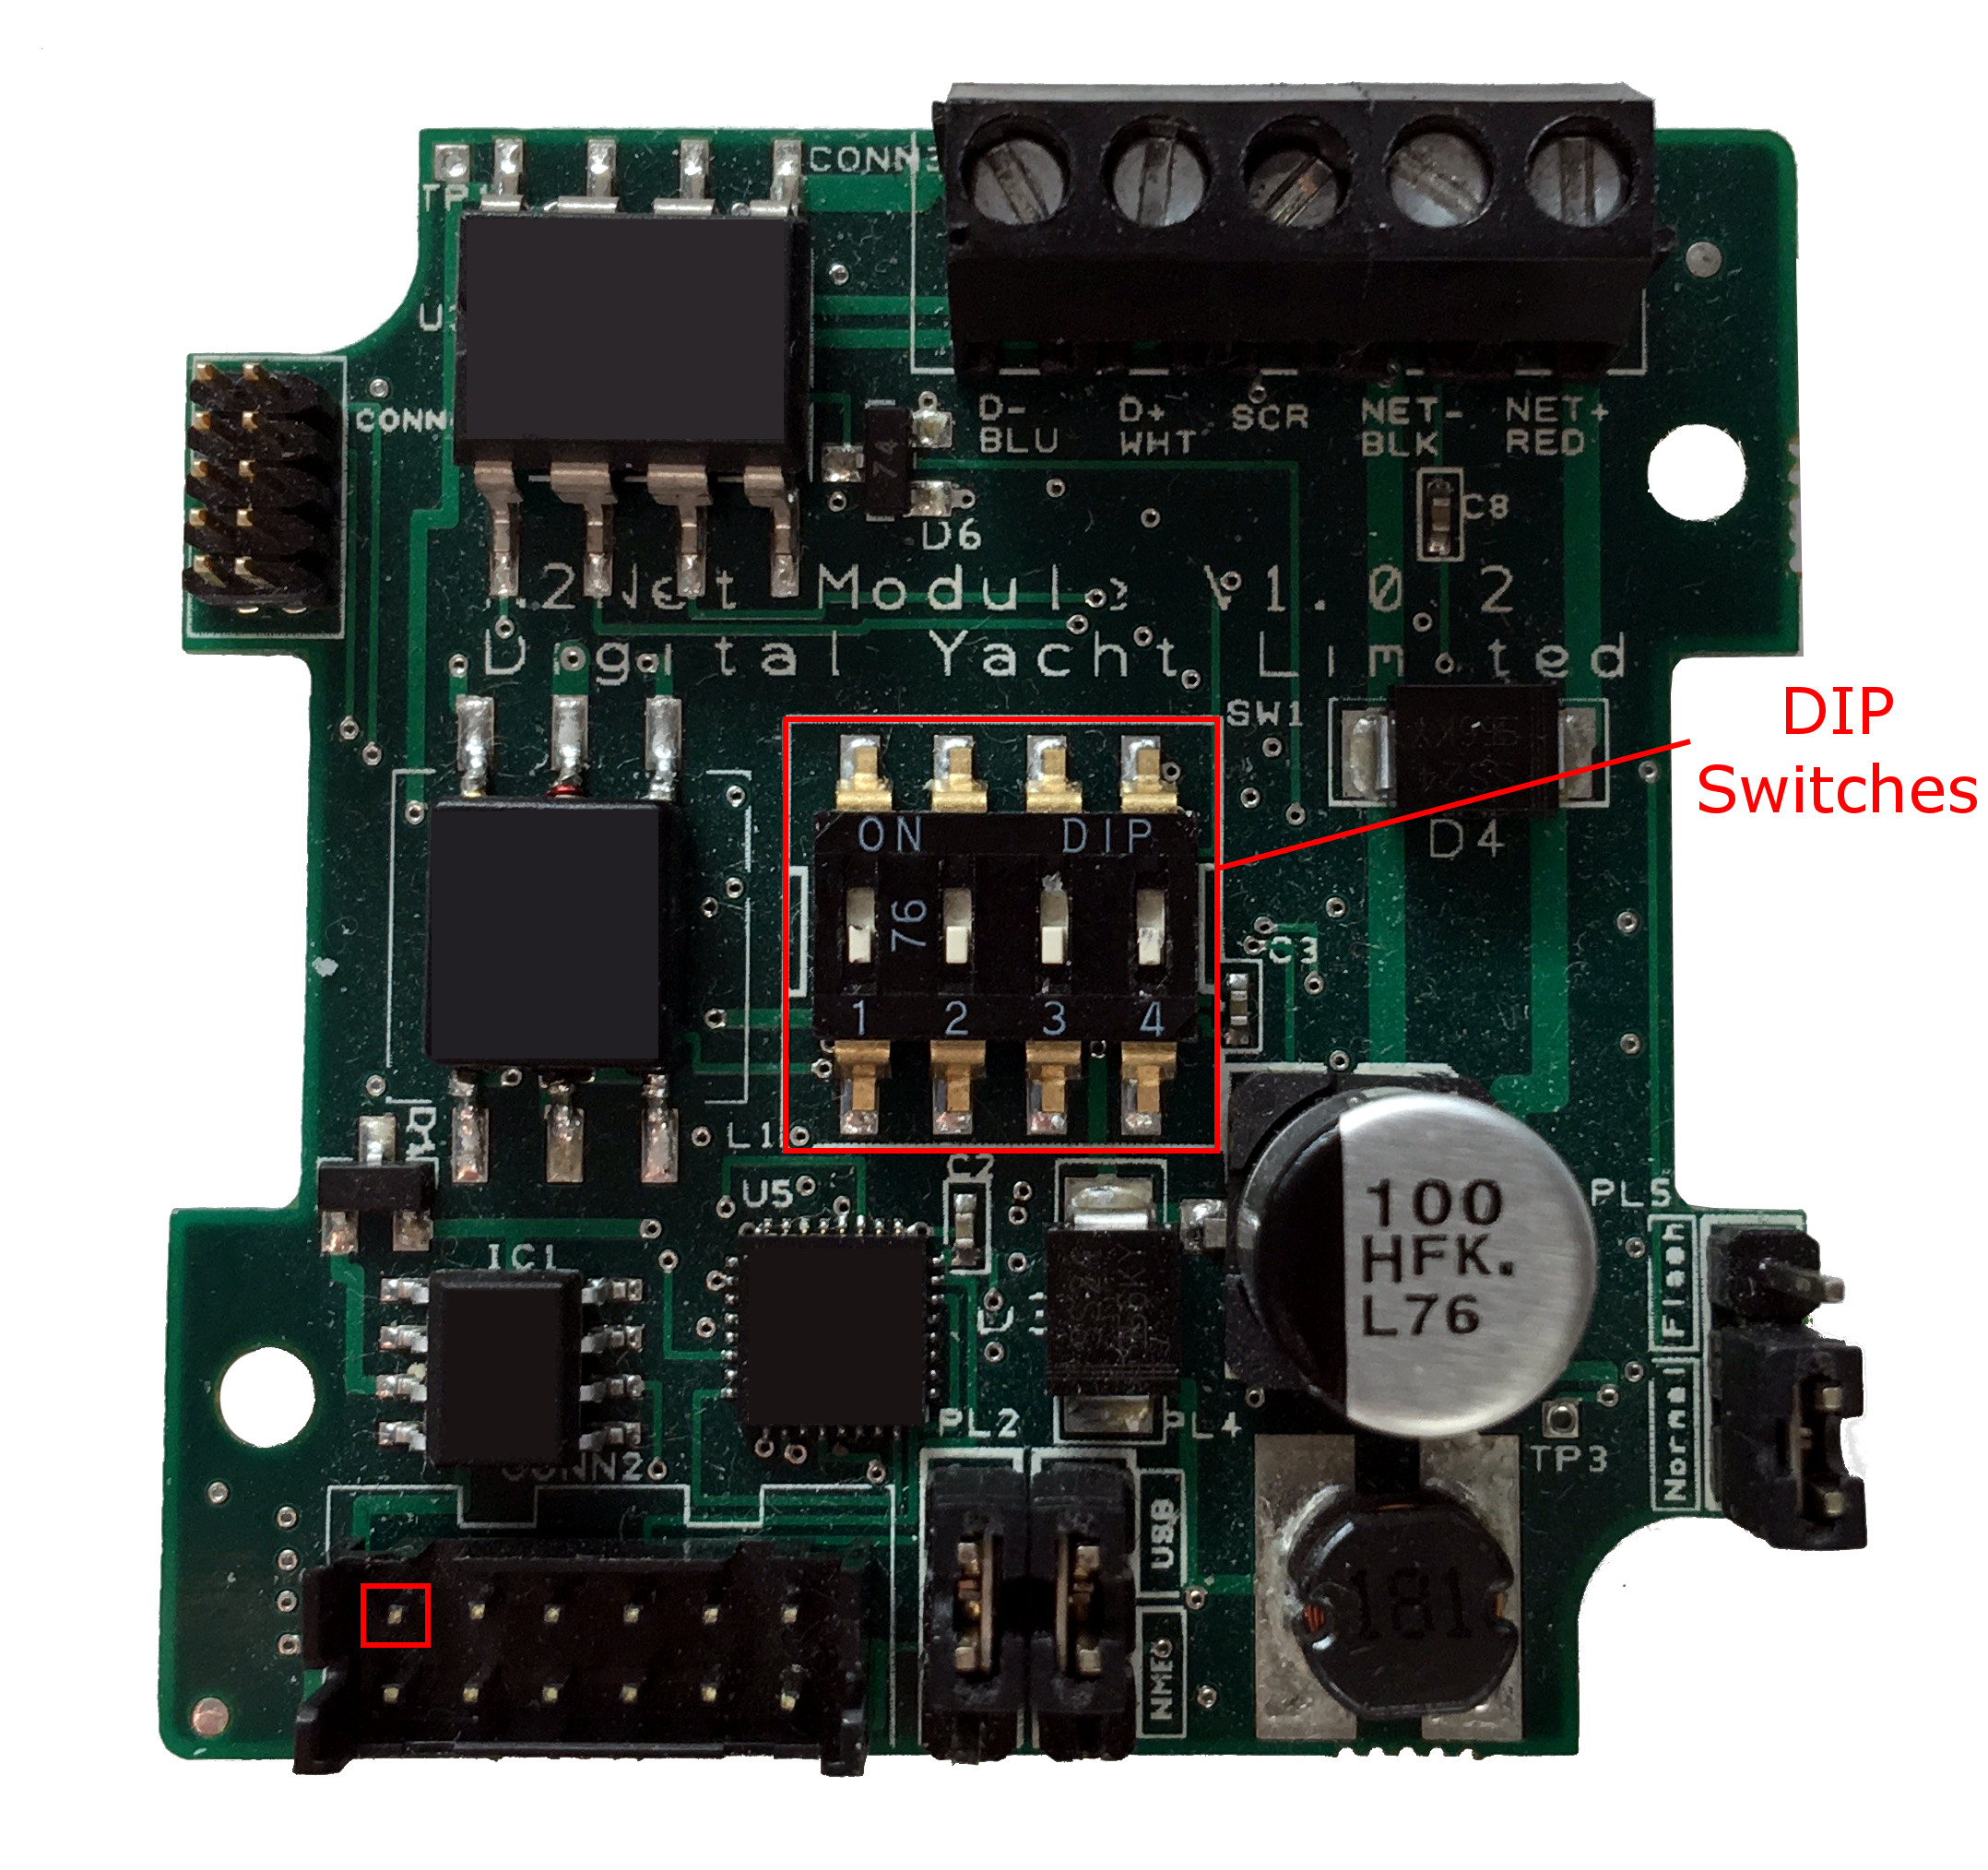
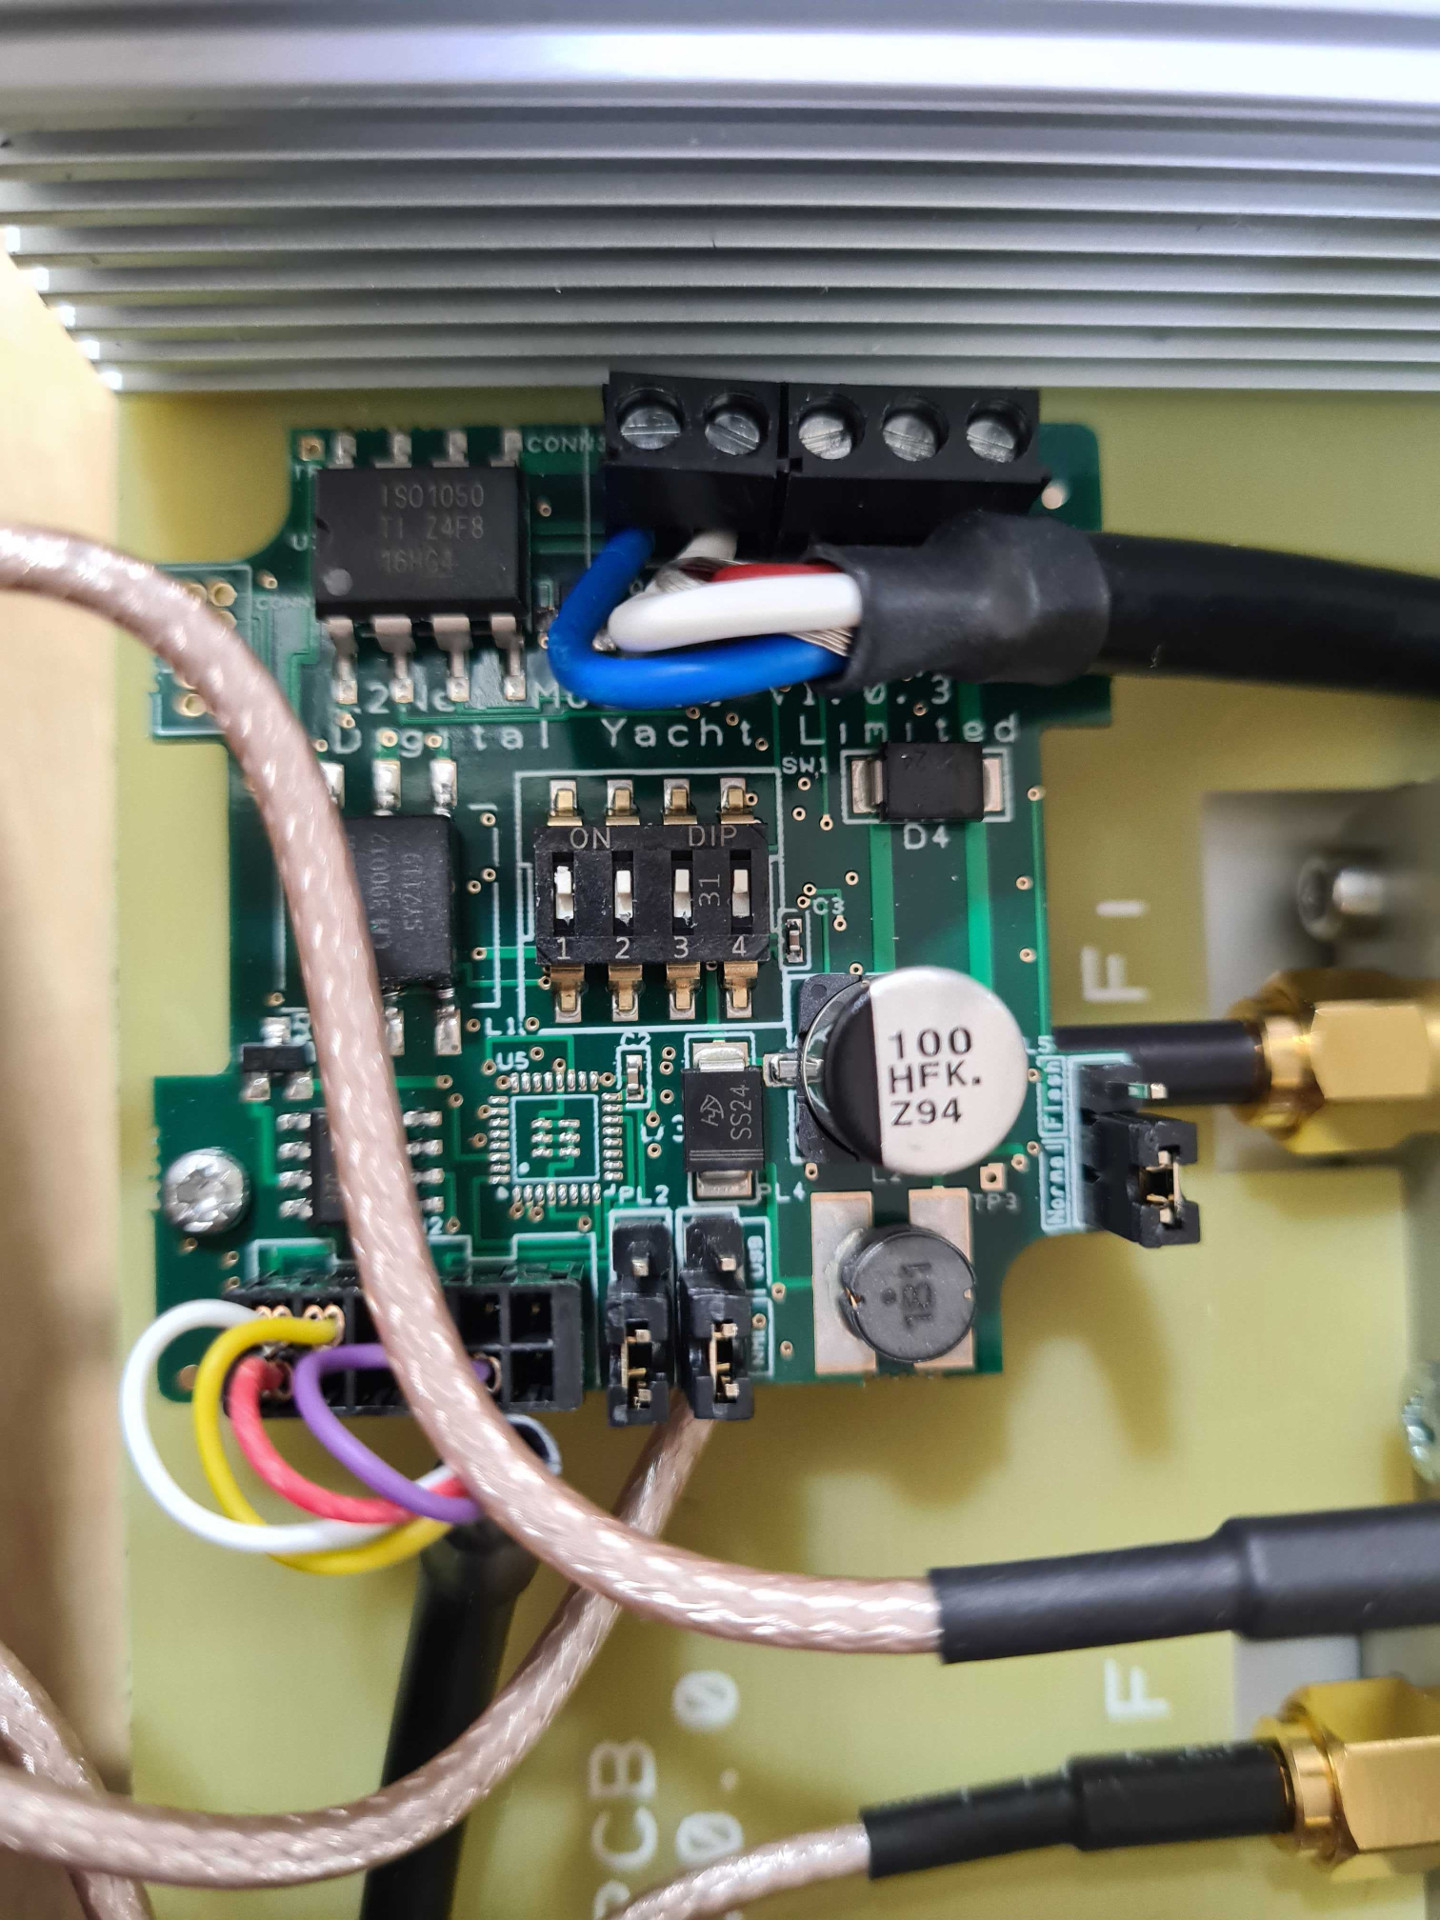
Description
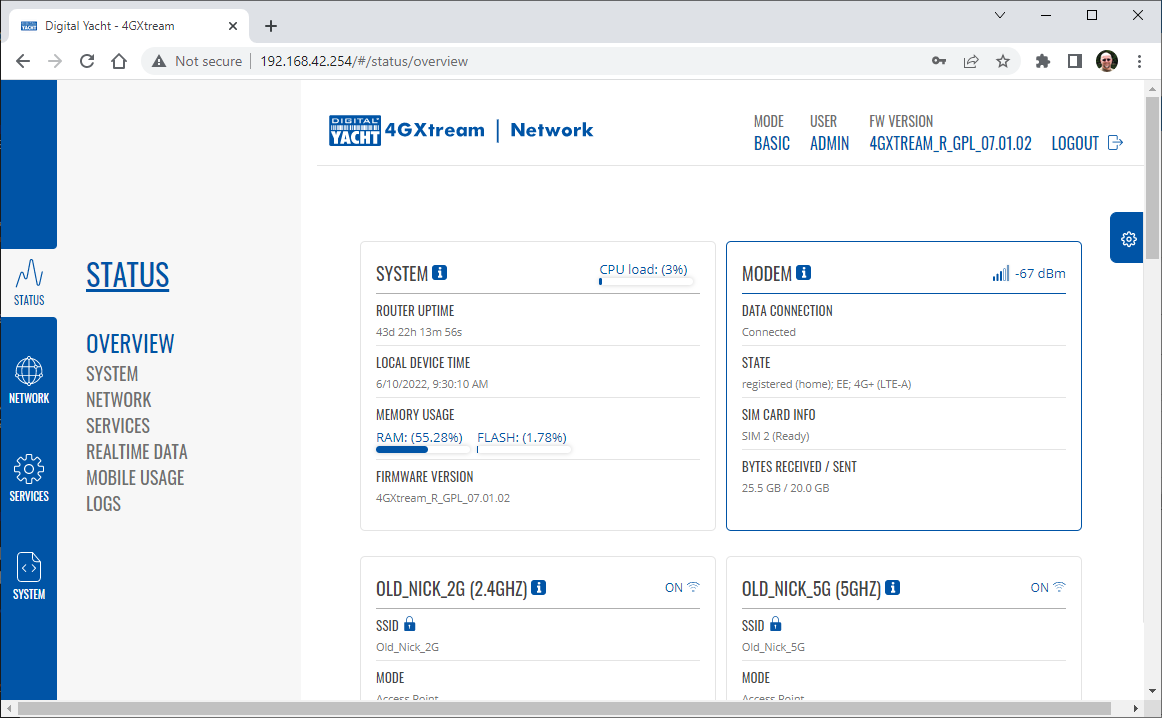
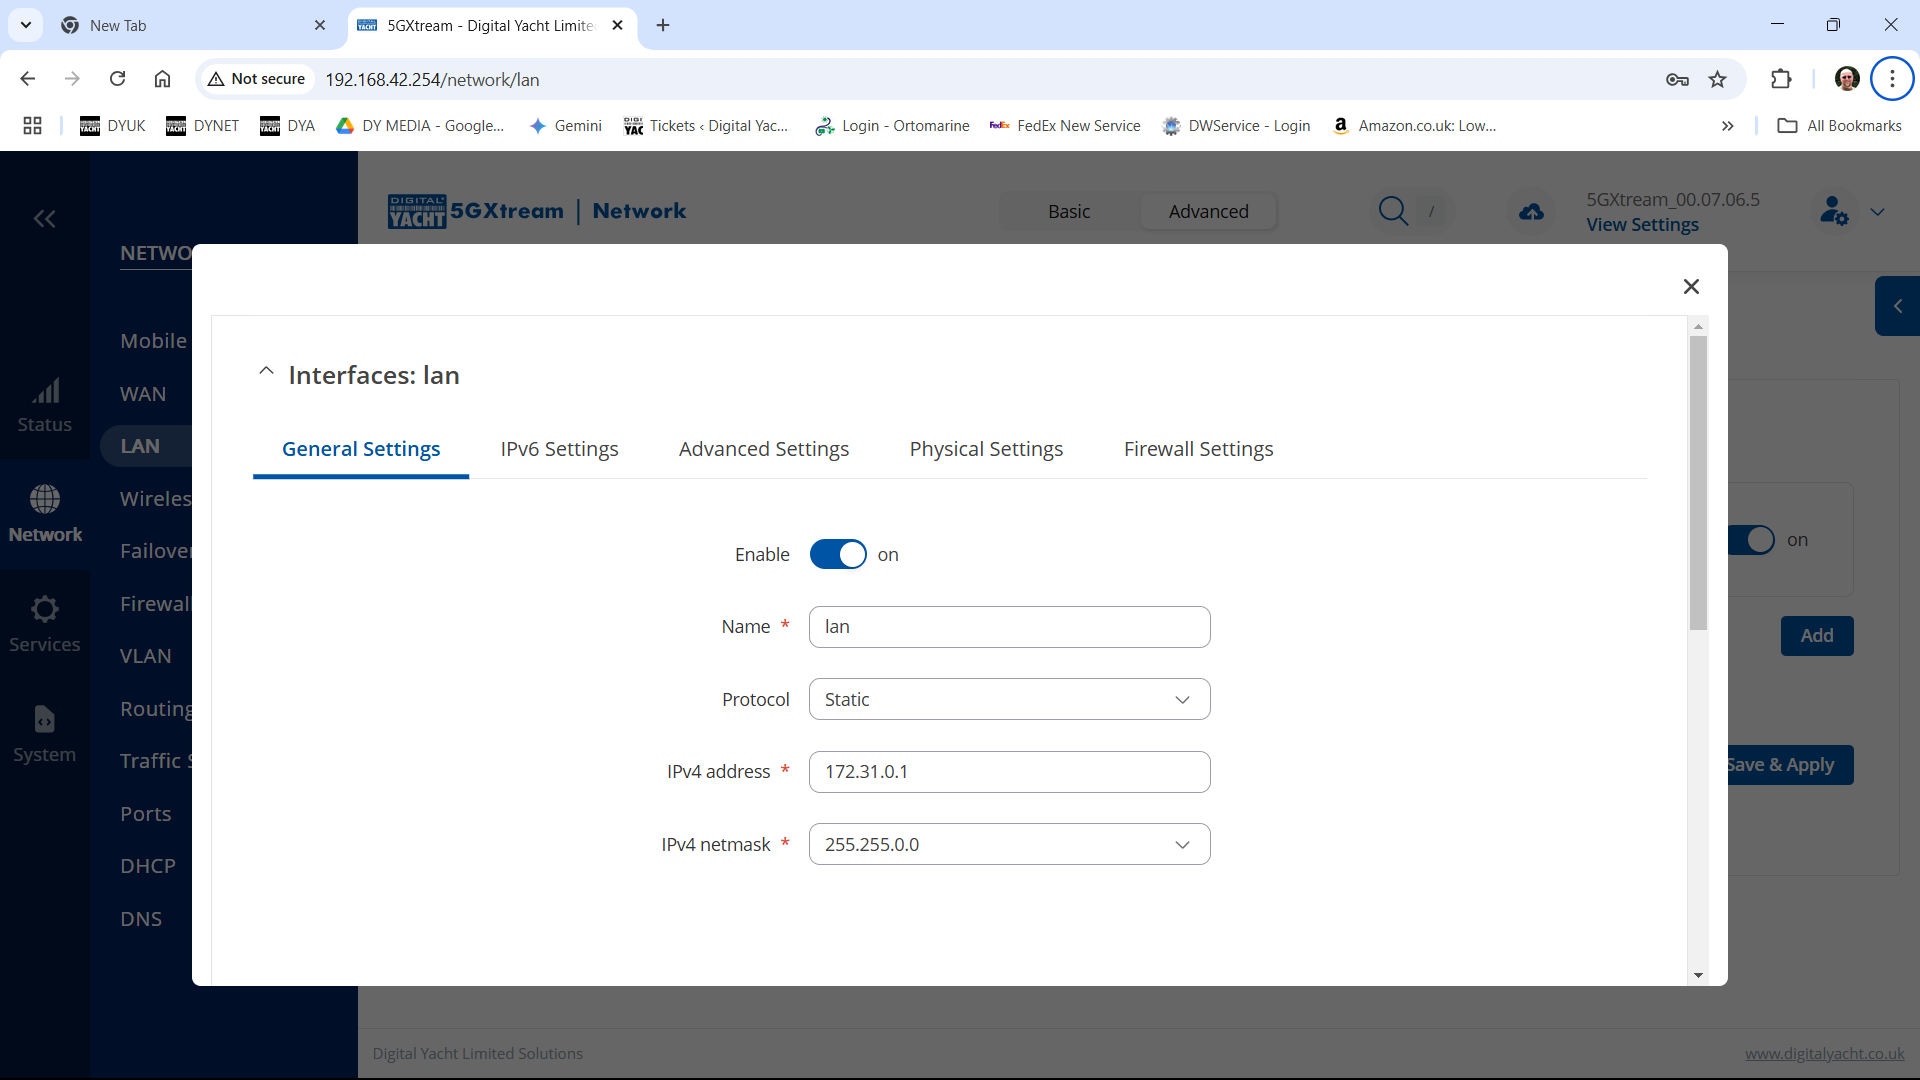
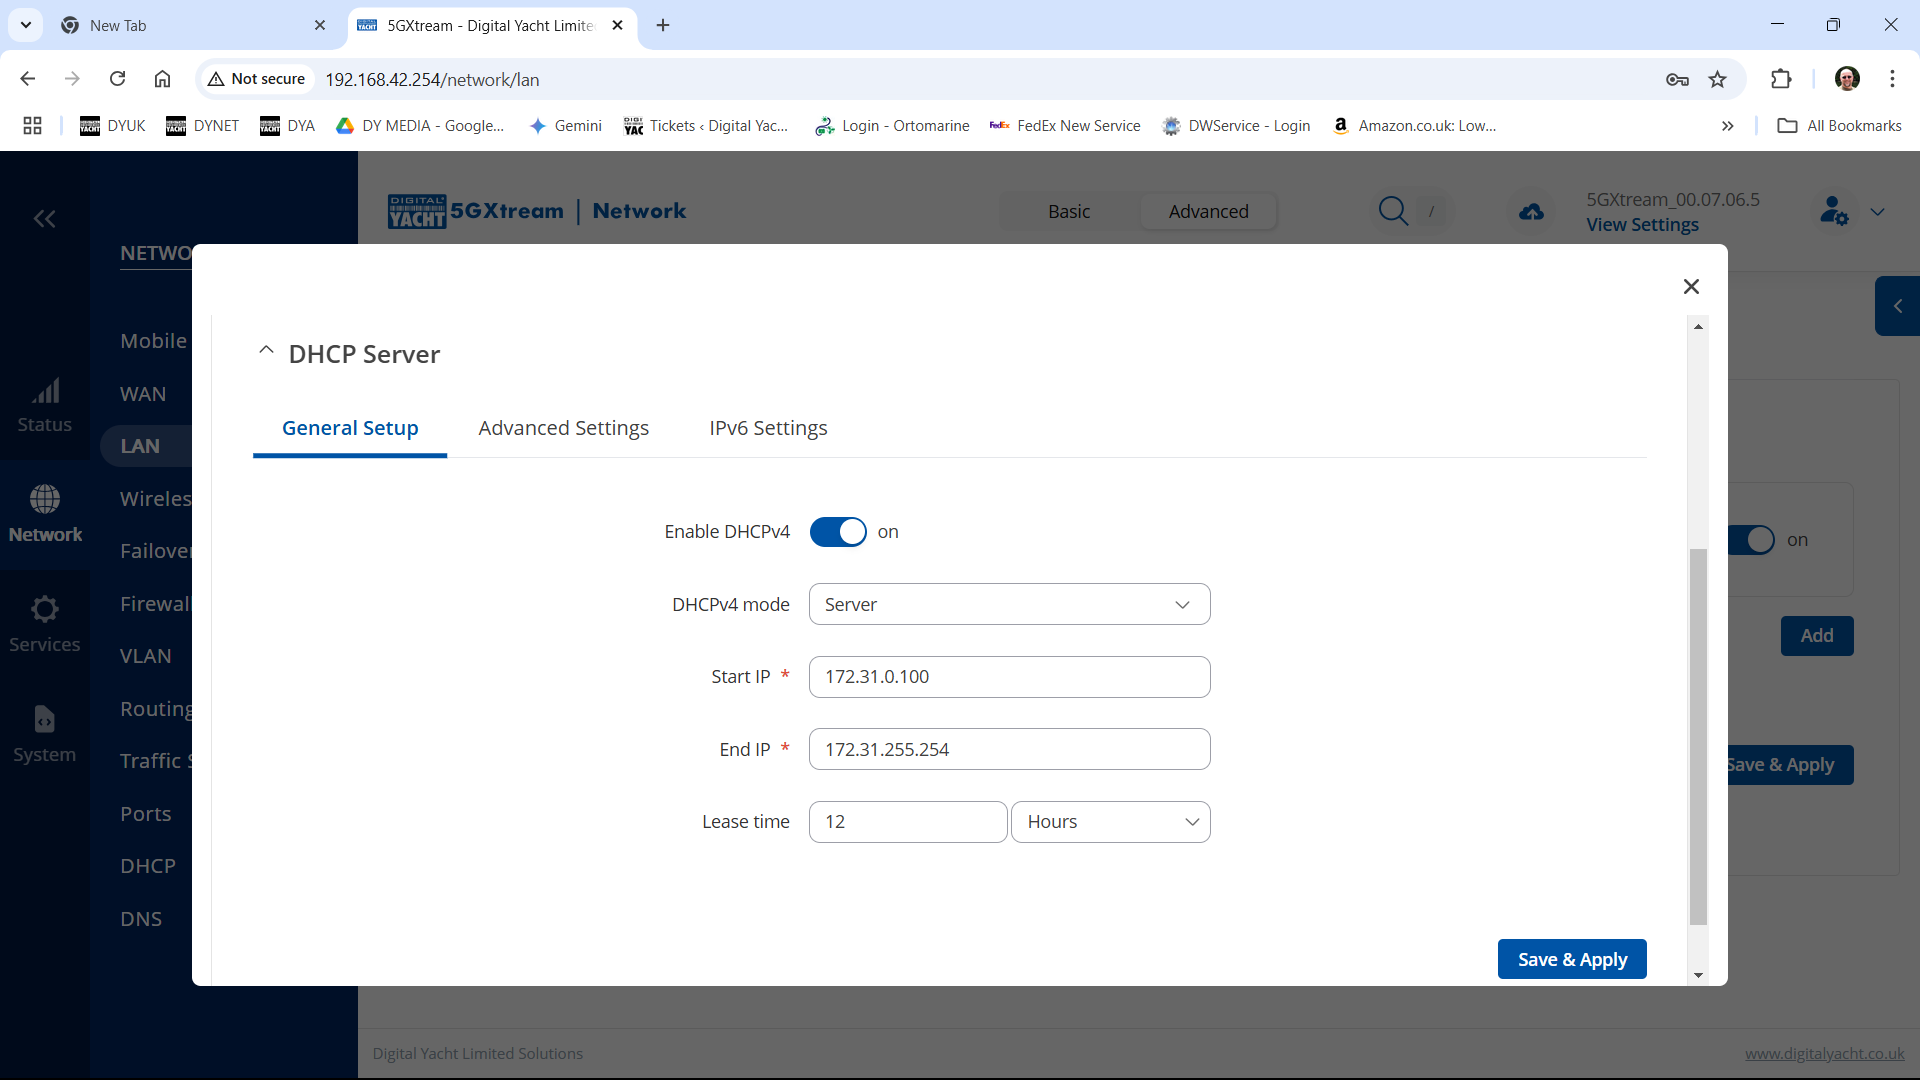
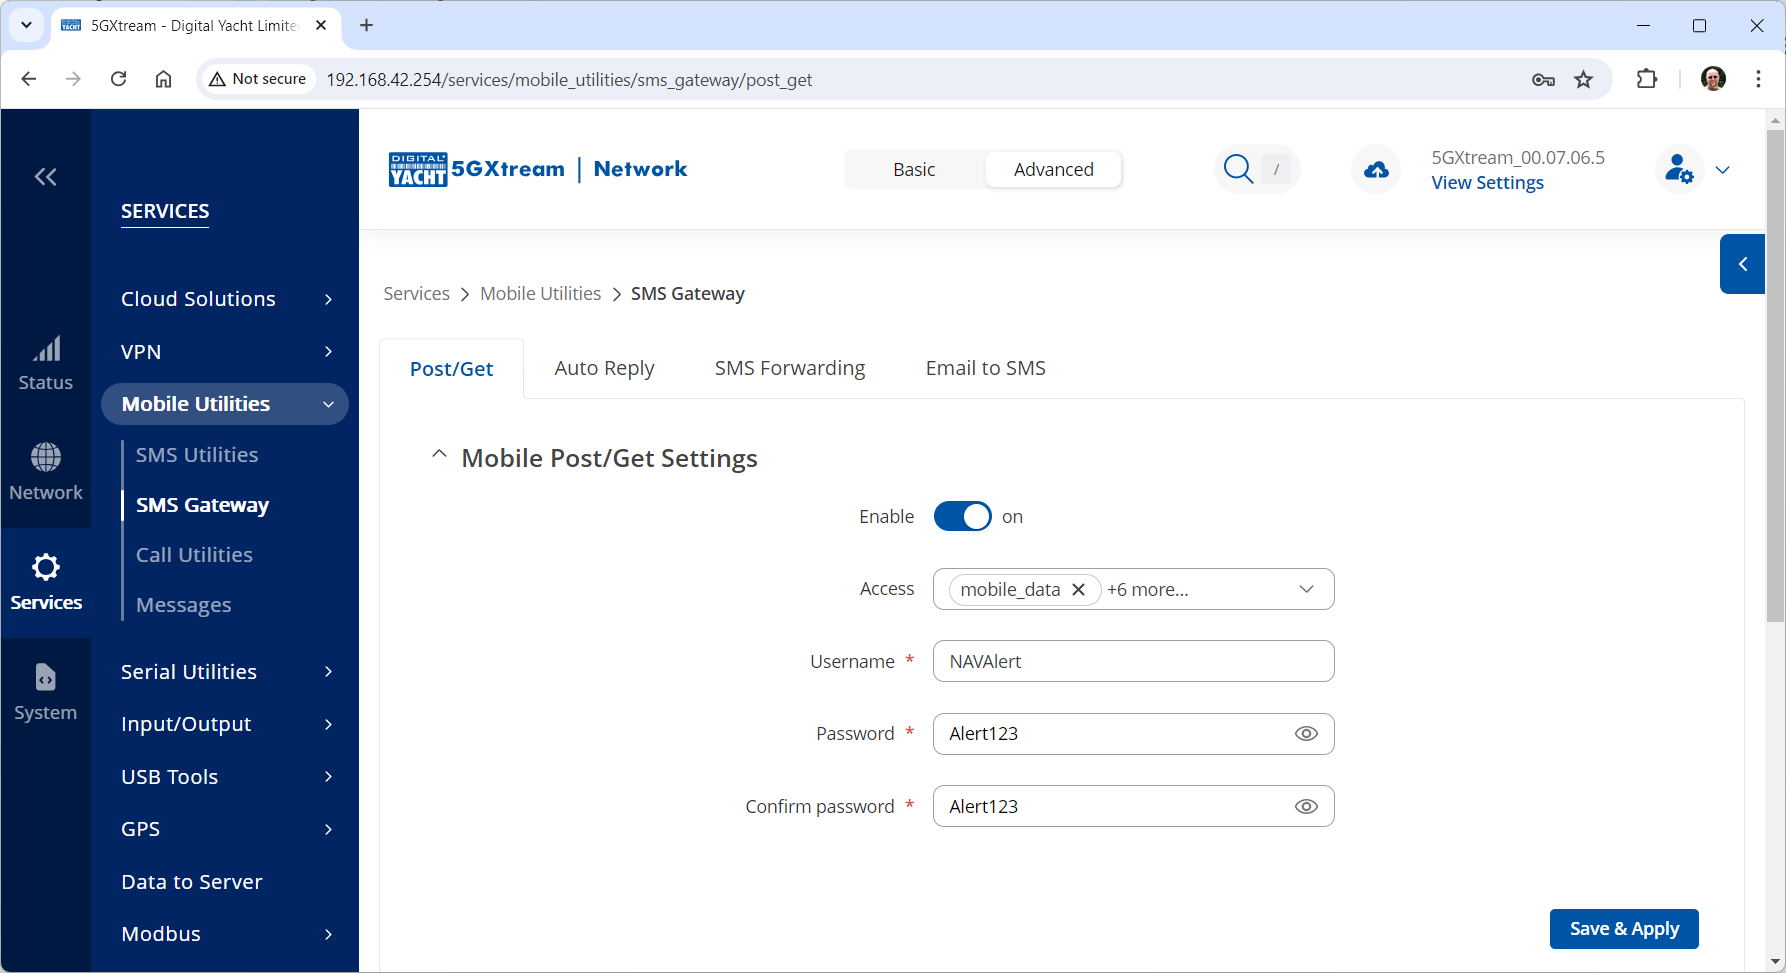
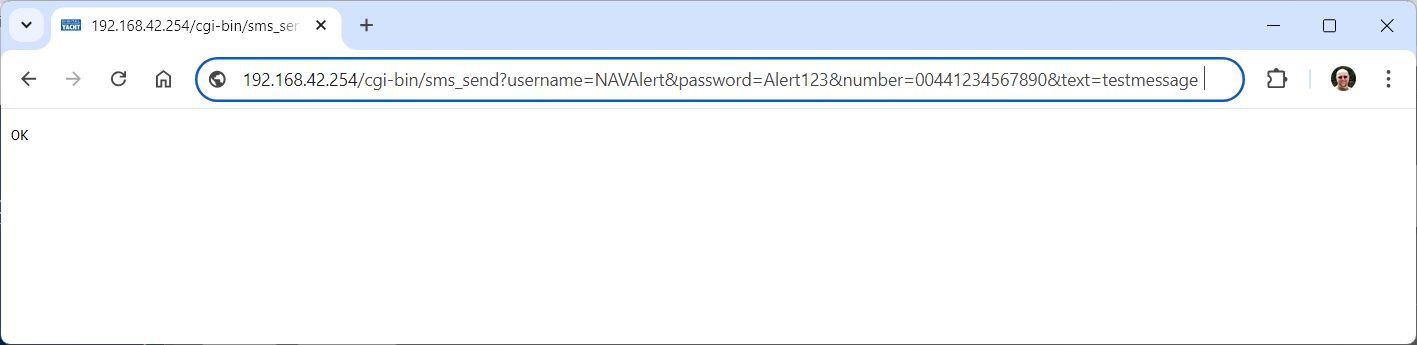
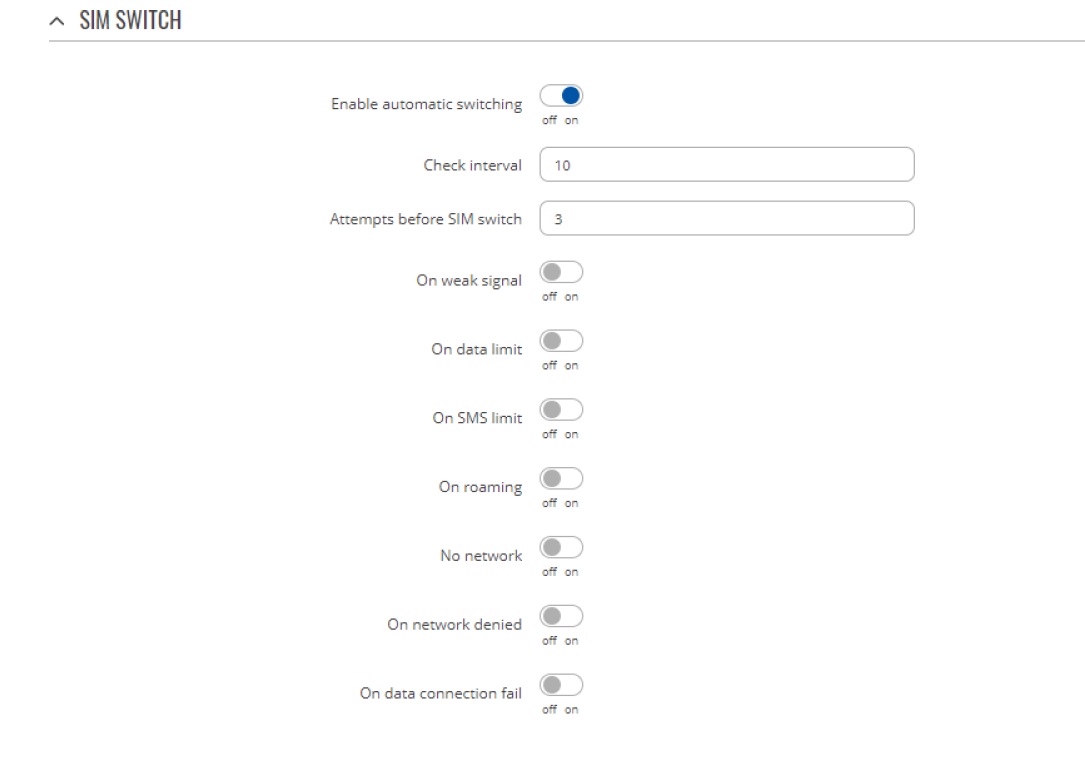
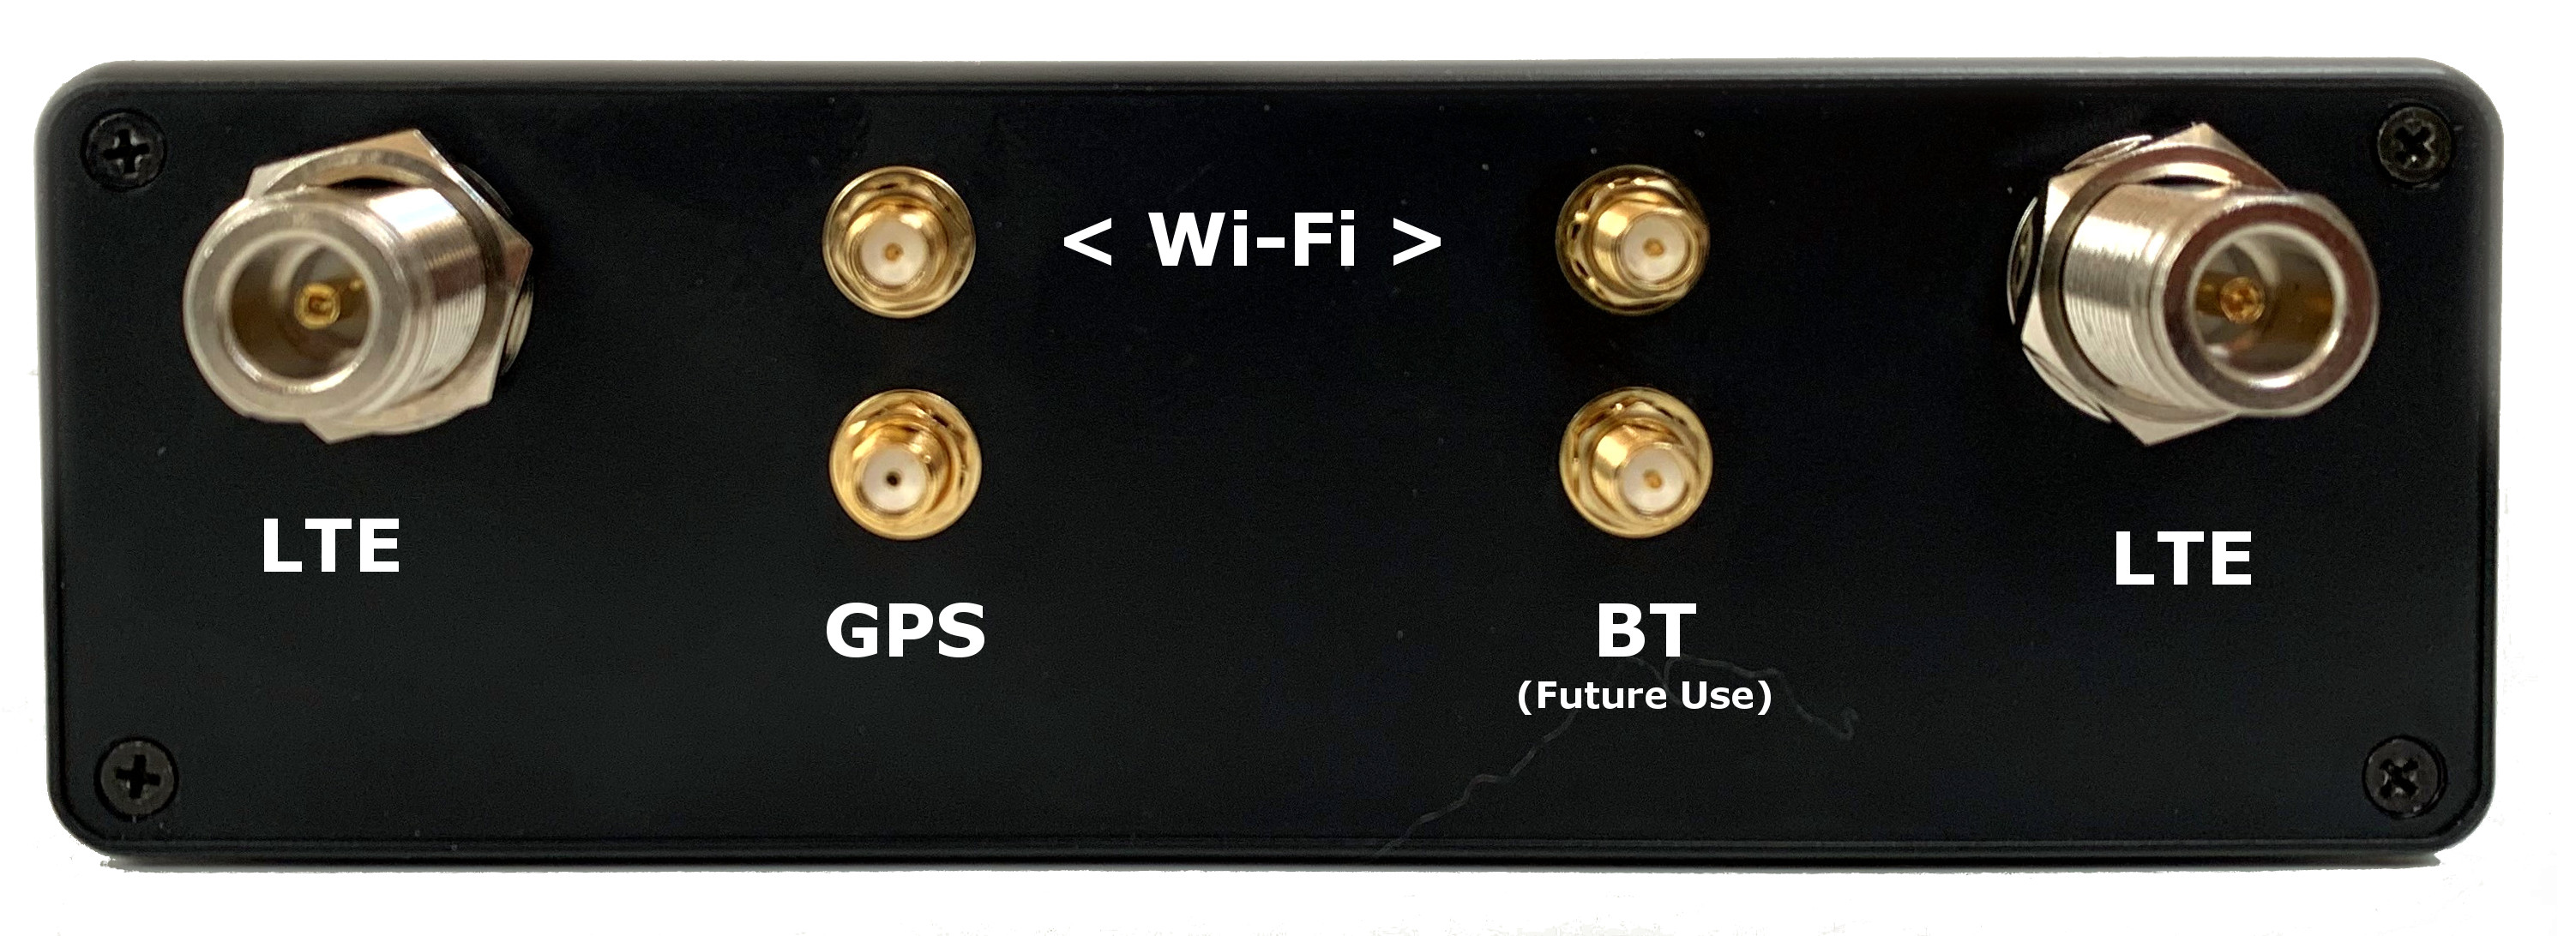
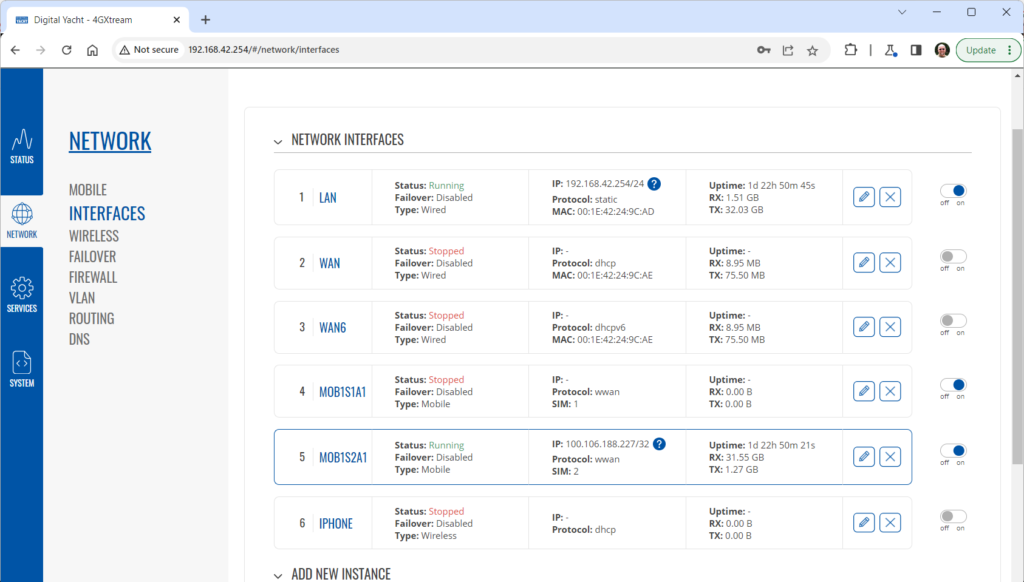
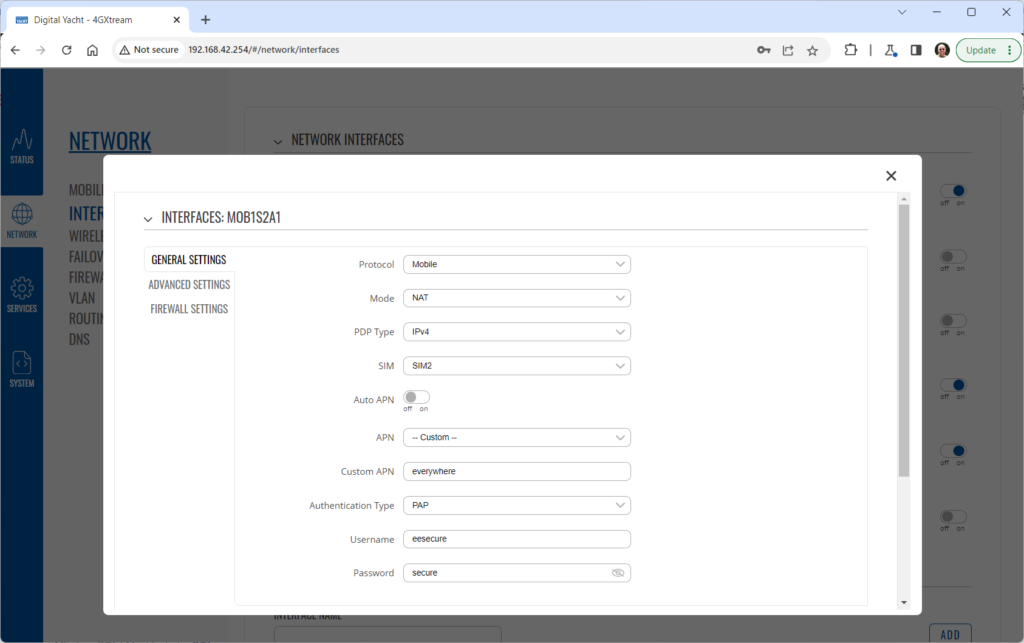
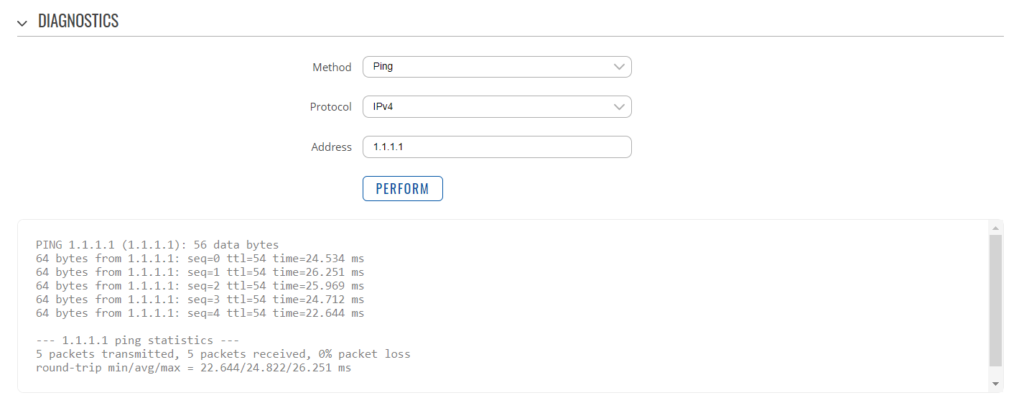
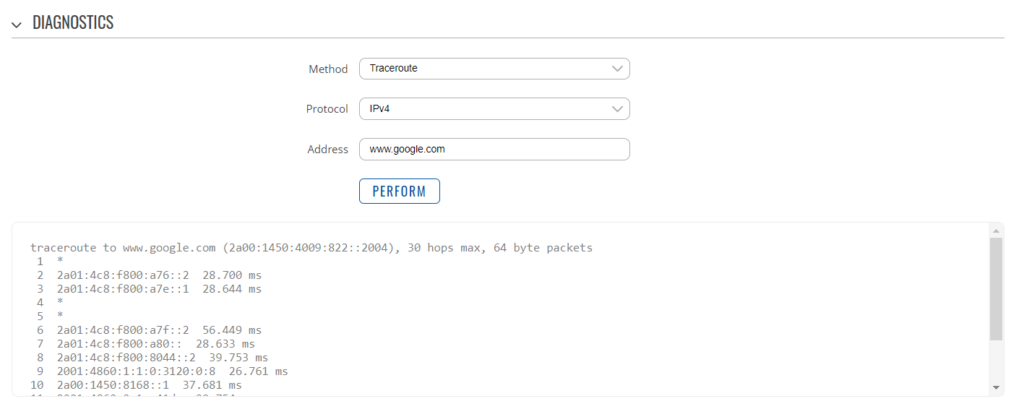
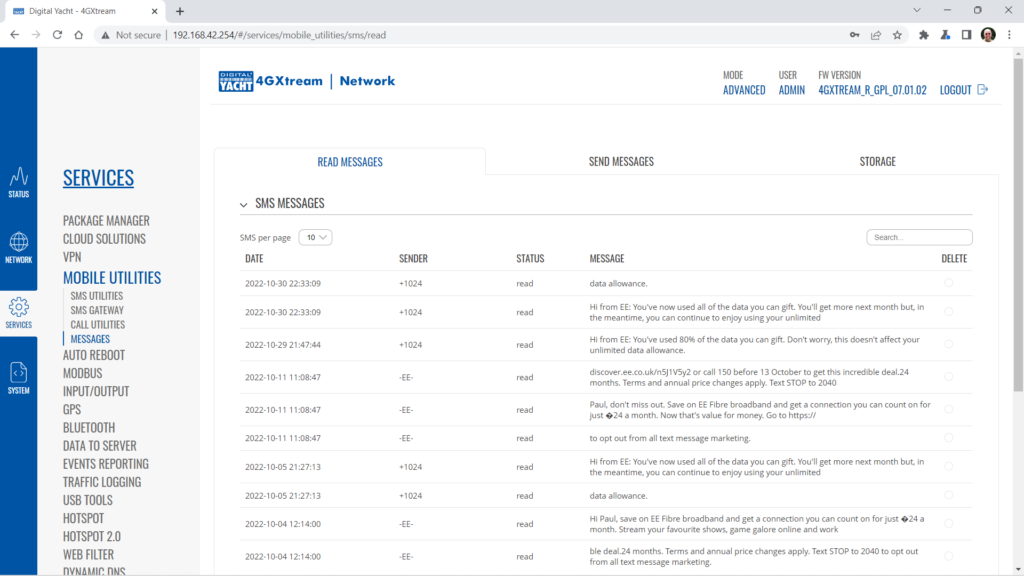
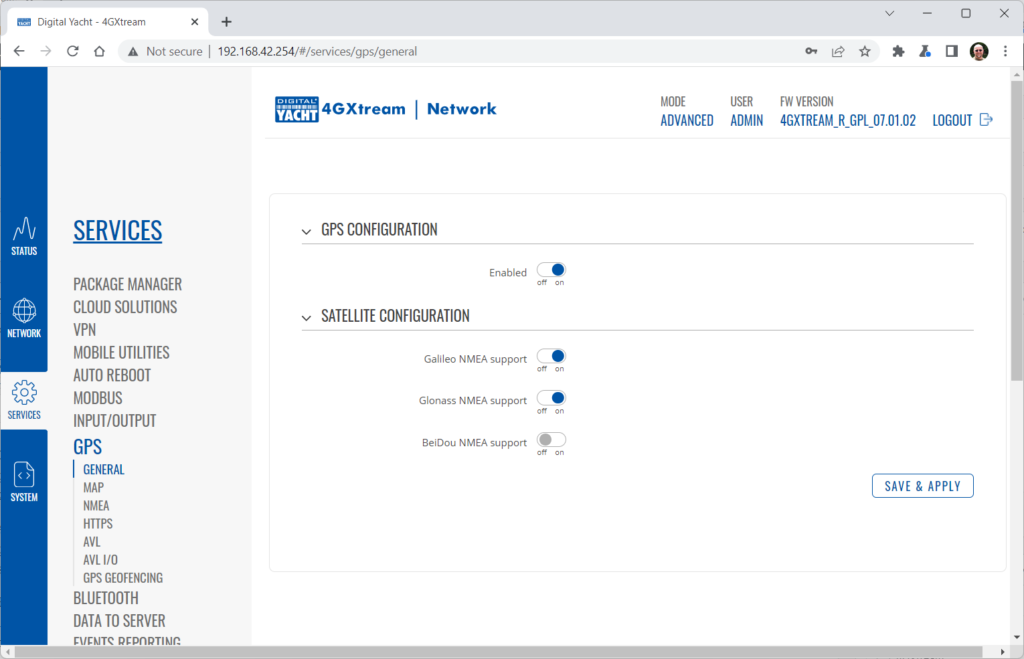
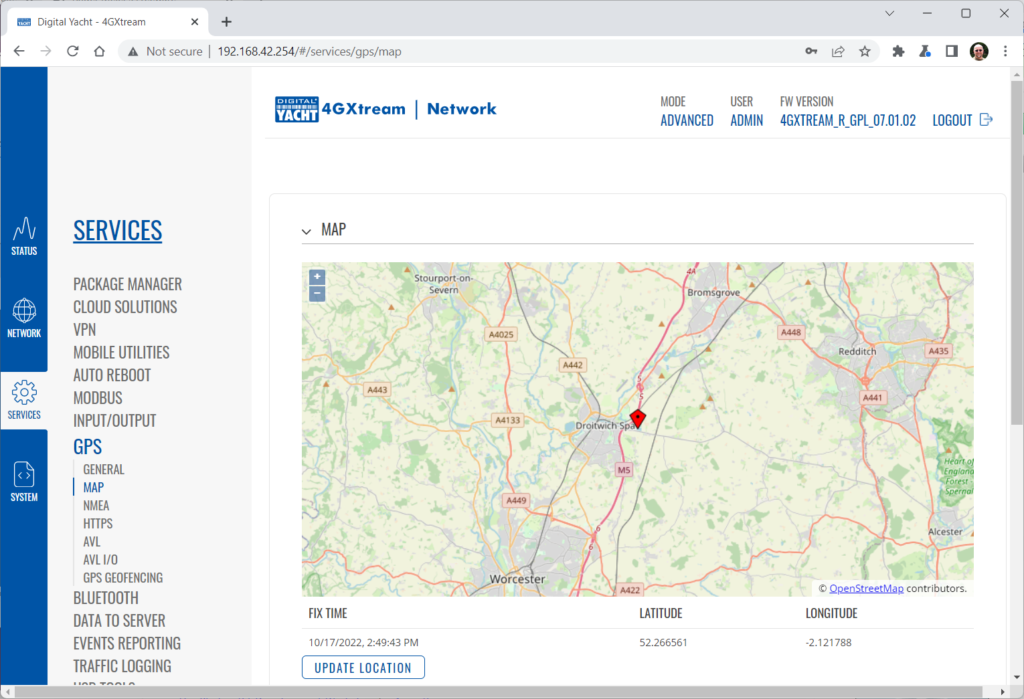
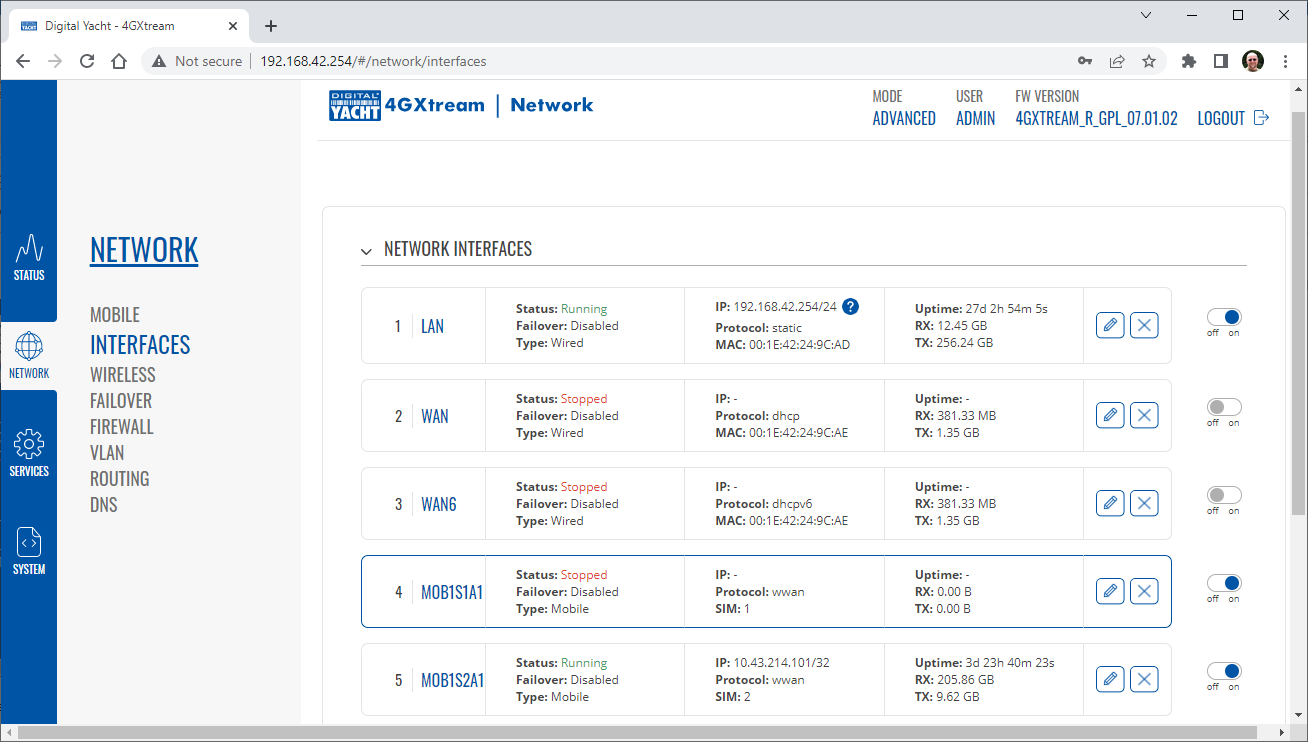
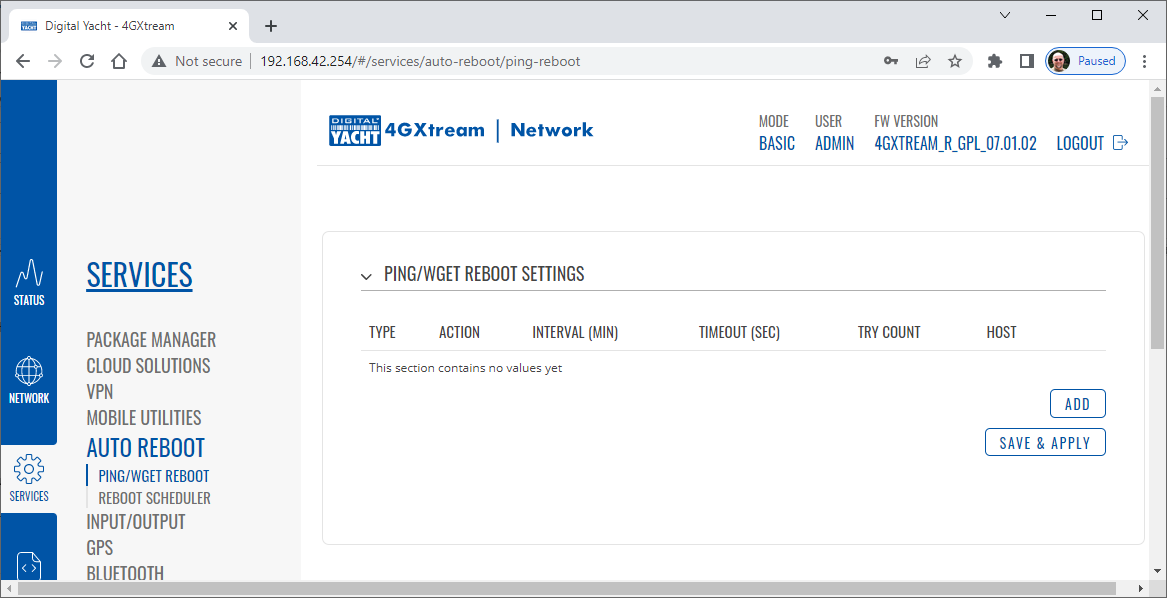
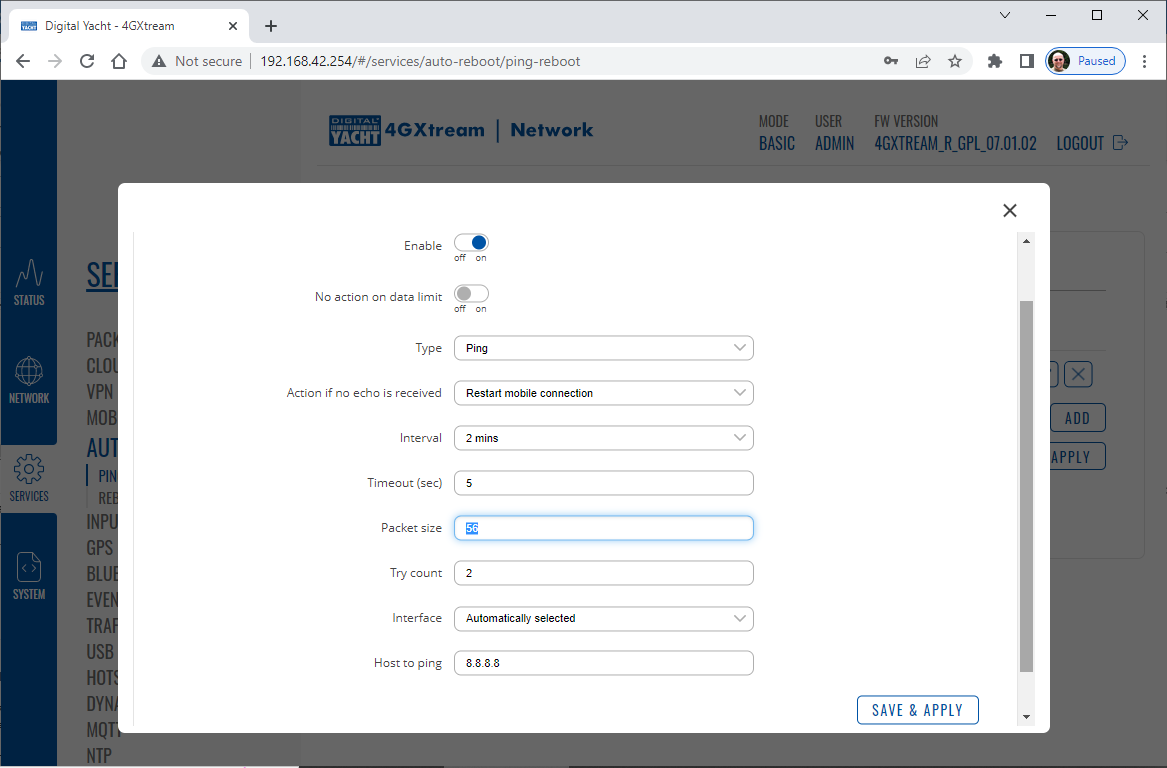
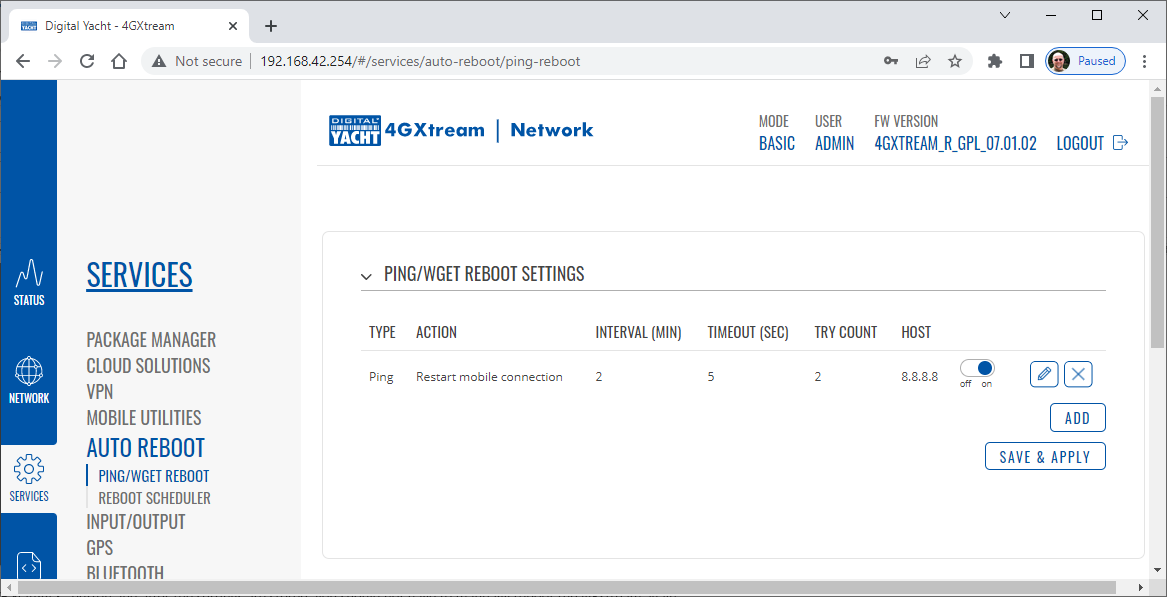
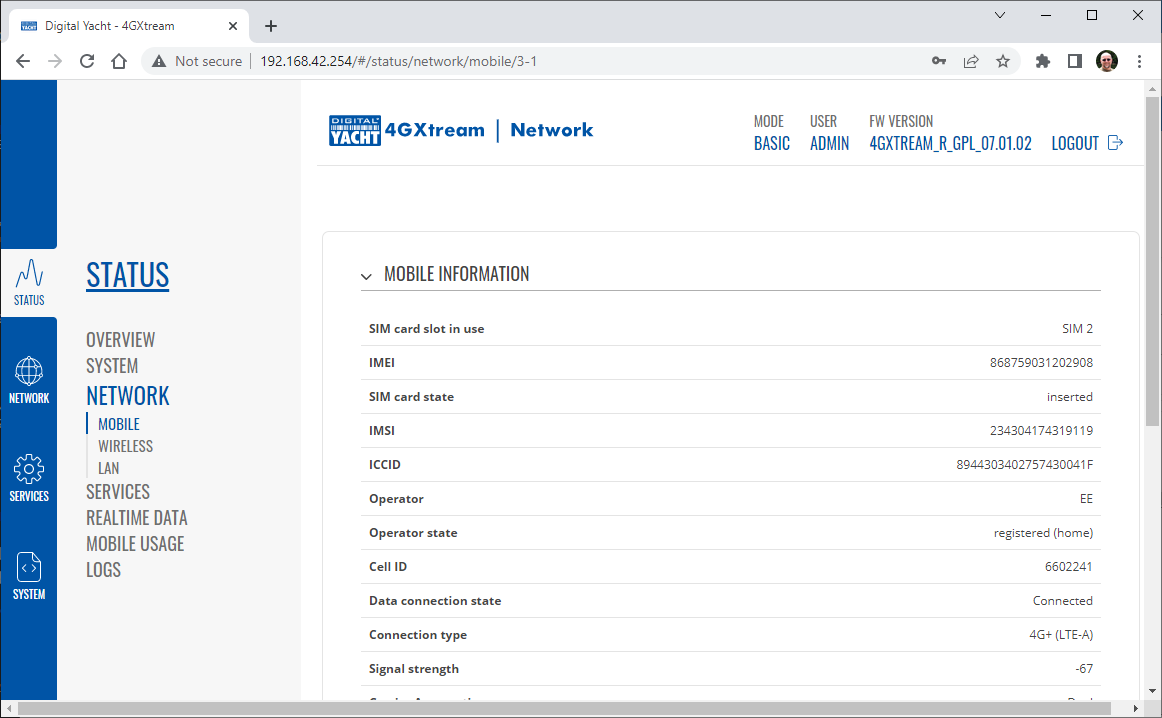
Both the WAN port and the 3 x LAN Ports on our NeXuX are 10/100/1000Mbps ports and if connected to another 1000Mbps wired Ethernet device will pass data at 1000Mbps (1Gb). A wireless device on the network will not achieve anywhere near 1000Mbps and depending on whether you are using the 2.4GHz or 5GHz wireless network, will only achieve around 50Mbps to 150Mbps. Please note that wireless devices share the maximum bandwidth that the wireless technology supports, so more wireless devices = slower speeds. Other issues that can affect wired transmission speeds are; quality and condition of the network cabling – best to use Cat6 cabling as although a Cat5e cable can support 1000Mbps, it lacks any redundancies in grounding, which is a common point of failure in network cables. Also if you have a network switch plugged in to the router to provide extra ethernet sockets and that is only 10/100 it will slow down all devices that are plugged in to it. If you have any speed critical devices like Smart TVs, streaming devices, etc. I would recommend plugging these directly in to one of the 3x LAN sockets on the NeXuX using Cat6 cable and you should achieve maximum throughput of data, up to whatever speed the StarLink antenna can provide in that location/time period. To change the IP address range used on the LAN network, go to NETWORK>LAN and then click the EDIT option. Set as shown below and click SAVE&APPLY. When the unit reboots, reconnect and access the web interface at the address you have set. In the example below, we have set the addres: 172.31.0.1 so when we reboot the unit, to access the web interface in our example, we need to write the address http://172.31.0.1 The DHCP range is set automatically, but if they want to check or change this, go back to NETWORK>LAN and click EDIT and the DHCP settings are in the Firewall Settings tab. In order to direct the 4GXtream’s internal GPS data to it’s internal NMEA 2000 gateway, we must create a TCP network connection between the two devices. Now you should have the 4GXtream’s GPS data on the NMEA 2000 network. On the router, in Advanced mode go to SERVICES>MOBILE UTILITIES>SMS GATEWAY and check if there is a Username setup called NAVAlert…. If there is not, then create one and if there is, please set the Password to Alert123 in both boxes and click the SAVE&APPLY button. Now open a new browser window and copy and paste the following link into the Address bar…. You should see an OK page appear and after a few seconds receive an SMS on your mobile….ignore my IP address and Mobile number which are different to yours. This proves that the 4GXtream is configured OK for SMS. Now let us turn our attention to the NAVAlert. Please can you enter your mobile number pre-fixed with your country code i.e. 0033617812887 in the NAVAlert SMS field. If you have a button just to select 4GConnect or 4GXtream, then you do not have the latest firmware. You can either update your NAVAlert unit’s firmware, I will need to send this to you tomorrow as our developer is out of the office today, or you can go back to the SMS Gateway page on the 4GXtream and change the password of the NAVAlert Username to the original password = Alert and then click the Send Test SMS button. The 4G /5G Xtream has two SIM card slots which can be manually switched between, or you can use the automatic SIM switch feature to automatically switch between them. When the automatic SIM switching feature is enabled, the 4G/5G Xtream will monitor the current SIM network and if a certain condition occurs, it will switch to using the other SIM network as detailed below. The SIM Switch section provides you with the possibility to configure SIM switching rules, i.e., set up circumstances under which the device will perform a switch from using one SIM card to another. Refer to the figure and table below for information. • • LCP echo • • ICMP echo If no echo is received, the data connection is considered to be down. When configuring SIM switching from the Secondary card, an additional field called “Switch back to primary SIM card after timeout” becomes available: If you have a very low internet speed (less than 5m/sec) then several factors can interfere with your internet speed. When a device is connected to one of our wireless 4G routers, the router has to “route” the data, which takes time. The typical 2.4GHz speed of 50Mbps is shared across all devices on the wireless network: more devices, less speed It is not uncommon for other 2.4GHz wireless networks to be present on a modern boat; MFD, Charger/Inverter, AIS, etc. Each network, will potentially cause interference and slower speeds To get a better speed, the best solution is to connect your laptop via Ethernet. With the 4G Connect Pro, you can get internet up to 60m/s via Ethernet but via WiFi, a good connection would be 25-35Mbps. The Bluetooth connector that is not currently used for any marine applications is a Reverse Polarity SMA connector and should be identical to the two Wi-Fi antenna connectors. The GPS antenna is a standard SMA connector and the supplied GPS antenna should plug straight in with no additional adaptors required. Below is an image showing the 4GXtream connectors, that you can use to check against your unit. You will need a StarLink Ethernet Adaptor, like the one below: https://www.starlinkhardware.com/starlink-ethernet-adapter-setup-and-review/ Then using a normal network cable, you need to plug the Ethernet Adaptor in to the WAN socket of your 4GXtream and set the Wired WAN as the highest priority WAN connection. You can use the Failover feature of the 4GXtream to make it switch to Mobile (4G) when Starlink is not connected to the internet. Finally and most importantly, you need to Enable Bypass Mode in the Starlink. Even though the Starlink router is now in bypass mode, you can still access most of the dish settings from either the app, or the Starlink web interface. You’ll need to be on a device that is connected to your 4GXtream. If you aren’t familiar with the web interface, it can be accessed from a web browser by visiting: or When you scan for wireless networks on whatever mobile device you are using, can you see the 4GXtream wireless network? If you can, please connect to it using the default wireless password = 4GXtream Once you are wirelessly connected to the 4GXtream, then please open your web browser in a Private/Incognito window (important so that it does a fresh load of the 4GXtream web interface) and then try to go to http://192.168.1.1 or http://4gxtream Whichever, address you use, it is very important that you include the http:// as this tells your browser that you want to go to a specific address and not do a Google search on 192.168.1.1 or 4gxtream This must work as it is a core feature of the 4GXtream and will have been tested during production. Assuming that you can now bring up the 4GXtream web interface, we need to check the main STATUS>OVERVIEW page. Most of the time 4GXtream will connect to the SIM operators APN settings automatically, but some networks we still have to manually enter the APN settings. To find your SIM’s correct settings, please check out this website: https://www.apnsettings.org/ The 4GXtream runs on Linux, which uses Android underpinnings, so make sure that the APN settings are for Android use. Please also note that the PDP type should always be set to IPv4 only and when Googling the APN settings, ignore the older MMS and WAP settings, it needs to be the LTE/4G settings. In general, unless indicated differently by the MFD manufacturer (Navico/Garmin/Raymarine/Furuno), it is best to leave the manufacturer’s wired Ethernet network, just for connecting the manufacturer’s equipment together and if you want to provide the system with an internet connection, to do this by connecting the master MFD wirelessly to our 4GXtream. This will result in having two wired Ethernet networks on the boat, one for the navigation equipment and the other for internet access and normal IT type networking, but it will result in the most reliable operation of the two networks. Most MFD manufacturers do not want customers to open up their Ethernet network to either a conventional LAN or WAN environment that they have no control over. Unknown network devices, levels of network data and protocols, that the manufacturer has never tested against, could potentially have serious, negative effects on the operation of their equipment. The MFD’s wireless interface will be on a separate subnet and “locked down” so that it just does what they need it to do and no more. When you tell the wireless interface to join another wireless network in STATION (STA) mode, rather than its default ACCESS POINT (AP) mode, it will get an IP Address for the wireless interface from the 4GXtream and be able to go online for updates, weather data, etc. You will basically be plugging the Star Link in to the WAN socket of the 4GXtream and then using the web interface to switch between the wired WAN interface (Star Link) and the 4G Mobile interface. There is a “Failover” mode in the 4GXtream where you can tell it to use the Wired WAN by default and then switch to mobile if there is no internet connection on the wired WAN interface (Star Link). This article online tells you how to bypass the Star Link router and will be applicable for our 4GXtream… https://www.starlinkhardware.com/how-to-bypass-the-starlink-router Although the approach you are taking with DDNS and Port Forwarding would work well on a conventional land based network, that is connected to the internet via a Cable/ADSL router, there are several reasons why they may not work on a mobile network: It’s worth noting that some mobile network providers may offer specific plans or services that allow for more open network access or even static IP addresses, which can facilitate DDNS and port forwarding. However, these options may come with additional costs and may not be available on all networks or in all regions. Overall, the combination of NAT, carrier restrictions, firewall policies, and dynamic IP addresses on mobile networks can make it challenging for DDNS and port forwarding to function reliably. If you require remote access to devices on a mobile network, you may need to explore alternative solutions such as VPN (Virtual Private Network) or cloud-based services that facilitate remote access without relying on DDNS or port forwarding. Our 4G products (4GConnect and 4GXtream) provide good internet connectivity over 4G mobile networks and we know that they are used by some of our customers to remotely access their marine systems. To remotely access the systems on a boat, the normal method is for the equipment on the boat to initiate a secure connection to a cloud server and then you use an App on your mobile device to also access the cloud server. The cloud server then routes you through to your boat’s data, which you can view in almost realtime. This method relies on the equipment manufacturer creating the cloud system and app to make this happen. The best example of this type of system is the Victron VRM system. The second method is to use a VPN service to create a more generic cloud connection, not specific to one manufacturer, which basically connects your mobile device to the boat’s Ethernet network. Once the VPN connection is established, you can remotely do anything that you would normally do when on the boat. Setting up a VPN on our 4G Products is possible, but requires networking knowledge and is not something that Digital Yacht is able to provide support on. You would need to find a suitably experienced IT networking engineer. If you want to explore the VPN solution, I would recommend ZeroTier which can be installed on our 4GXtream and is a free and relatively easy to setup VPN service, that I played with a few years back. OpenVPN is also supported on our 4GXtream. Since the end of 2022, we have started receiving support requests from new EE customers that cannot get their Digital Yacht 4G Products to work with their EE SIM. It would appear that recent EE SIMs have a Virgin Mobile profile included, which is seen as the default APN settings when our products are set to Auto APN mode (default). If your SIM is being correctly read, you are getting a good mobile signal strength, the STATE is shown as “Registered (home); EE; 4G (LTE)” but the DATA CONNECTION is shown as Disconnected, then please try the following settings. Open a browser, go to http://192.168.1.1 and login to the web interface. Now change to ADVANCED mode by clicking on the word BASIC in the top right corner of the web interface. On the menu select NETWORK>INTERFACES and you will see the page below…. Click on the “Pencil” Edit icon for the SIM slot the EE SIM is inserted in – MOB1S2A1 in the example above. Now you need to set Auto APN to OFF and enter the following details in the boxes that appear. Also make sure that PDP Type is set to IPv4 Only and not IPv4/IPv6 which is the default… Once all of the settings are correctly entered, scroll to the bottom of the page and click the “SAVE & APPLY” button. Give the unit 20-30 seconds to apply the settings and reboot the modem and then you should see the DATA CONNECTION change to Connected and you will be online. Many products from leading marine electronics manufacturers now feature a wired and/or wireless network interface. In some larger systems such as those from Navico/Garmin/Raymarine/Furuno, the MFDs, radar scanners, cameras and sonar systems will all be networked together via Ethernet cables. When one of our 4G Products is used as the central wireless router for internet connectivity, some customers have been confused as to whether they can join all of the devices together on one common network. In general, unless indicated differently by the MFD manufacturer, it is best to leave the manufacturer’s wired Ethernet network, just for connecting the manufacturer’s equipment together and if you want to provide the system with an internet connection, to do this by connecting the master MFD wirelessly to our 4GXtream. This will result in having two wired Ethernet networks on the boat, one for the navigation equipment and the other for internet access and normal IT type networking, but it will result in the most reliable operation of the two networks. Most MFD manufacturers do not want customers to open up their Ethernet network to either a conventional LAN or WAN environment that they have no control over. Unknown network devices, levels of network data and protocols, can create interoperability issues that the manufacturer has never tested for, potentially having a serious, negative effect on the operation of their equipment. The MFD’s wireless interface will be on a separate subnet and “locked down” so that it just does what they need it to do and no more. When you tell the wireless interface to join another wireless network in STATION (STA) mode, rather than its default ACCESS POINT (AP) mode, it will get an IP Address for the wireless interface from the 4GXtream and be able to go online for updates, weather data, etc. The following power consumption figures are applicable to our 4GXtream. Power consumption does vary significantly, depending upon the amount of mobile data being transferred and how much wired/wireless network activity is taking place. Below are the average consumption figures for 12v and 24v systems… Minimum – Powered up but no mobile or network data transfer = 3.75W Normal – Powered up with a couple of network devices doing light internet access = 4W Maximum – Powered up with multiple network devices doing heavy internet access = 10W In some situations, our 4G Products can appear to be connected to the internet, but due to other external conditions such as AV Software, ISP issues or local network settings, you cannot access websites from your browser. If this happens, there are some additional tests and checks that can be carried out. Go to SYSTEM>ADMINITSTRATION>TROUBLESHOOT and do the following tests…. PING TEST Enter an IP address of 1.1.1.1 and click the PERFORM button. This sends a series of data packets directly to a public website (Cloudflare) which then sends them back to your 4G Product over the Mobile network. The results are shown in the box below and if all of the packets are received, then the connection is good and it might be a DNS issue – continue to the Trace Route Test. Traceroute Test Change the method to Traceroute and the address to www.google.com and click the PERFORM button again, you should see the following info in the box that traces, the route through the internet to the Google web server. If the test fails and the Google site is not reached, then you may have a DNS setting issue on your wireless device. Try setting it to use a fixed DNS server address of 8.8.8.8 which is the Google public DNS server. Check SMS Messages Sometimes, it can be an issue with your mobile network operator account that is stopping the internet access. Please check if you have received any notification SMS messages from the Mobile Operator that might explain why we are connected but not getting a good internet connection? To do this, go to SERVICES>MOBILE UTILITIES>MESSAGES and you should see any SMS messages that the Mobilke operator have sent you… Finally, some anti-virus, VPN or network security software has been known to block mobile internet connections, particularly common on business computers. Try temporarily turning off any anti-virus, VPN or network security software and see if that fixes the problem. If it does, make sure that your new 4G Product is in the list of “Safe Networks” in your anti-virus/security software. Our 4G Products are used globally on lots of different networks and occasionally, due to incorrect APN settings or SIM card issues, a unit will not correctly register on the mobile network and no internet connections will be available. In this situation, please start by checking the SIM card, as per this article that we published on our blog… https://digitalyacht.net/2022/08/12/getting-correct-sim-cards-4g-products/ If that does not resolve the situation, then in order to assist you our support team will need the following screen shots and information… One of the lesser known facts about our 4GXtream, is that it has a built-in GPS receiver and is supplied with a passive GPS antenna. This is primarily for position logging or for enabling a geo-fence alarm function. However, this GPS data can also be transmitted out on the NMEA 2000 network. Assuming that the 4GXtream GPS antenna is connected, it is getting a good position fix and the NMEA 2000 cable is connected to a fully powered up and operational NMEA 2000 network, the notes below will configure the 4GXtream to become an NMEA 2000 GPS position source. From a device that is wirelessly connected to the 4GXtream, open a browser and bring up the web interface at http://192.168.1.1, and then login to the 4GXtream web interface. If the 4GXtream is in BASIC mode, click on the word BASIC and you will be asked if you want to go in to ADVANCED mode, confirm that you do. Now go to SERVICES>GPS>GENERAL and make sure the GPS is enabled… Now go to the SERVICES>GPS>MAP and make sure that your current position is being shown correctly on the map… Now we need to send the GPS data to the USB port which is connected to the 4GXtream’s NMEA 2000 gateway. This is done by creating an internal “loopback” TCP connection and then sending the output to the USB port as a Serial data stream. First go to SERVICES>GPS>NMEA and configure the NMEA Forwarding settings as shown… Scroll further down and in the NMEA Sentences Settings, turn on the GPGGA and GPRMC sentences with an interval of 1sec… Click SAVE & APPLY and then move on to the SERVICES>USB TOOLS>USB TO SERIAL settings and set them as follows, noting that the ID has already been automatically set and will be different to the value below (DO NOT CHANGE IT)… Click the SAVE & APPLY button and now your GPS data will be sent to the NMEA 2000 gateway and on to the NMEA 2000 network. If you have other GPS Position sources on the NMEA 2000 network you will need to make sure that you select the 4GXtream as the preferred position source when you wish to use it – it will appear on the NMEA 2000 as a Digital Yacht N2Net NMEA2000 Serial Gateway. With the unit fully powered up i.e. connect power and wait >1 minute for it to boot up, using the supplied SIM removal clip or some other blunt pointed object, gently press and hold the small Reset Switch on the front face of the unit, for at least 5 seconds as detailed below for the Factory Reset function…. The reset button has two functions: After the unit has been reset, all of the settings will be back to as they were when it left our factory. The 4GXtream is a powerful device with lots of functionality and unless you are an experienced IT Engineer, then the only configuration changes that we would recommend are… All of this is covered in our latest User Manual; The firmware version is normally displayed in the top right hand section of any of the web pages….example below of the original 4G Connect “Black & White” web interface and the latest “Blue & White” web interface… The 4G Xtream only has a “Blue & White” web interface. Setting up remote access to any network that is operating on a mobile LTE (3G/4G) network is never easy, even for experienced IT engineers. Unfortunately, Digital Yacht just do not have the resources or depth of knowledge to support our customers in doing this on an individual basis. When your remote network is “hidden” inside a mobile network that abstracts all external connections to the internet, the only way to create a VPN is for the 4GConnect/4GXtream to initiate a connection to your VPN server or shared cloud server that does the data routing for you. Our 4GConnect is based on OpenWRT, which supports two different VPN services; OpenVPN and ZeroTier, plus a couple of tunnelling protocols that could be used as an alternative to VPN. If you do not have the services of an experienced IT engineer to help with setting up a solution, then I would look for examples of connecting to a remote OpenWRT network over LTE using VPN services. Here is a link to the OpenVPN documentation on the OpenWRT site and it covers using either a Client or Server setup. Hopefully with this information you will be able to find the relevant settings in our 4G products to setup your VPN. https://openwrt.org/docs/guide-user/services/vpn/openvpn/start If you have an AT&T Sim Card, then you need to be in “Advanced” Mode, click the word “Basic” in the web page header and then go to Network>Mobile and set the Service Mode to “4G (LTE) Only” and then click the “Save+Apply” button at the bottom of the page…. After the new settings have been applied, go to Network>Interfaces and then click on the “Pencil” Edit button of either MOB1S1A1 (SIM1) or MOB1S2A1 (SIM2) depending upon which SIM slot the AT&T SIM is in…. In the Pop-Up settings window, turn off the Auto APN switch and some new boxes will appear. Select “Custom” from the drop down APN list and then type “Broadband” in the Customer APN box exactly as written with a capital B and then click the “Save+Apply” button at the bottom of the page… After the settings have been applied, go to Status>Overview and check in the Modem panel that you are connected. Now try going to another website to check you have internet. So out of the box our 4GXtream units work in High Speed Gateway Mode and will convert NMEA 2000 data to NMEA 0183, which for users who just want basic navigation data, will be enough. For advanced users that want software such as Expedition to receive all of the NMEA 2000 data in RAW Mode, then you will need to do the following…. Make sure that your 4G Xtream has the latest firmware. When you update your firmware unit, using the System>Firmware menu option, please remember to turn off the “Keep Settings” switch. 1) With the 4GXtream powered down and disconnected from the NMEA 2000 network, unscrew all of the top screws (from both end caps). Then unscrew the two bottom screws in the Antenna End Cap and gently move this end cap way from the enclosure as far as possible without putting undue tension on the small coax cables inside. 2) It should now be possible to gently slide out the top of the aluminium enclosure (top face with product label on). 3) With the top of the enclosure removed, you will see the small gateway PCB which has 4x DIP Switches in the middle. All of the switches except switch 4 will be in the OFF position (default positions). 4) Using a small screwdriver or any other fine tipped tool, very gently push switches 1, 2 and 3 in to the ON position so that all switches are in the opposite position to the image above. 5) Re-assemble the 4GXtream, by reversing the steps above and once back together, connect the NMEA 2000 cable to your NMEA 2000 network and turn on the 12/24v Power to the 4GXtream. 6) After 45-60secs, the 4GXtream wireless network should appear. Connect your wireless device to the 4GXtream wireless network and then open a browser and go to http://4gxtream or http://192.168.1.1 7) Login to the 4GXtream web interface using Username = admin and Password = 4GXtream and go to Services>USB Tools>USB to Serial 8) Click on the “Pencil” Icon to edit the USB to Serial settings and then simply change the Baud Rate setting to 230400 and click the SAVE+APPLY button at the bottom of the page. 9) Now you can go to a terminal program like Tera Term and setup a Telnet (TCP) client connection to the 4GXtream (192.168.1.1) on Port 2000. You should see a TCP connection open and the HeartBeat (Network Status Message) appear every second from the iKonvert… 10) If you want to see the RAW NMEA 2000 data, then you can initialise the iKonvert by sending the following command, must remember to set the terminal program to send <CR><LF> as the End of Line (EOL) command… $PDGY,N2NET_INIT,ALL If you have any issue with your 4G product then It is always worth updating your 4G Product to the latest version. This article, although written about the AT&T update, is still applicable for any unit. Updating 4G Firmware Please note that older 4GConnect units must do a two stage update to go from the first “Black and White” web interface version, to the latest “Blue and White” web interface version. The V01.14.05 is a special intermediate version (last of the “Black and White” generation) that must be loaded first, in order to make the jump to the new V07.02.08 firmware. https://digitalyacht.net/2022/03/04/important-update-4g-products/ Configuring 4G Product Here is the link to the very useful video on configuring our 4G Products – shows the latest “Blue and White” web interface… https://digitalyacht.net/2022/03/04/important-update-4g-products/ Getting the correct SIM card Here is the most recent article on SIM cards. If the customer is getting a good mobile phone signal on the 4G Product and the SIM card is being read, the network operator is recognised, etc. then it could be a SIM issue and this article explains what needs to be checked… https://digitalyacht.net/2022/08/12/getting-correct-sim-cards-4g-products/ This procedure is good for boats that are regularly going a long way offshore outside of mobile network range, such as fishing boats, blue water yachts, etc. Basically, our 4G Products can sometimes not reconnect properly when they come back in to mobile range and this feature makes the 4G Product keep checking if it is online and if it is not it will reboot the modem. Ping Reboot Configuration To enable the “Ping Reboot” feature, go to SERVICES>AUTO REBOOT and you will see a similar page to the one below… Now click the ADD button and I would suggest you use the same settings as shown below, which are the ones I have used in all of our testing. Every 2 minutes, 4GXtream will ping 8.8.8.8 which is the Google public DNS server and is always online. If it does not receive a reply within 5 seconds, it retries two more times and if there is still no reply it restarts the 4G Modem. Click the “SAVE & APPLY” button and after the settings are stored, you should not have to manually reboot the 4GXtream again. Since COVID forced many of us to start working remotely, we are seeing an ever increasing demand for our 4G Products. Once installed and working, these products are extremely reliable, but with so many mobile network operators around the world, initial setup can be confusing. To help our customers get up and running as quickly as possible, we have created a new video on configuring our 4G Products. This video is filmed using one of our 4GXtream products, but is equally applicable for our 4GConnect and 4GConnect Pro products, particularly if you have updated to the latest V07.01.02 firmware as detailed in a previous post “Important Update for our 4G Products”. This update adds the same, new “Blue and White” web interface to our 4GConnect, as our 4GXtream has and will be the interface that all future videos and technical documents will be based on. Our 4GXtream router but also the latest 4G Connect version have a new “Auto-APN” feature that reads the SIM details and selects the correct APN settings for the SIM’s mobile network. APN stands for Access Point Name and are the settings your 4G product needs to pass to the network carrier; AT&T, Vodafone, T-Mobile, etc. in order for the carrier to allocate your 4G product an IP address and connect you to the right secure network. On many networks the new “Auto-APN” feature works very well, but today we had a Vodafone customer contact us who could not get their 4GXtream to connect correctly. The solution was to manually override the APN settings, by following the procedure below. Now go to NETWORK>INTERFACES and click on the Edit button (pencil icon) of the SIM card interface you are using, SIM 1 in the example below. You can now edit the SIM settings to disable Auto-APN mode and add manual “Custom” APN settings, as shown below which are the correct settings for a Vodafone UK (contract) SIM. Once you have set the manual APN settings click the “Save & Apply” button and once the settings have been changed, go to the STATUS>OVERVIEW page to see if you now have a connection to the internet. If your network carrier has not given you your APN settings, then this is a pretty good site to try and we would be really grateful if you could let us know if the Auto-APN settings work for you or what manual settings you had to use. One of the most common problems, that the Digital Yacht support team help our 4G Product customers with, is SIM card issues. This little piece of plastic, with its integrated memory chip, containing a unique identifier, that allows your data usage to be tracked, causes a disproportionate amount of wasted time and effort, so we decided to publish a guide to avoid the pitfalls that we regular see. Not all SIMs are created equal and with the majority aimed at mobile phone users, it is important that the SIM you use in our 4G Products meet the following criteria…. Once you are confident that your SIM meets all of the above criteria, please insert it in to our 4G Product and using the web interface, go to STATUS>NETWORK where you should see a screen similar to the one below, minus the red annotations…. The key pieces of information to look for on this page are that the SIM Card State shows “Inserted”, which means that it has been read by our 4G Product. Then you should see the IMSI and ICCID numbers, which are stored on the SIM and used by the 4G Product to identify itself to the network operator. The IMEI number is unique to the 4G Product’s modem and will always be displayed, even if the SIM is not inserted… Other key information on this page are the Operator and Operator State. The image above was using a SIM from UK operator 3 which was a fully registered, had plenty of Data and had established a data connection. Assuming that you have followed this guide and selected the right SIM card, then there is one last hurdle to overcome, making sure that our 4G Product is using the right APN settings for the SIM’s network operator. The Access Point Name (APN) settings, vary from network operator to network operator, and with the latest firmware updates, our 4G Products will automatically try and set these from a database of popular APN settings. However, for some networks, it is still necessary to manually enter the APN settings, please see our configuration video for more details. Once you have everything working, there should be no need to make any further changes to the settings, but occasionally the connection will fail. This can be for a number of reasons, but more often than not, particularly if you are using a Pay As You Go type SIM or you are using International Roaming, it will be a network operator issue and you should check that you have not received an SMS notification from the operator. To do this, go to the SERVICES>MOBILE UTILITIES>MESSAGES screen where all of the received SMS messages are displayed… Make sure there are no “Data Limit” or “Roaming” related messages that might account for your loss of connectivity and if you are still having problems after rebooting the modem, which you can do at the bottom of the STATUS>NETWORK page, please contact your network operator to check the status of your SIM account. To decide whether to use the Mobile 4G connection or the WL510 long range wireless connection, you will need to go in to the 4GXtream web interface and click on the Network>WAN menu option….which will display the page below. You can use the switches at the end of each line to select whether you want to connect to the internet via Mobile 4G or via the WL510 Wi-Fi on the wired WAN interface. In the screen shot above, taken from my boat’s 4GXtream, I do not have an WL510 wireless booster connected to the Wired WAN interface, so it does not show any information about it but on your unit, with the WL510 connected, there should always be an 192.168.10.xxx IP address and uptime values. Just click Save and Apply after making your selection. If the unit has been working and suddenly stops or you have followed the steps above and everything appears to be OK but you still do not have a connection to the internet, then the fault is likely to be with the SIM or network operator. Could any of the following factors be applicable? The only option in this situation is to contact the network operator, which can be a convoluted exercise, but we have seen this situation many times and if you can get through to the right person and tell them the exact nature of the problem, then it can be resolved. The best source of APN settings is online at https://apnsettings.org and the best way to search for them is to do a Google search like apnsettings.org UK Vodafone 2022 as the search facility on the website is not great. If the default Auto APN setting on the 4GXtream does not work, manually set the APN settings for your SIM card and save them. If they are correct, you should see the Data Connection in the STATUS>OVERVIEW page (see above) shown as Connected and in the NETWORK>WAN page, whichever MOB SIM Slot you are using should have an IP address – in the example below MOB1S2A1 has IP address 10.44.45.58/24 We have two models of 4GXtream and with the global world we now live in, we do occasionally get situations where a customer has bought a US unit and tried unsuccessfully to use it in Europe or vice versa. To check what model you have, go to STATUS>SYSTEM and check the device’s Product Code; RUTX11 0***** indicates a European/ROW model and RUTX11 1***** indicates a US model…. Go to STATUS>NETWORK>MOBILE and check that the correct SIM card slot is selected and that the SIM is shown as “Inserted”, the network operator is shown and the Operator State is shown as Registered(Home) or Registered(Roaming) depending upon which country you are in. If you go to the STATUS>OVERVIEW page, in the Modem panel, there is a signal strength indicator in the top right corner and this should be showing a good signal strength of between -40dBm and -90dBm. Don’t forget that as these are negative numbers, -40dBm is much better than -90dBm. Once you start getting signal strengths in the -97dBm to -110dBm range, your signal strength is not going to be good enough for a reliable internet connection. If you are seeing poor signal strengths but are in a good signal strength area, then we will need to look at antennas and cabling.Slower speeds when StarLink is active?
How to configure the LAN port address?
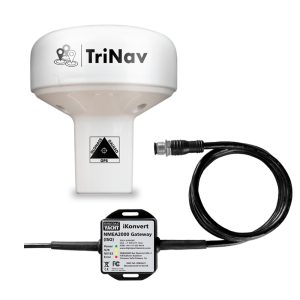
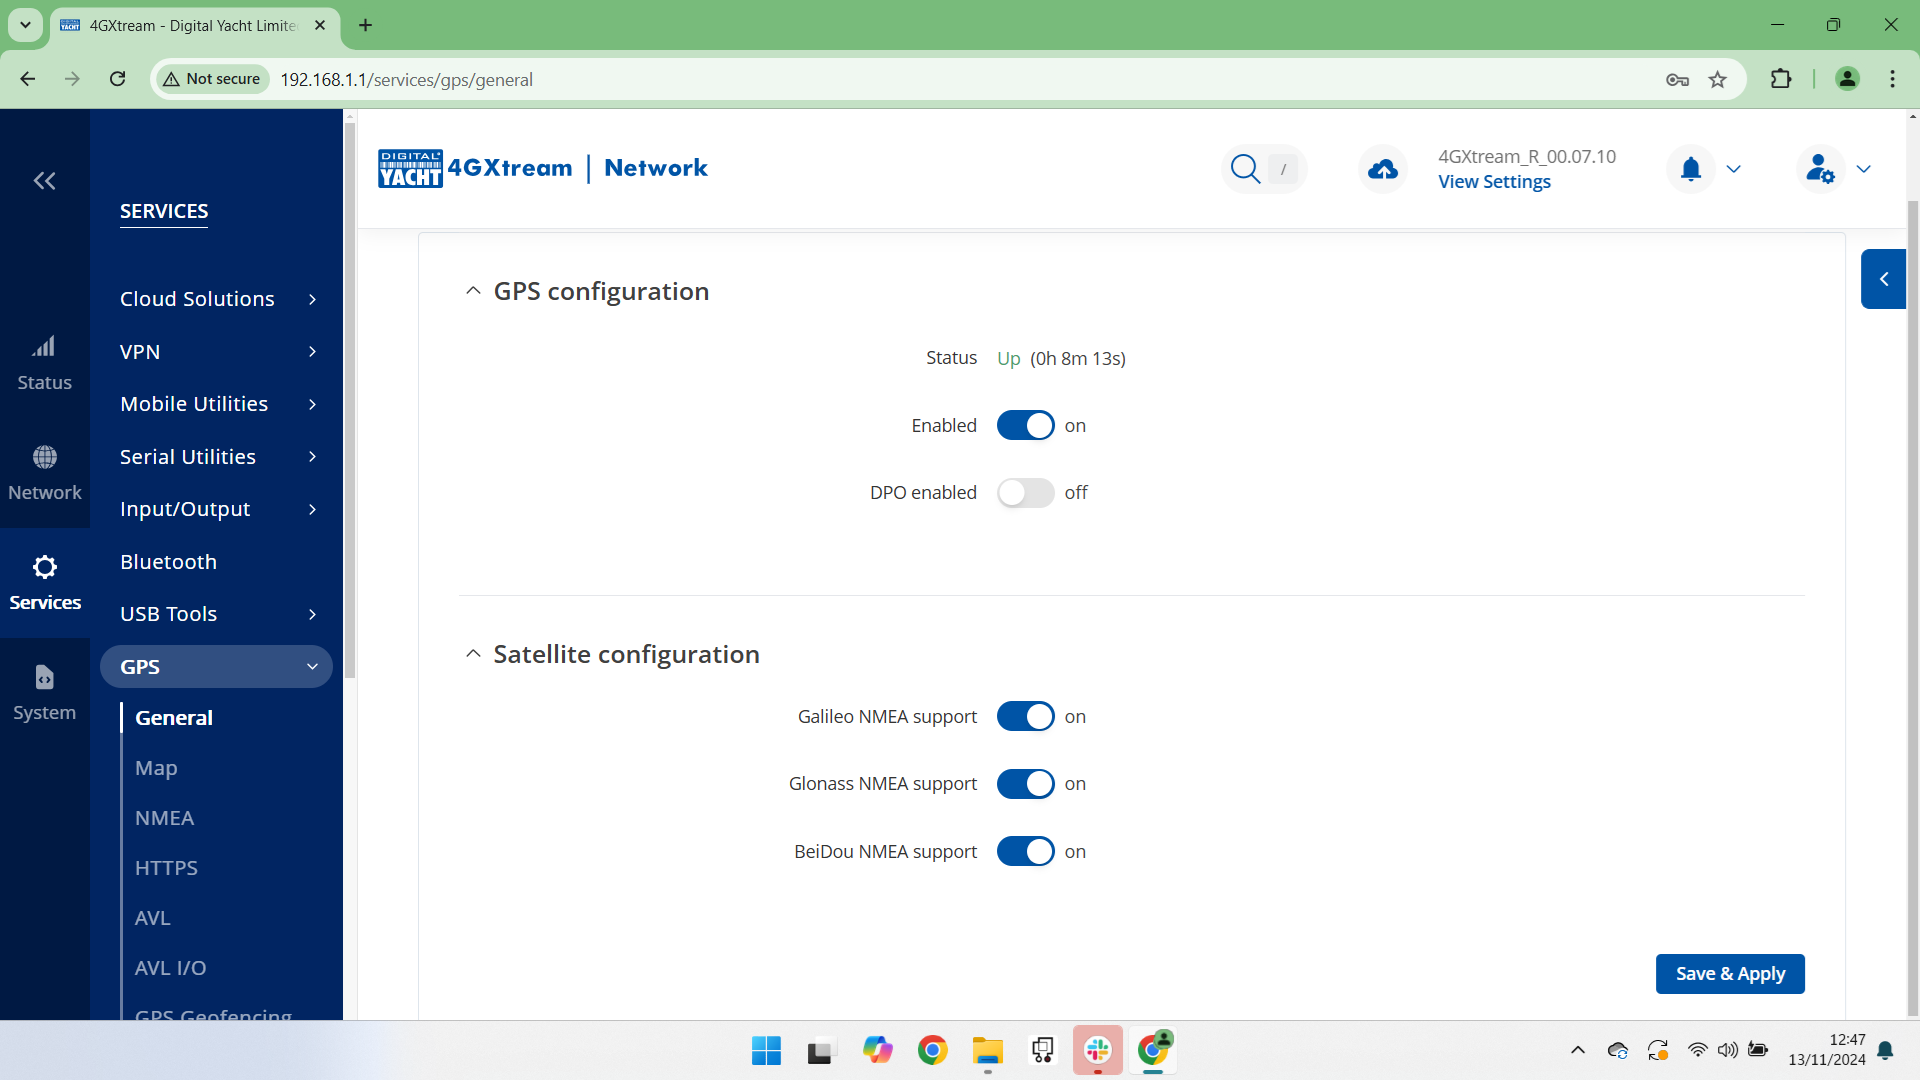
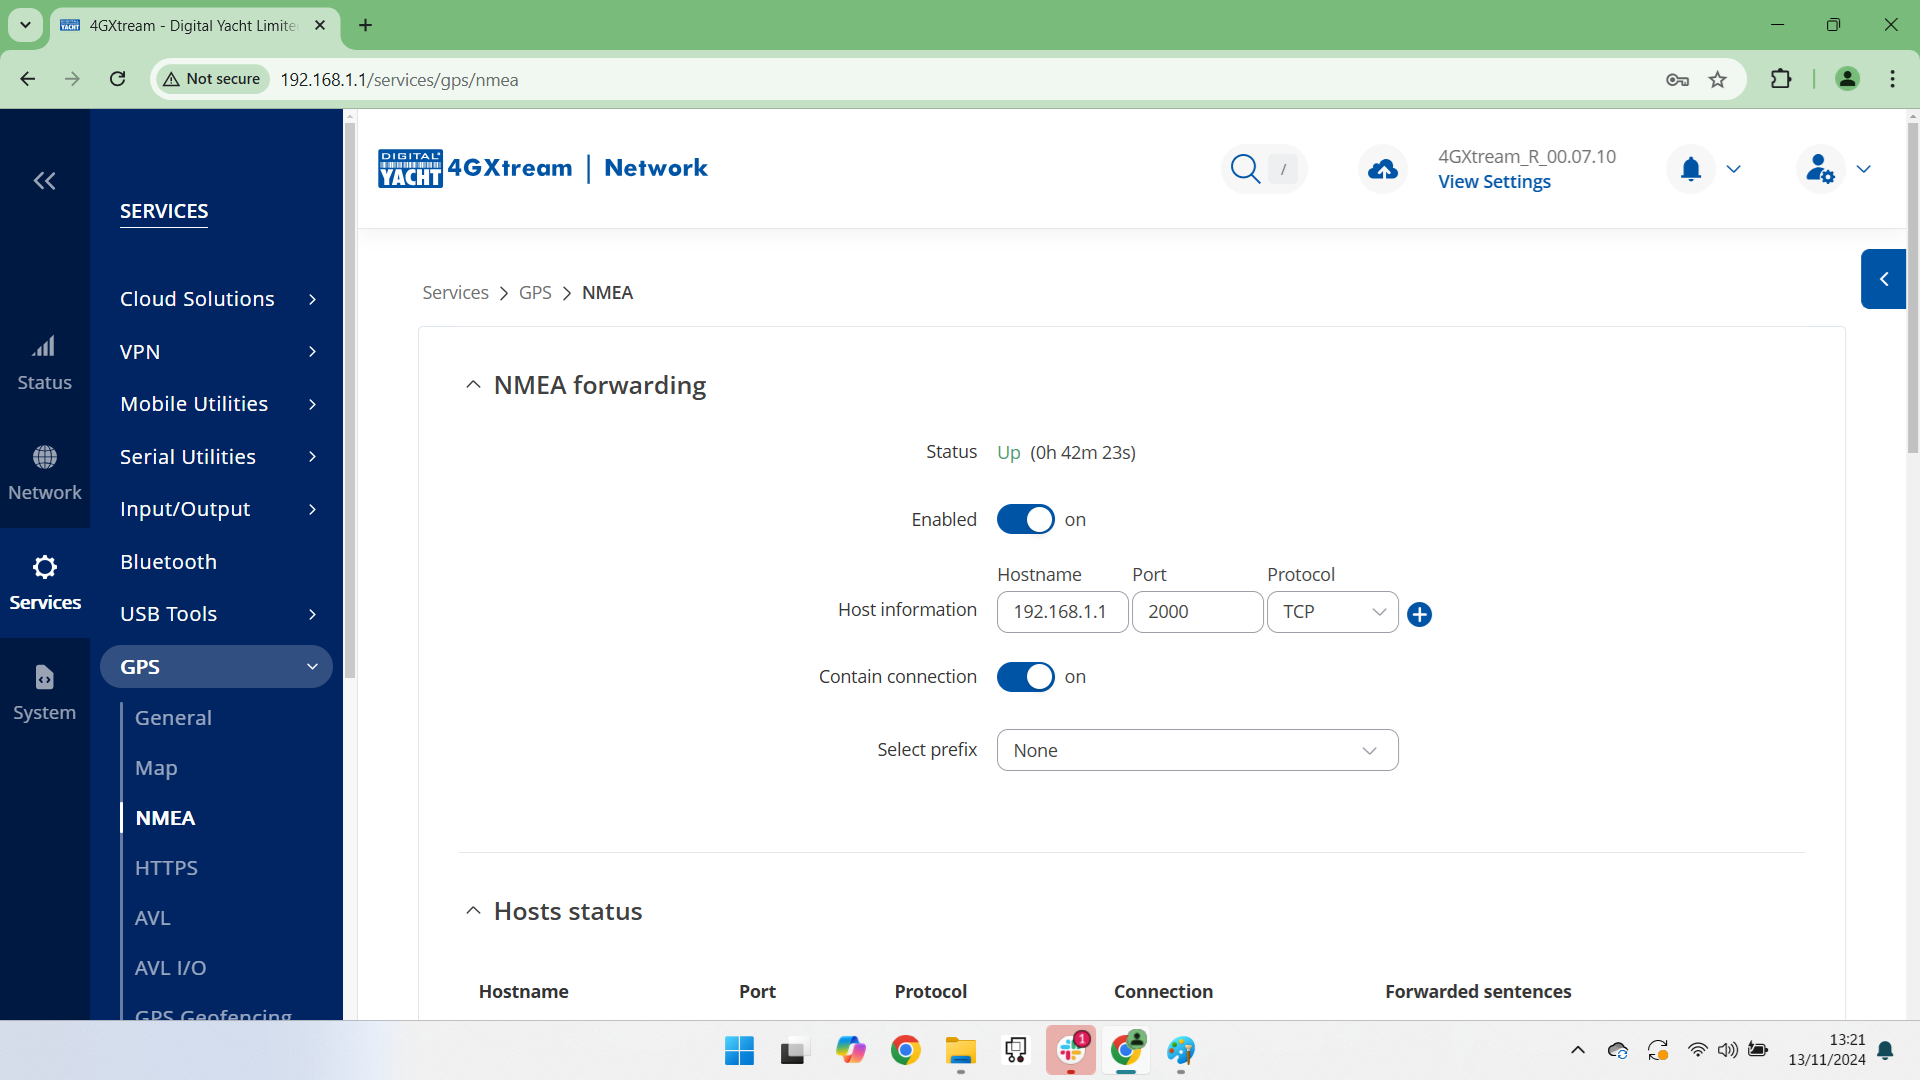
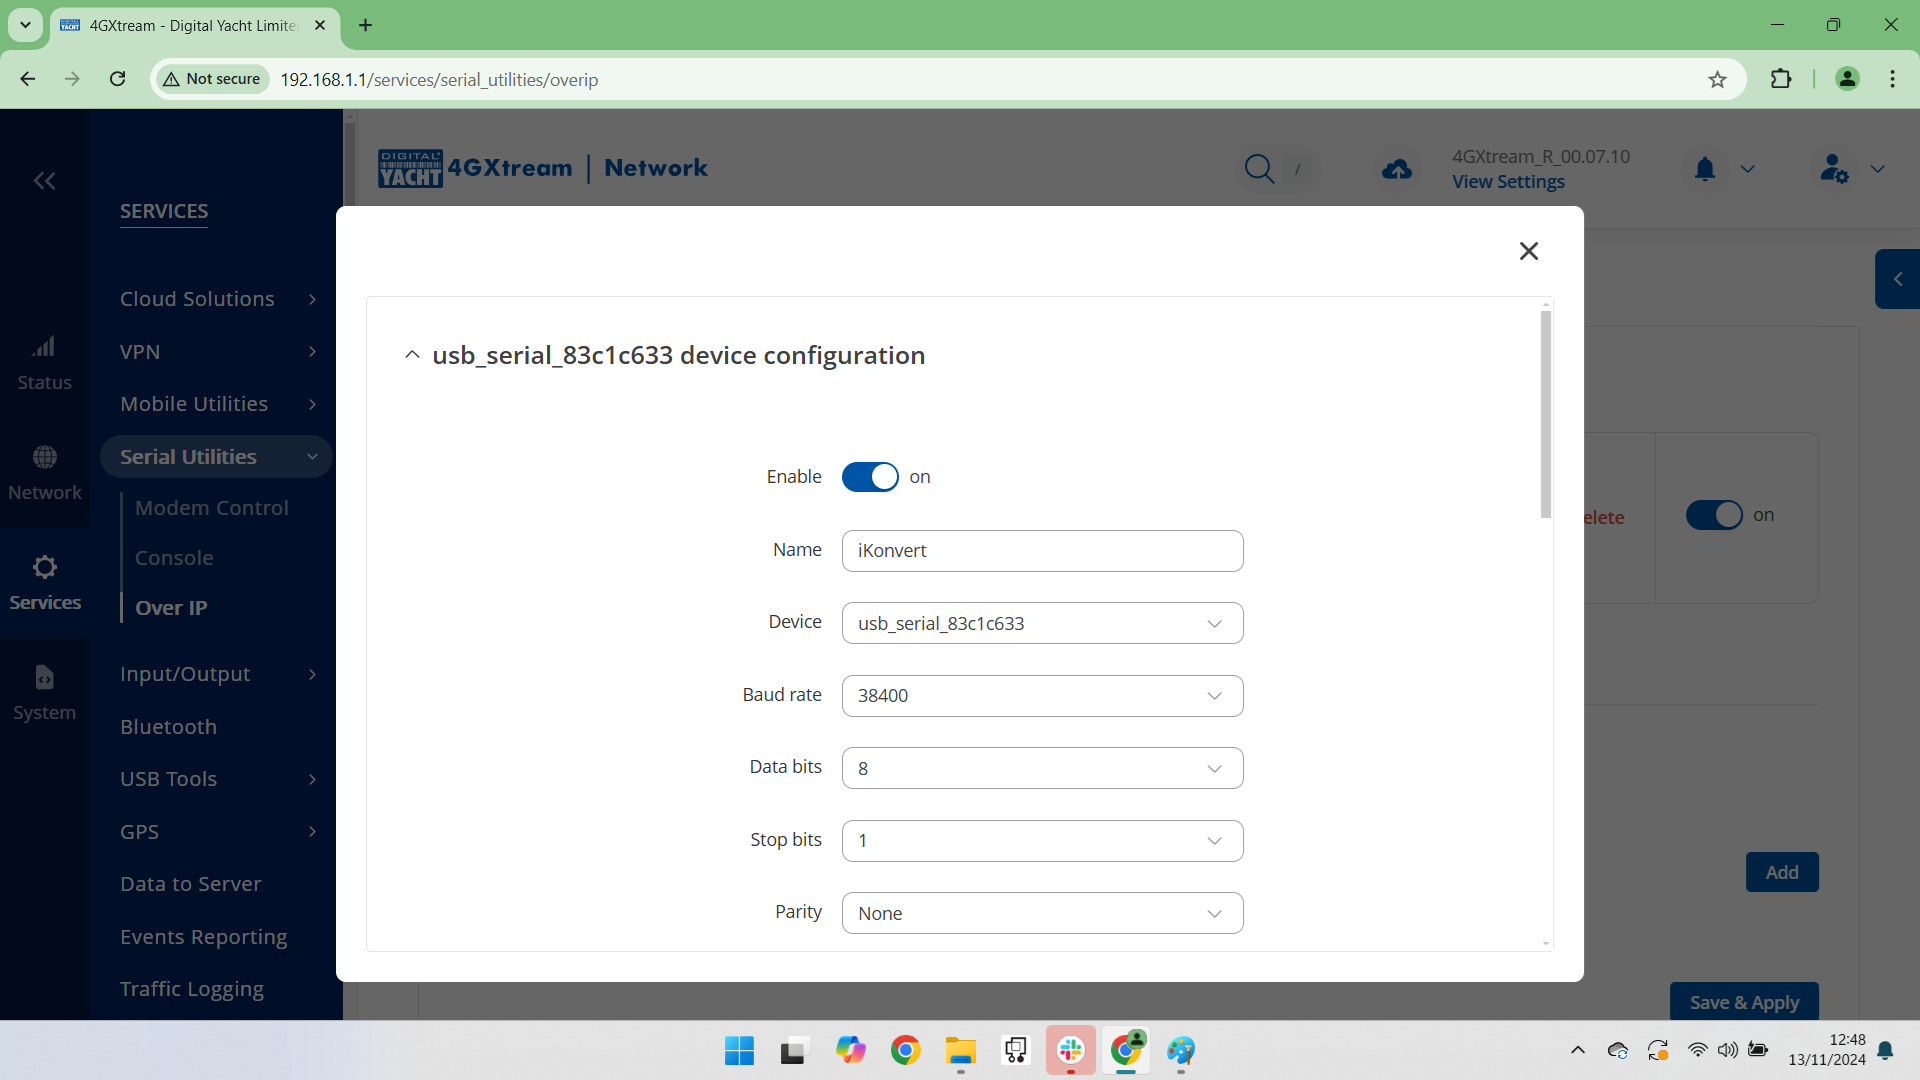
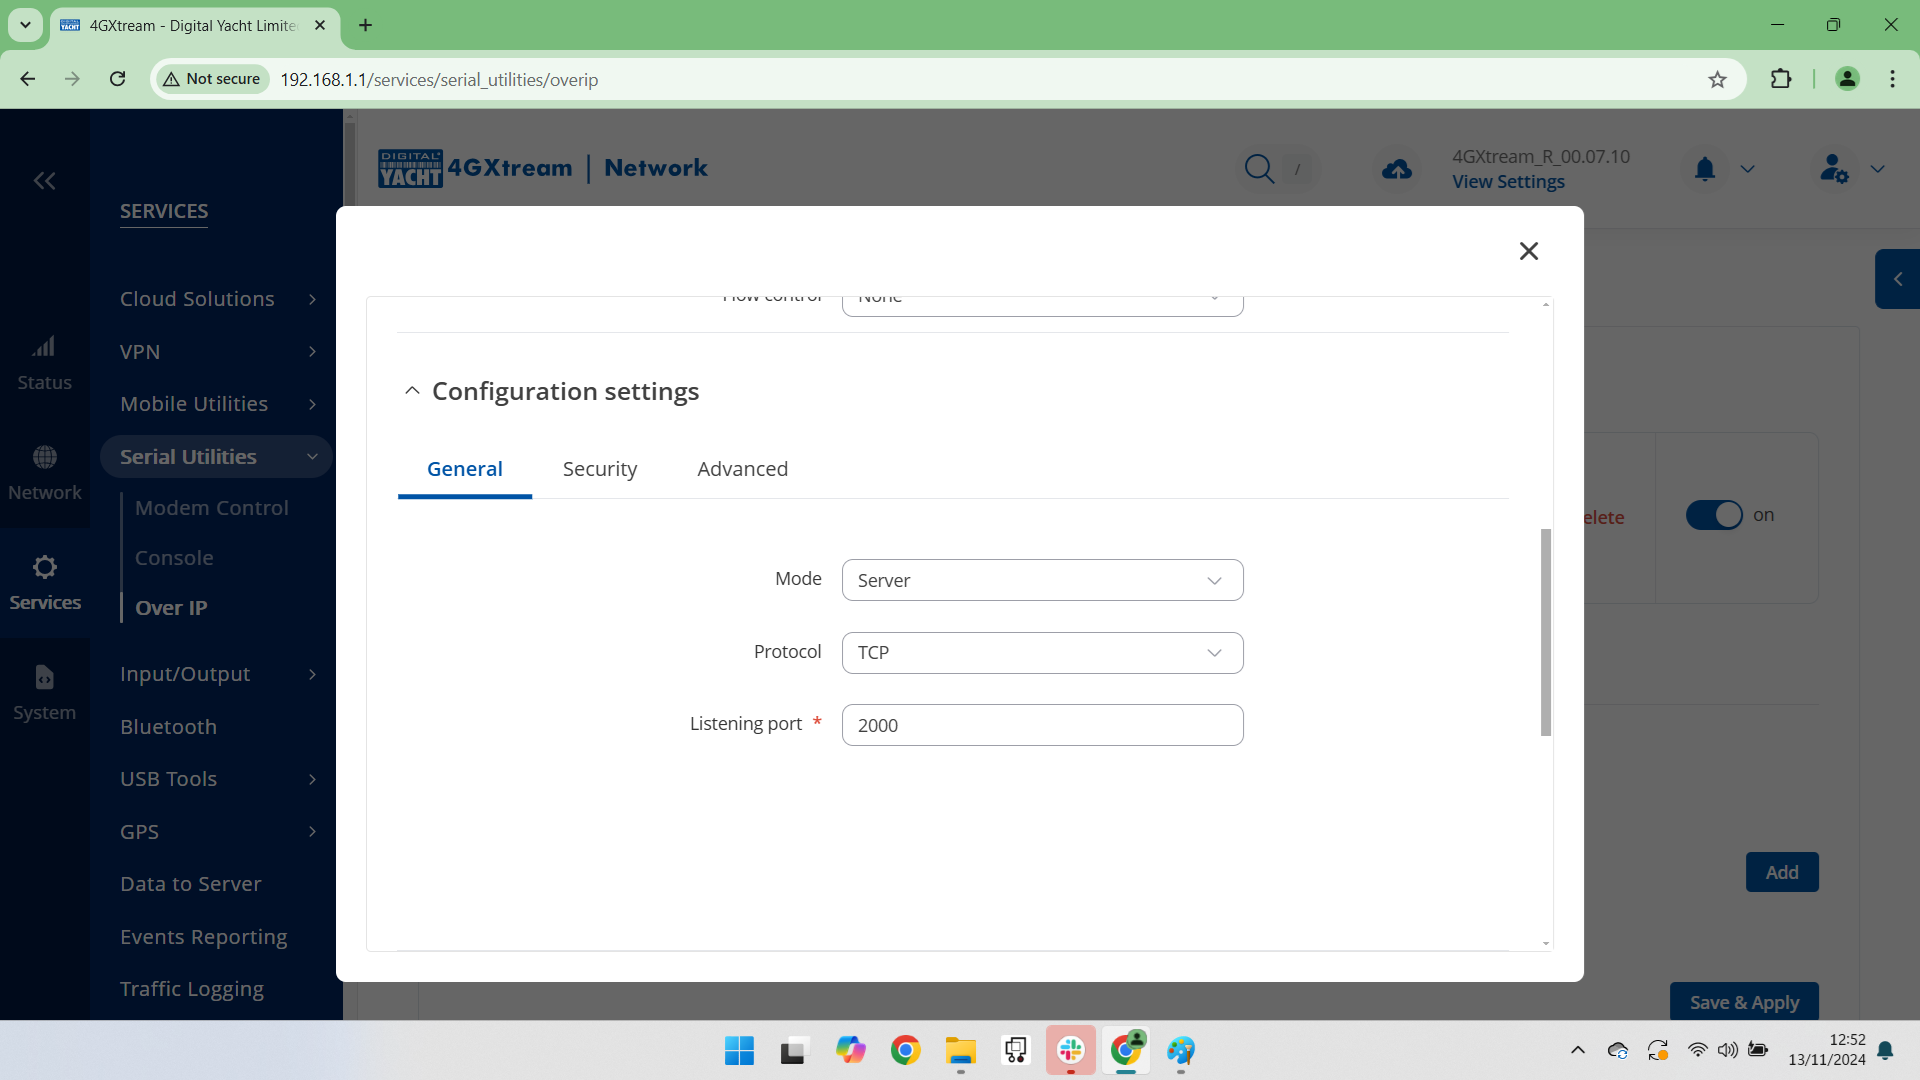
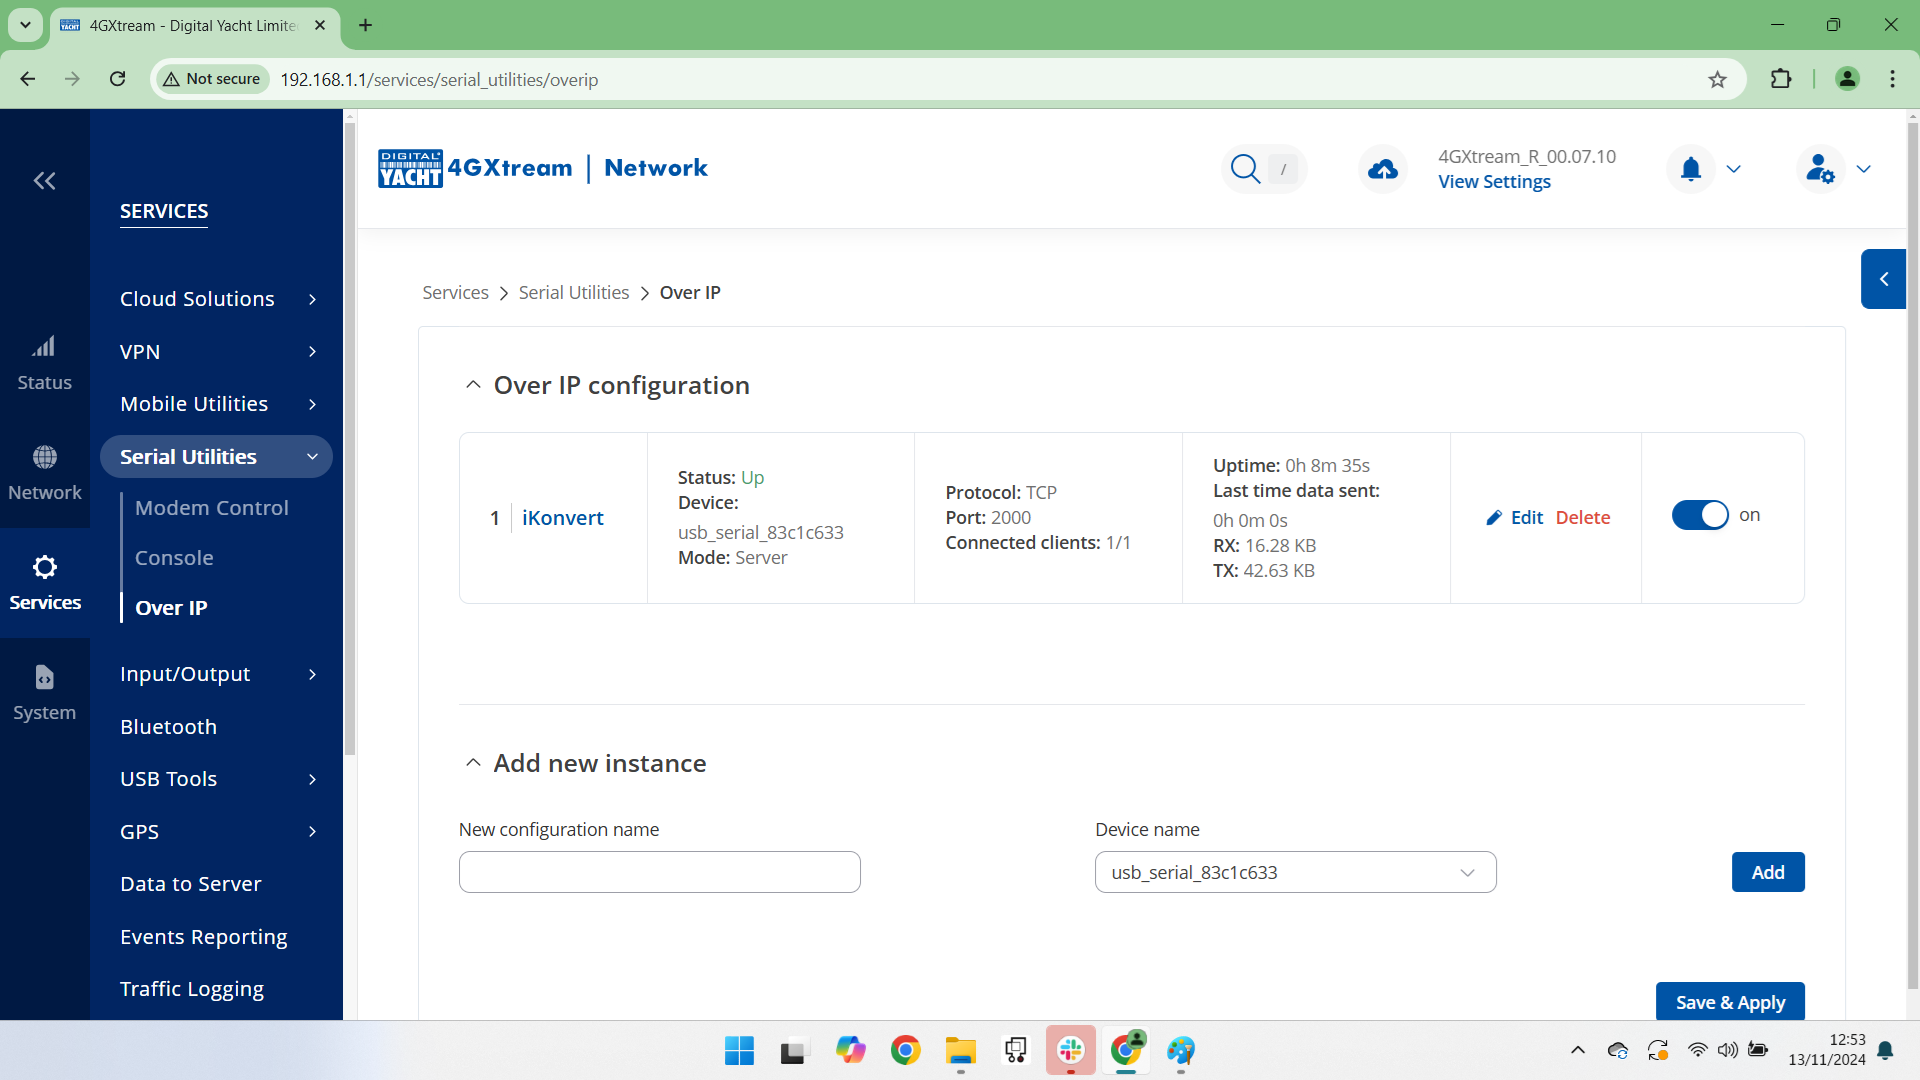
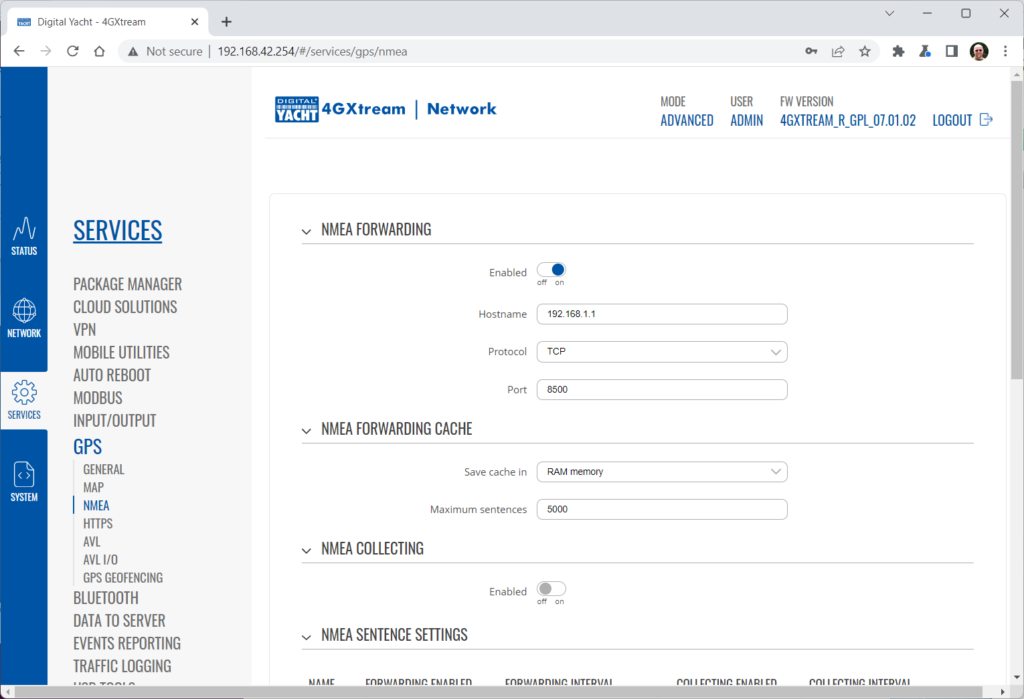
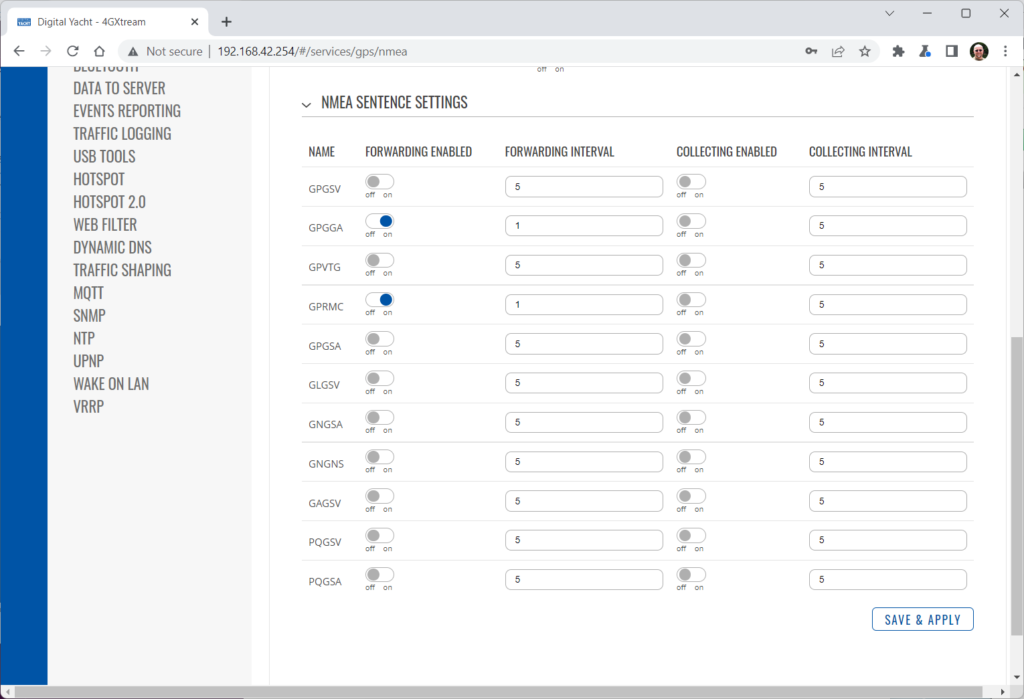
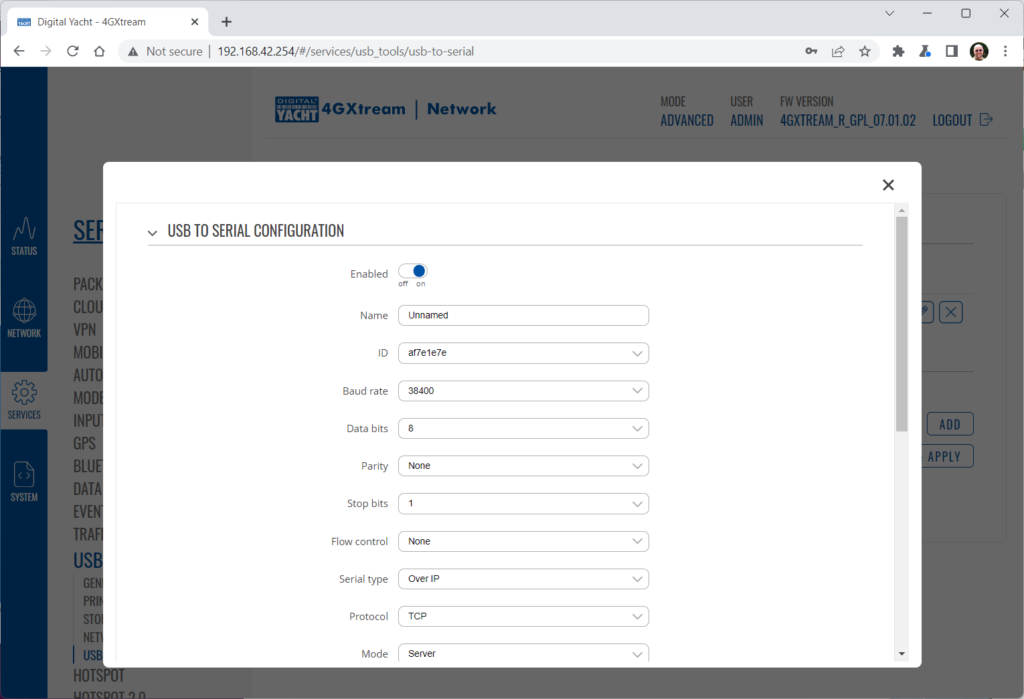
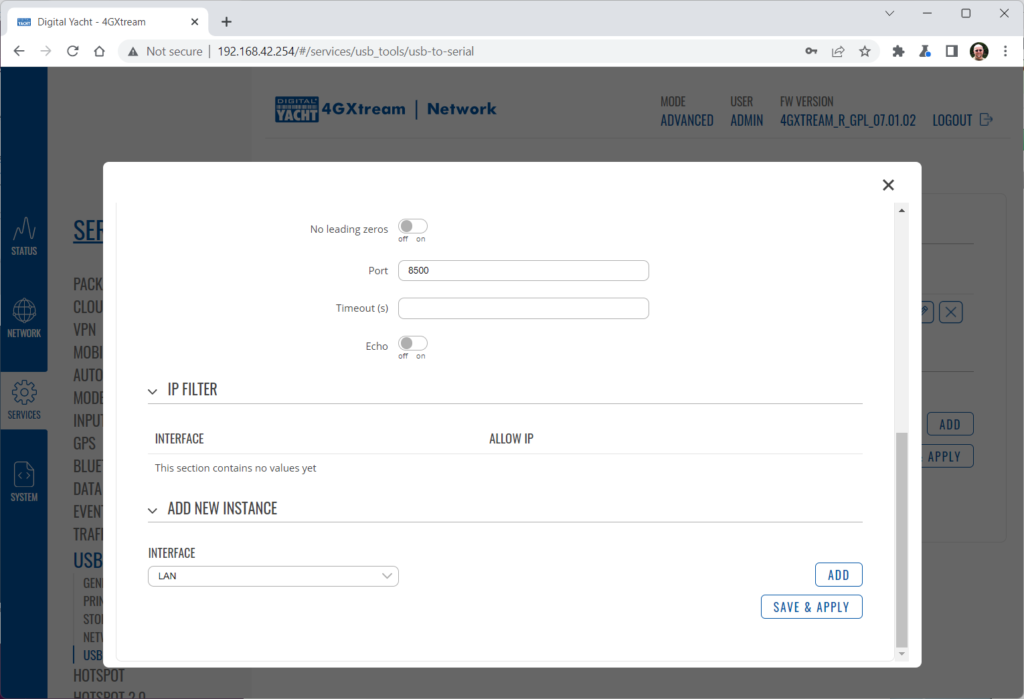
Using the 4GXtream’s GPS on the NMEA 2000 network
Applicable to 4GXtream units with NMEA 2000 interface

How to set up 4G/5G Xtream failover mode with Starlink
Testing and Configuring the NAVAlert SMS Feature with 4G/5G Xtream
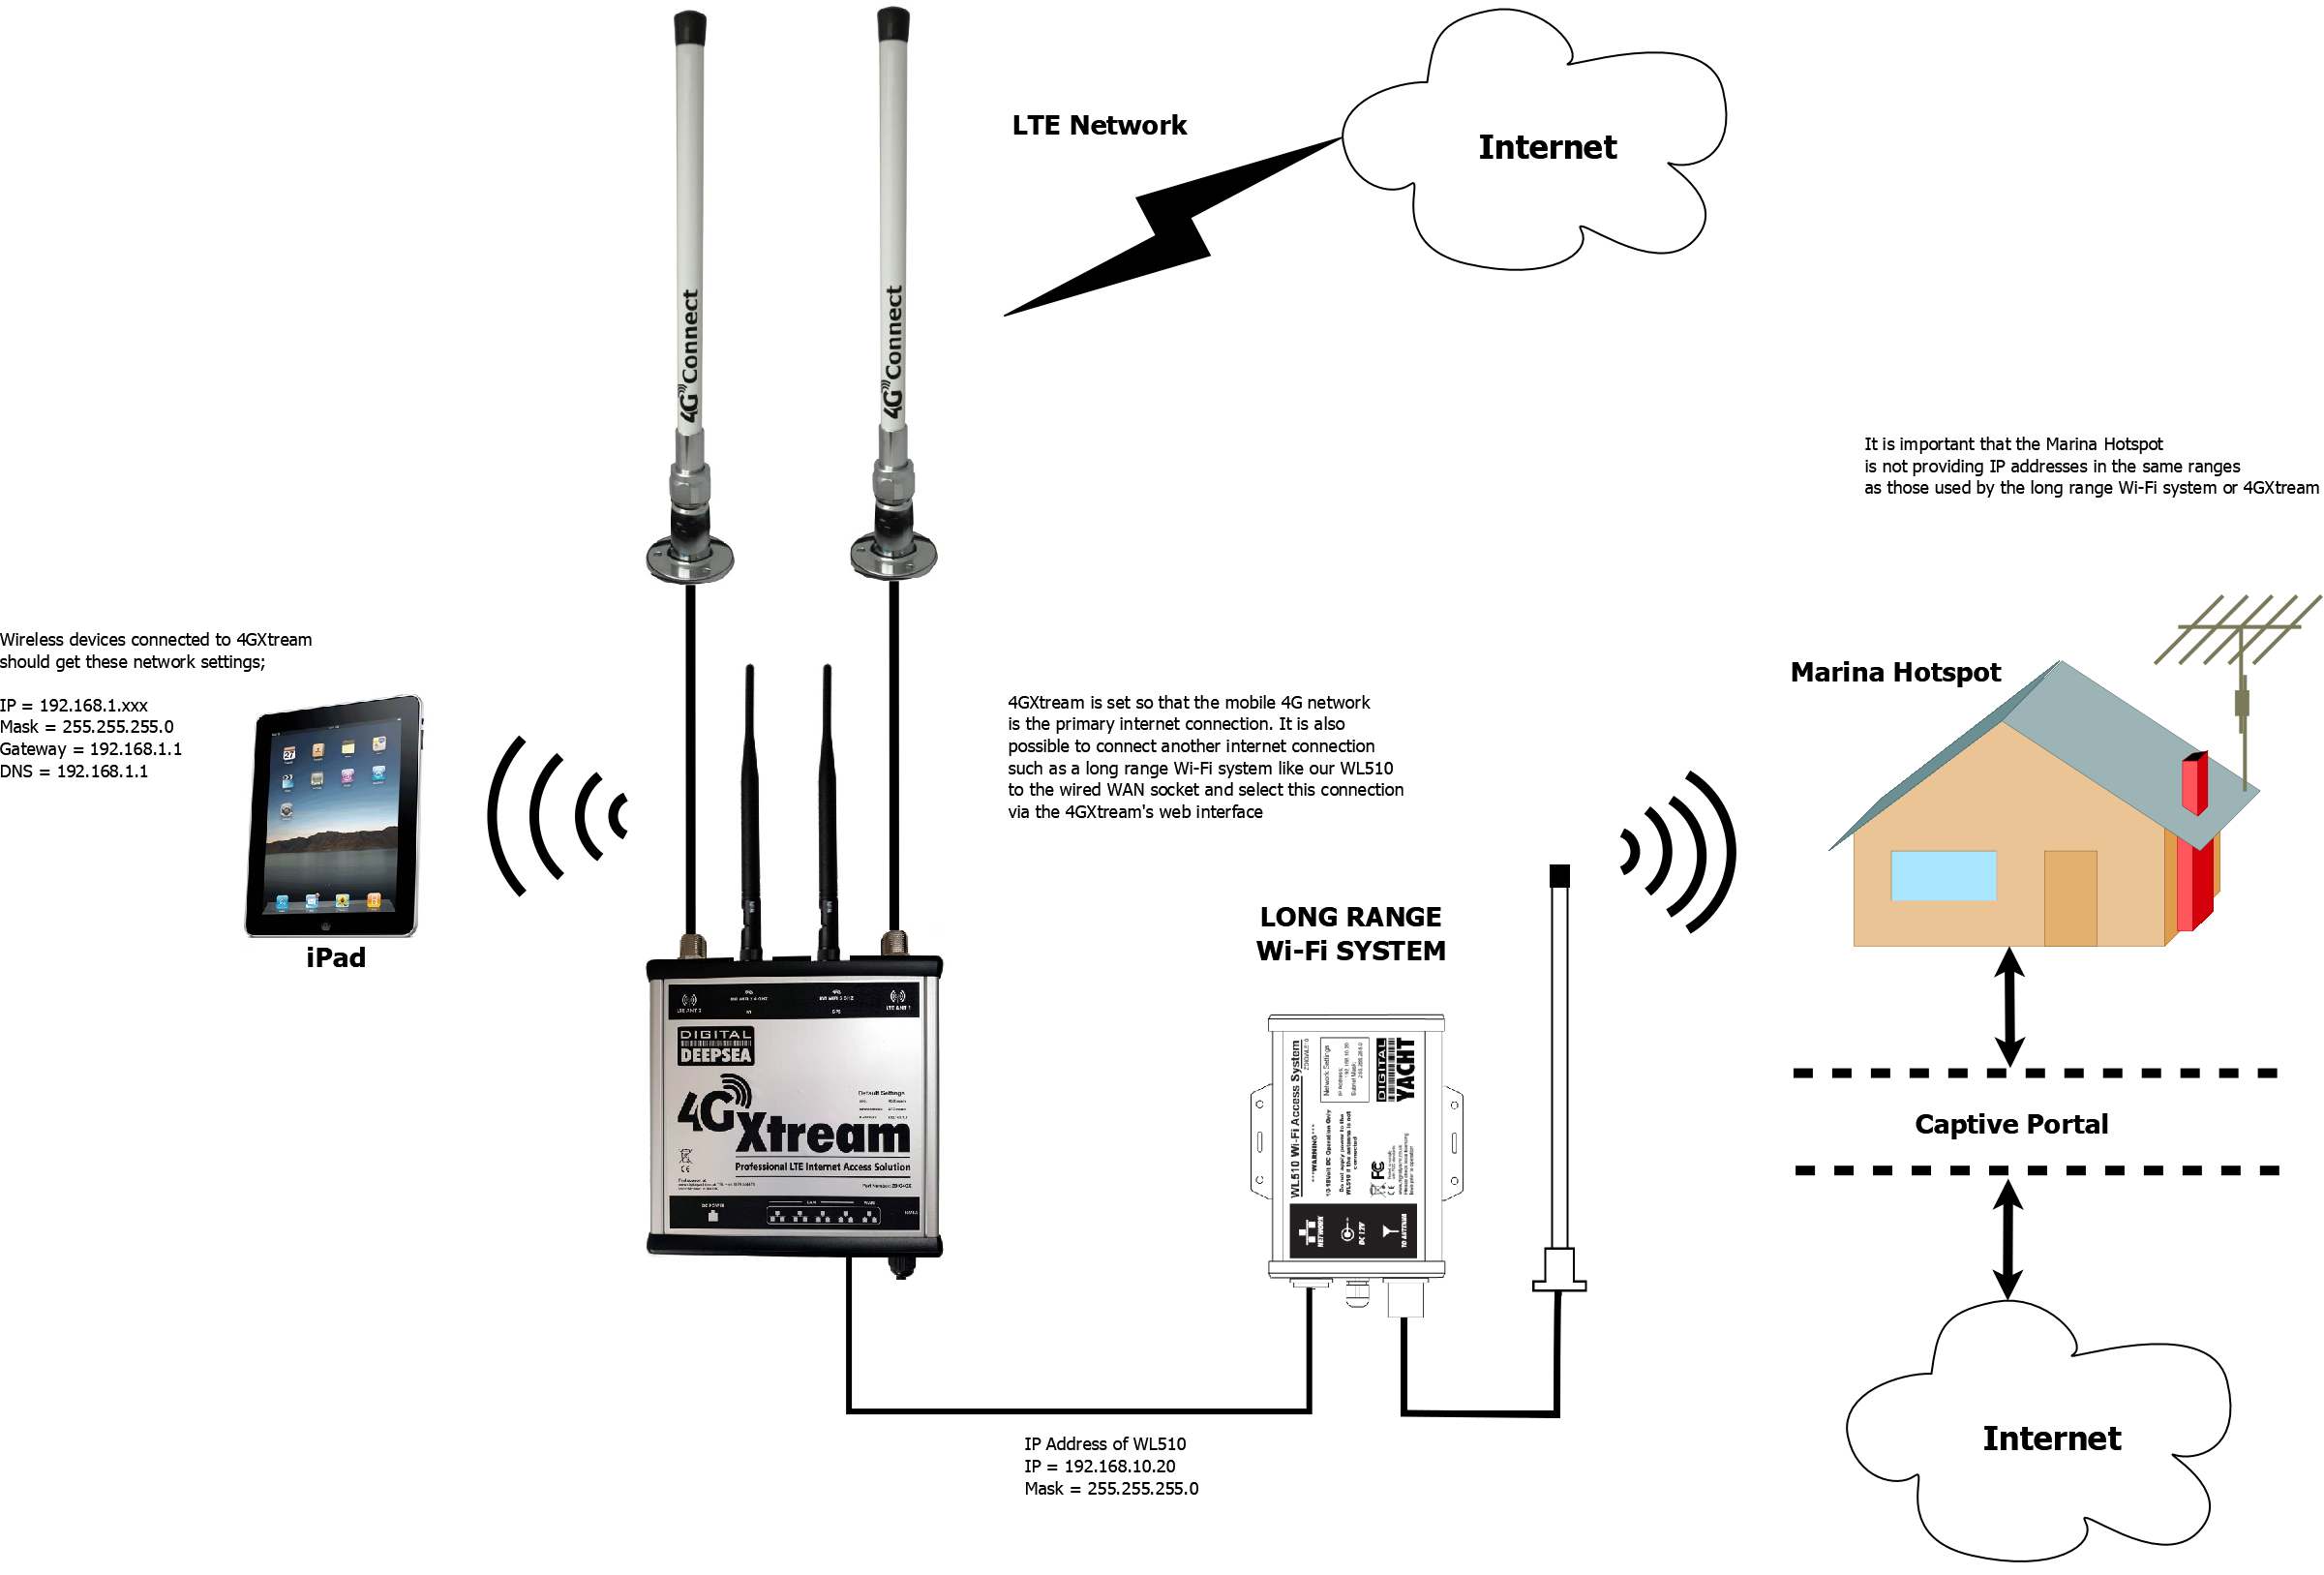
Powering Starlink antenna when connected to 4G/5G Xtream
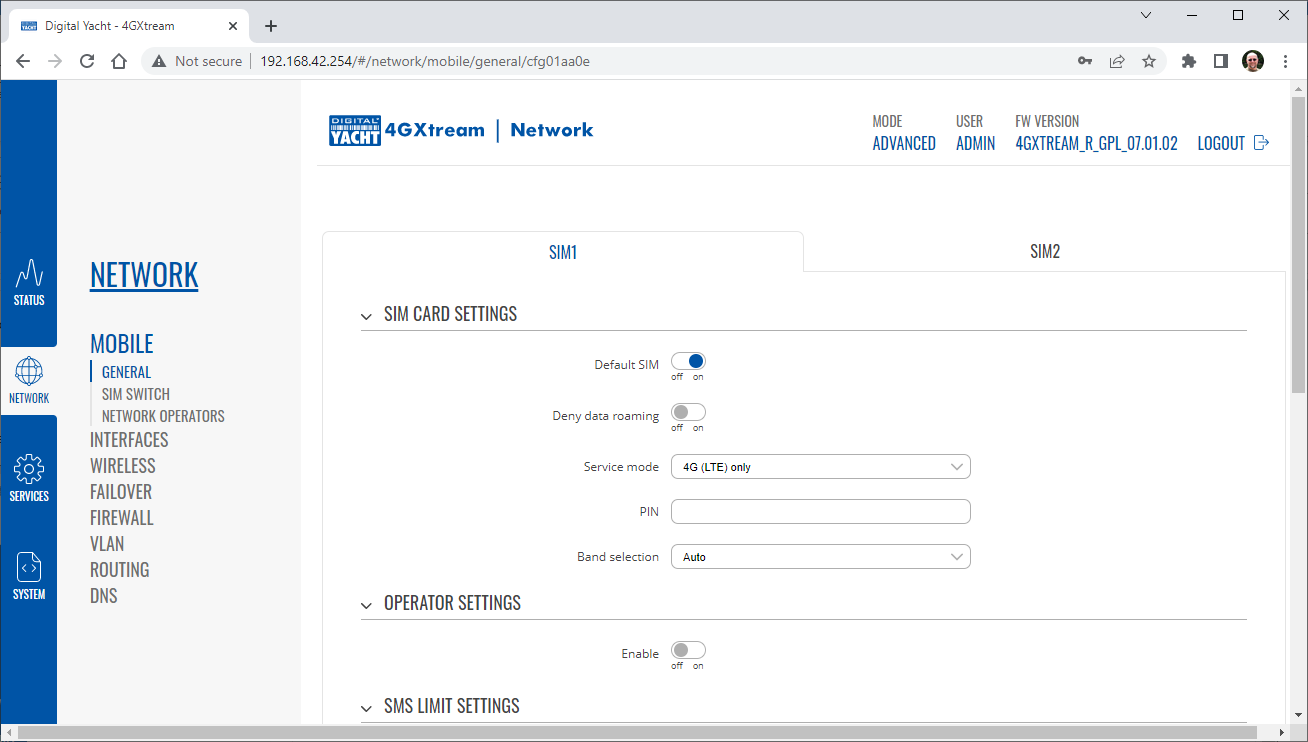
Switching SIM cards automatically or manually
Field
Value
Description
Enable automatic switching
off | on; default: off
Turns automatic SIM switching on or off.
Check interval
integer [3..3600]; default: 10
The frequency (in seconds) at which the device will check for SIM switch conditions. If such a condition exists, the router will perform a SIM switch, if not – it will check for the same conditions again after the amount of time specified in this field passes.
Attempts before SIM switch
integer [1..10]; default: 3
How many times a condition will be checked before executing a SIM switch. For example, if the device is a state that meets at least one SIM switch condition, the device will perform a number of additional checks specified in this field and will perform a SIM switch only if the condition is met on every check.
On weak signal
off | on; default: off
Performs a SIM switch when the signal strength drops below a certain threshold.
On data limit
off | on; default: off
Performs a SIM switch when the mobile data limit for this SIM card is reached. You can set up a mobile data limit in the Network → WAN (Basic WebUI mode) or Network
→ Interfaces (Advanced WebUI mode) pages by clicking ‘Edit’ next to the interface you wish limit the data for.
On SMS limit
off | on; default: off
Performs a SIM switch when the SMS limit for this SIM card is reached. You can set up SMS limit in the Network → Mobile → General page.
On roaming
off | on; default: off
Performs a SIM switch when roaming conditions are detected.
No network
off | on; default: off
Performs a SIM switch when a network connection is not available.
On network denied
off | on; default: off
Performs a SIM switch when access to a network is denied by an operator.
On data connection fail
off | on; default: off
Performs a SIM switch when mobile data connection fails. Possible failure determination methods are:

Field
Value
Description
Switch back to primary SIM card after timeout
yes | no; default: no
Attempts to switch back to the primary SIM card once the specified period of time passed.
Initial timeout (min)
integer; default: 1
Indicates a time value (in minutes) after which the device will attempt to switch back to the primary SIM card.
Setting up an anchor alarm with 4G Xtream / 5G Xtream
Slow internet speed through WiFi on my 4G Router
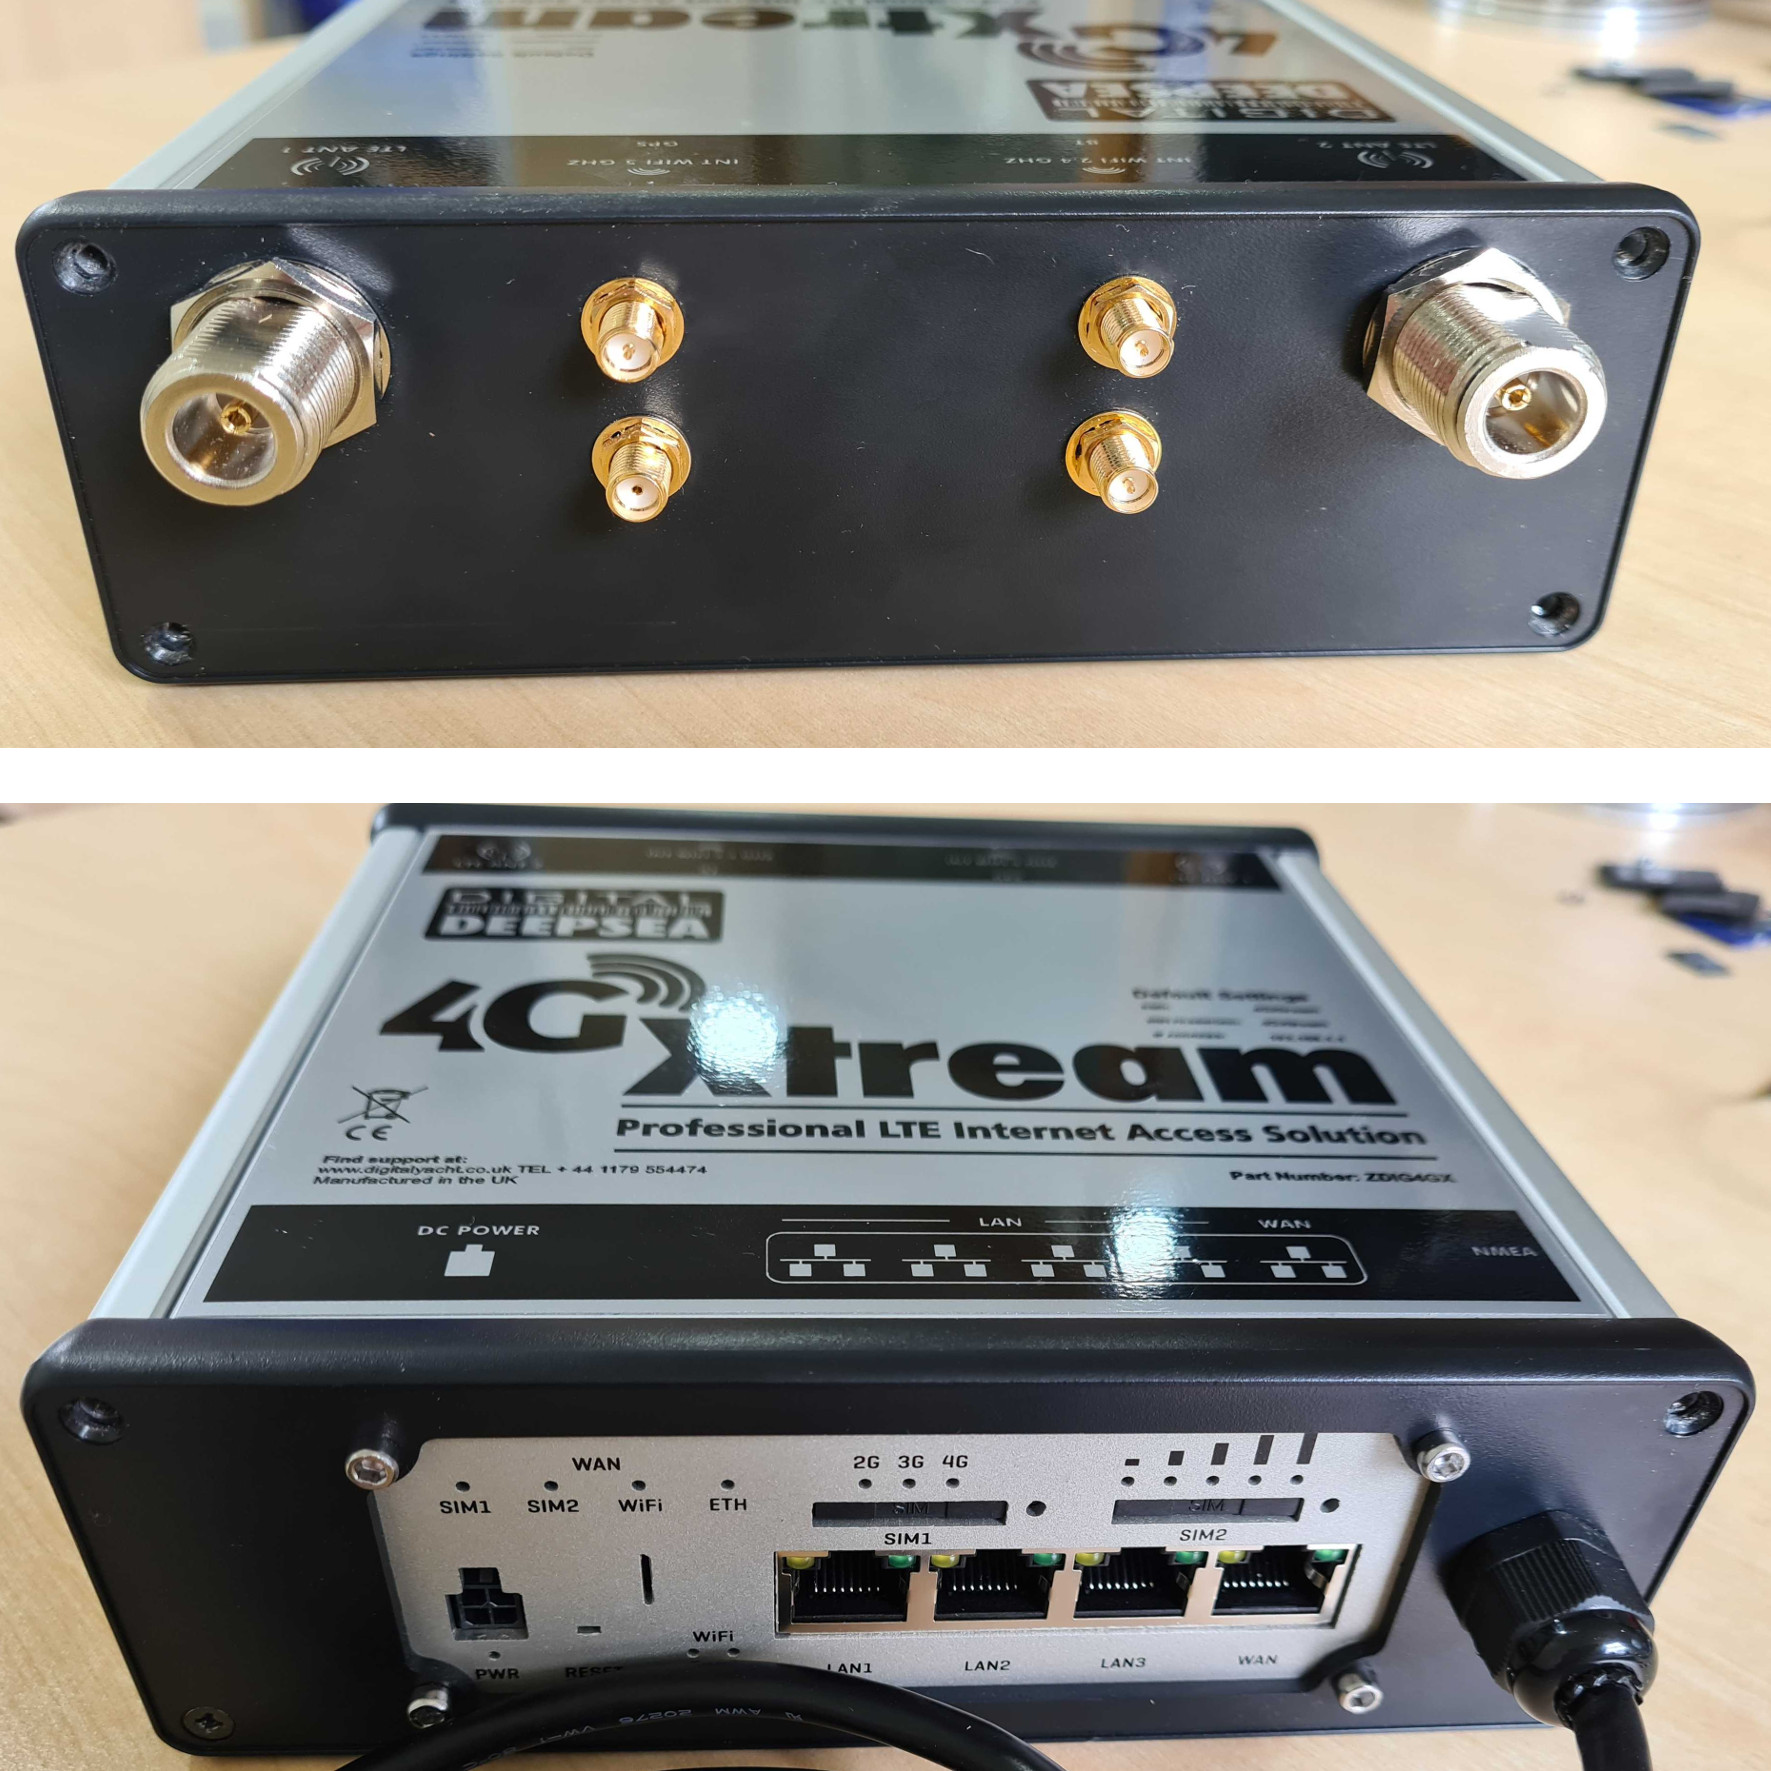
4G Xtream WiFi / GPS / Bluetooth antenna layout
How to use a Starlink Dish with the 4GXtream as the main router?
Why isn’t my new 4GXtream connecting to the internet?
4G Xtream and potential DHCP clashes with my MFD?
Starlink and 4GXtream
Boat remote access thought 4G – Port Forwarding to remote view CCTV system
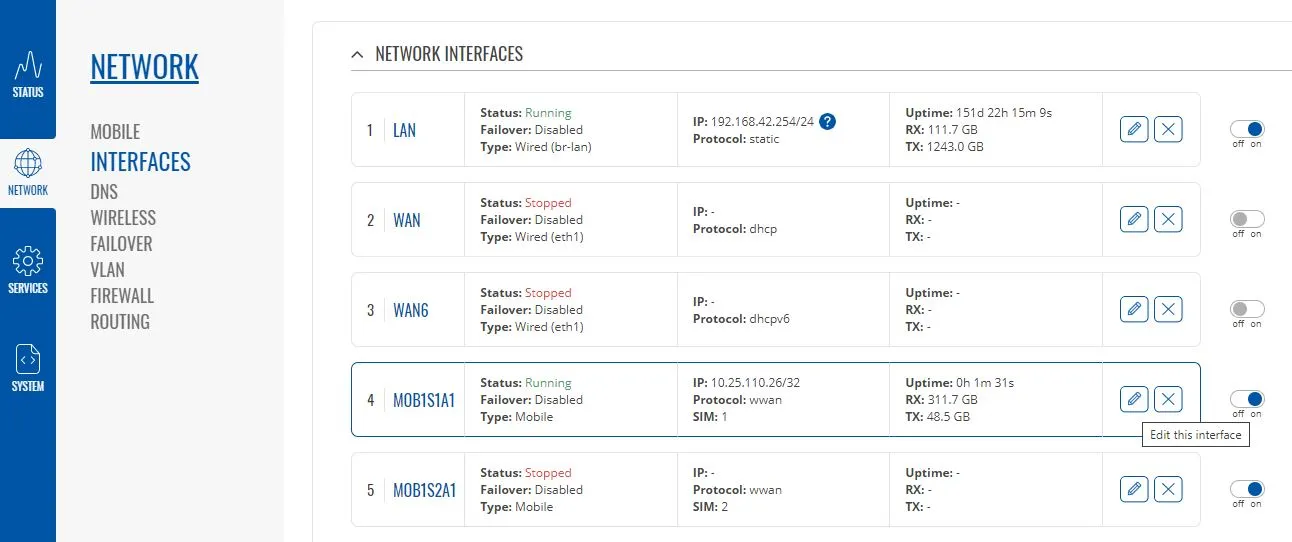
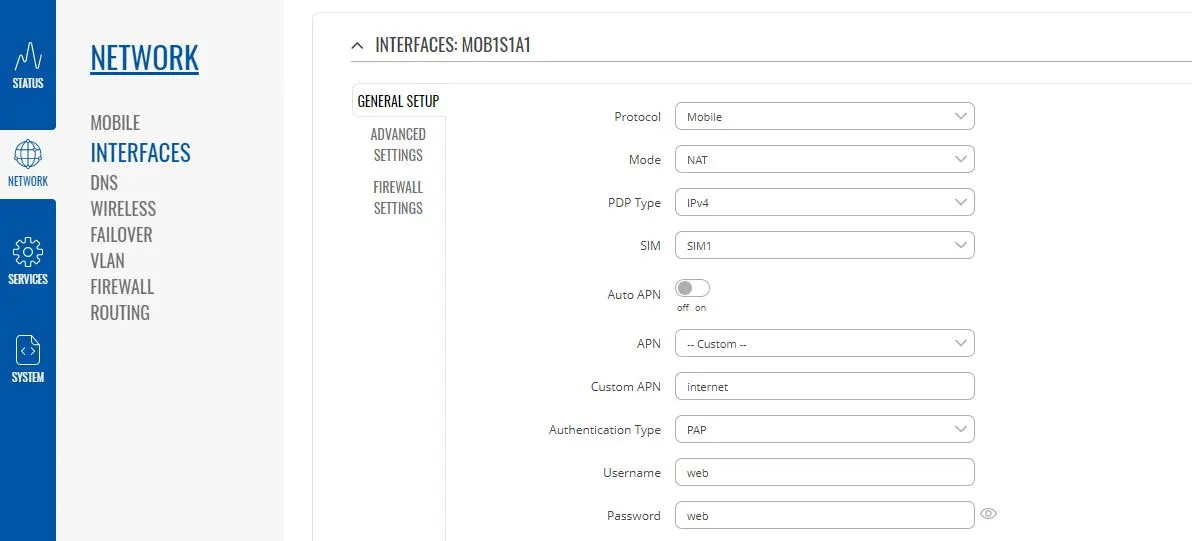
Manual APN Settings for latest EE SIM cards
Connecting other Marine Electronic Equipment to our 4G Products
4GXtream Power Consumption
How to connect 4G/5G Xtream to a WiFi hotspot?
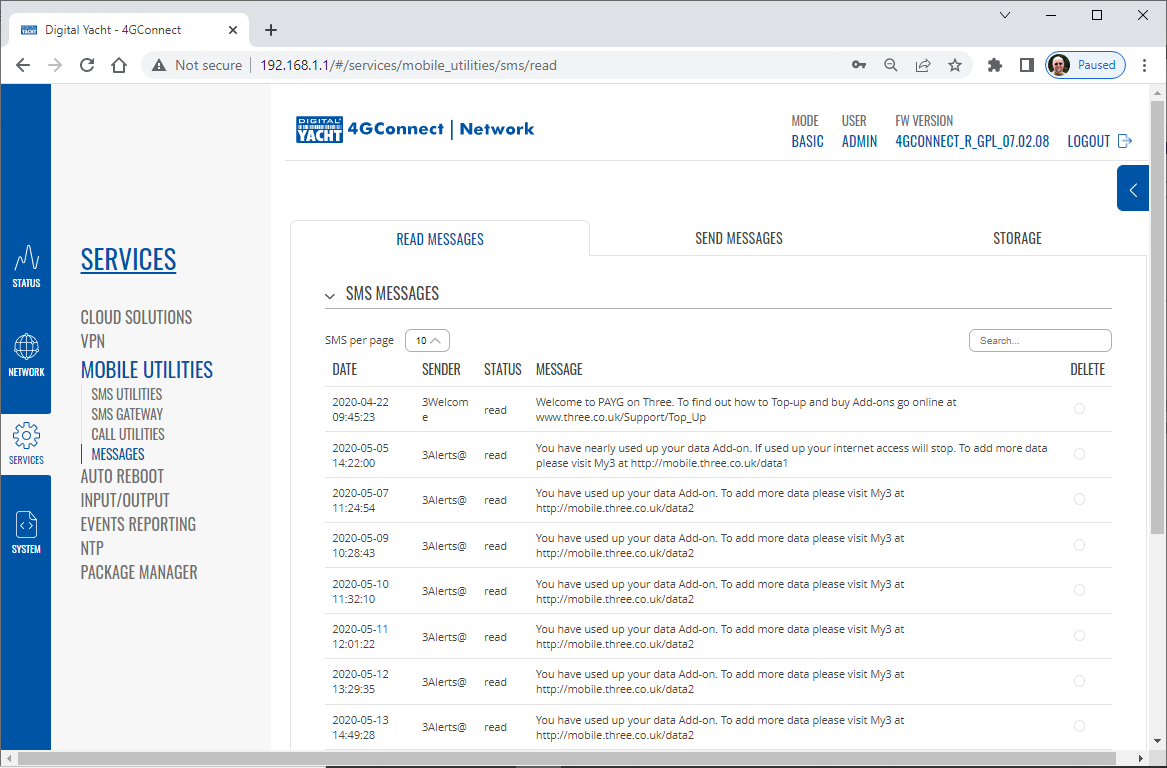
Advanced Diagnostic Tests for our 4G/5G Products
Generating Diagnostic Information on our 4G/5G Products
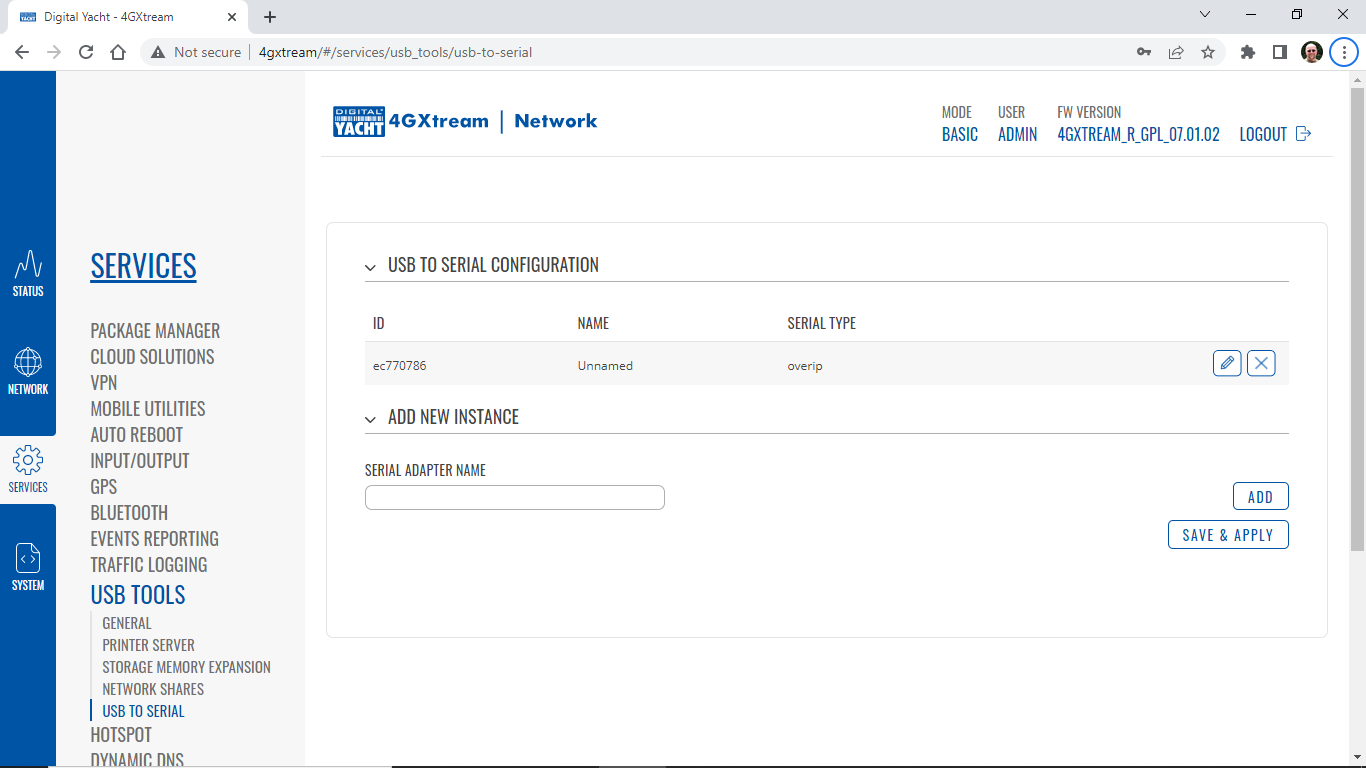
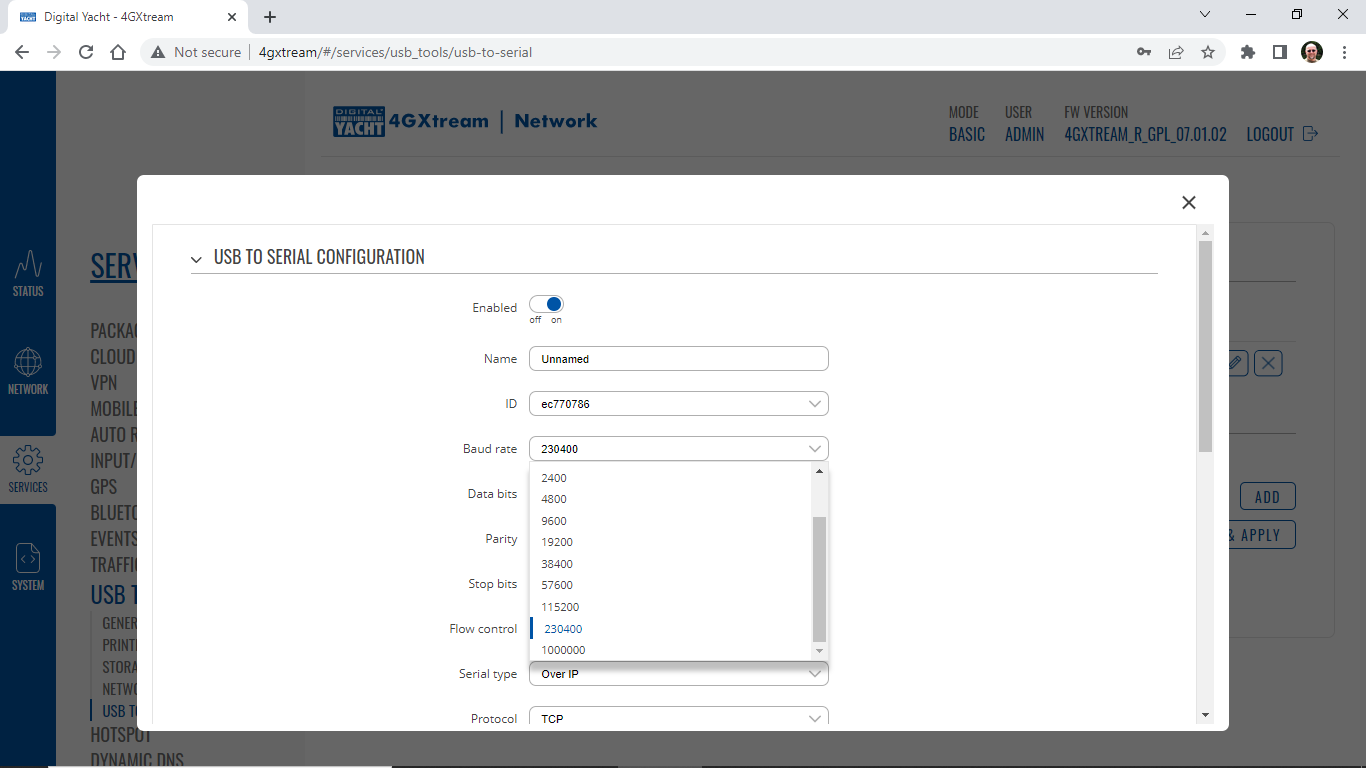
How to transmit the 4G / 5G Xtream’s GPS data on an NMEA 2000 Network
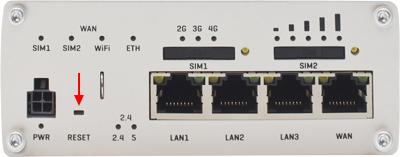
4G Xtream Factory Reset Procedure
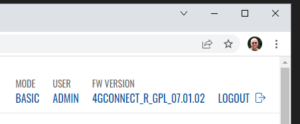
How to tell what firmware your 4GConnect or 4GXtream has?

VPN on our 4G Products
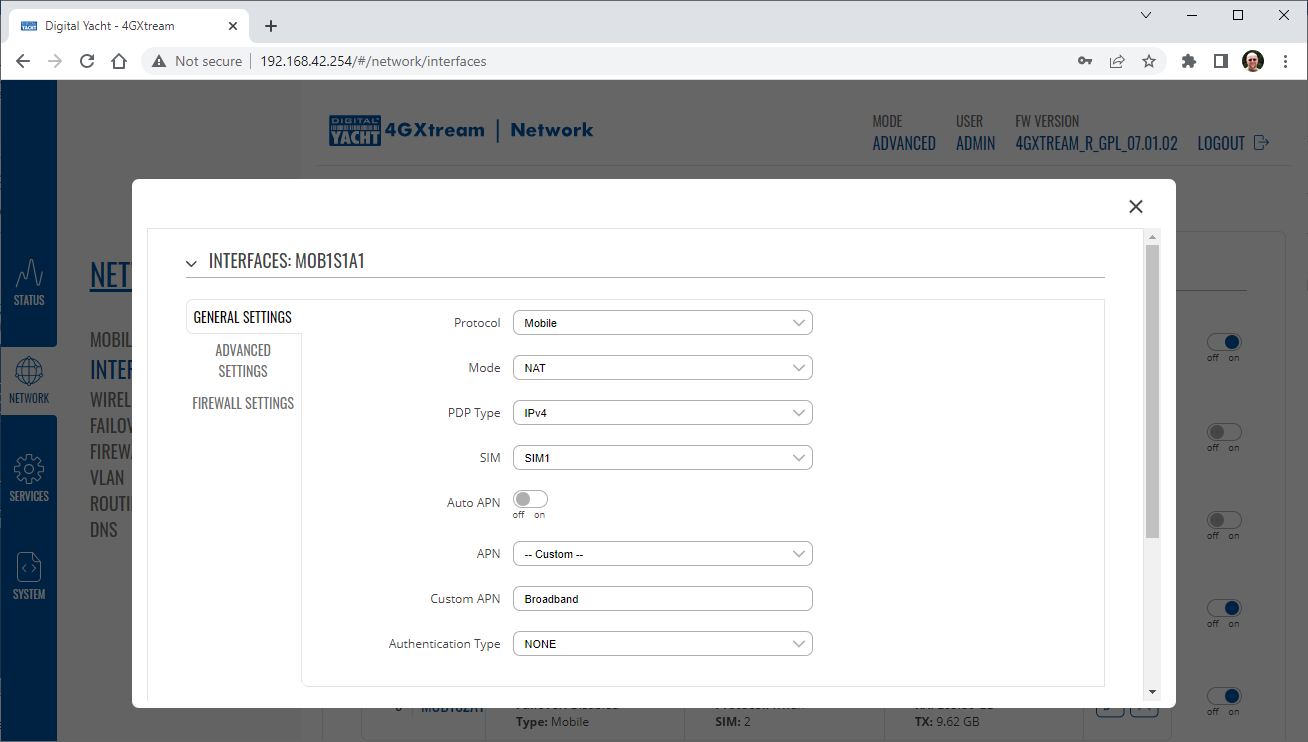
I want to set up my AT&T Sim card
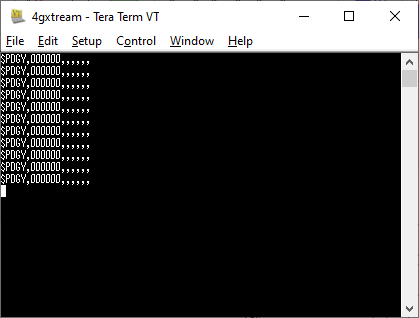
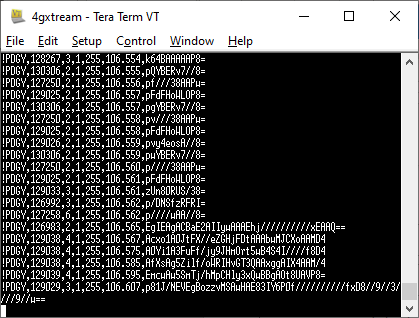
Configuring our 4GXtream to work with RAW NMEA 2000 PGN’s

General Information on 4G/5G Products (Configuration, updates, SIM cards)
4G/5G Products – Reboot in case of Mobile Network Disconnection
How to configure our 4G products?
How to override the Auto-APN Settings?
Getting the Correct SIM cards for our 4G Products
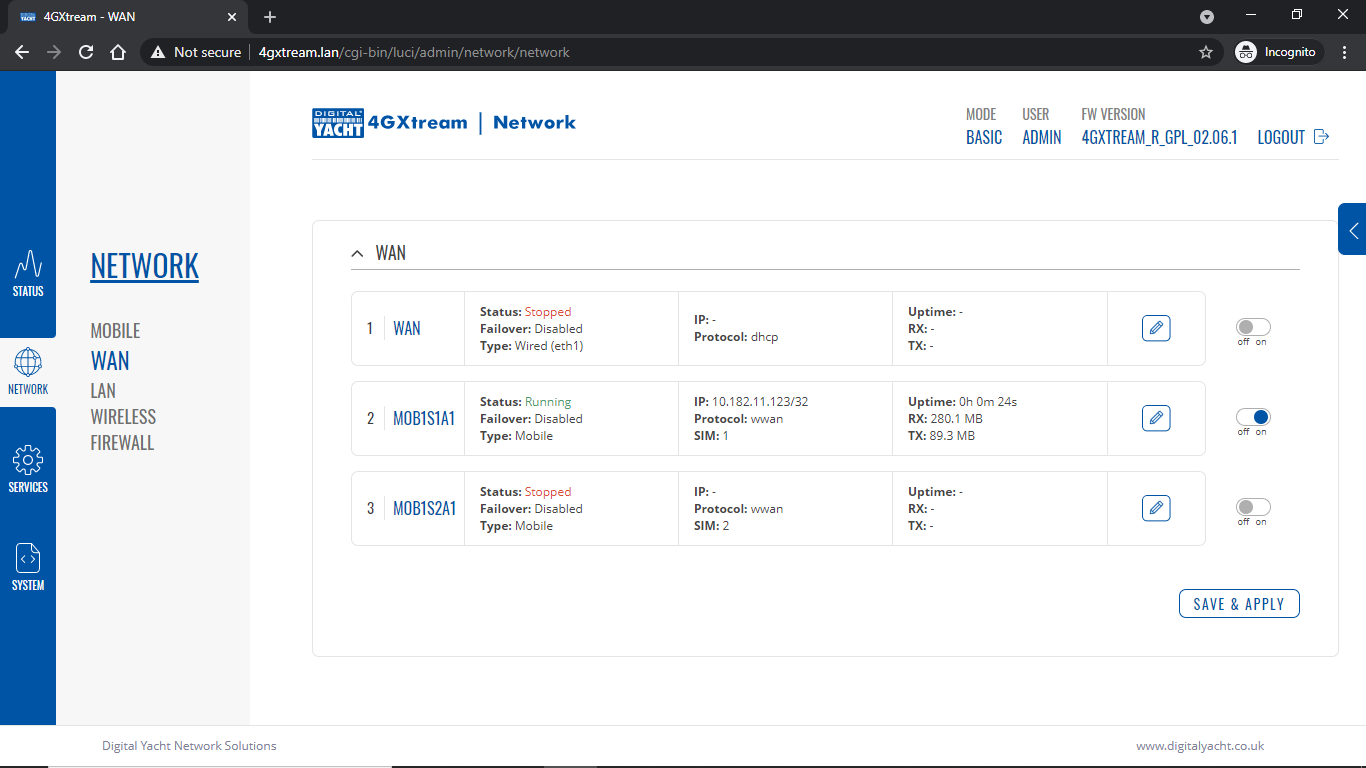
Using WL510 with 4GXtream
Is the SIM or Network Operator causing the problem?
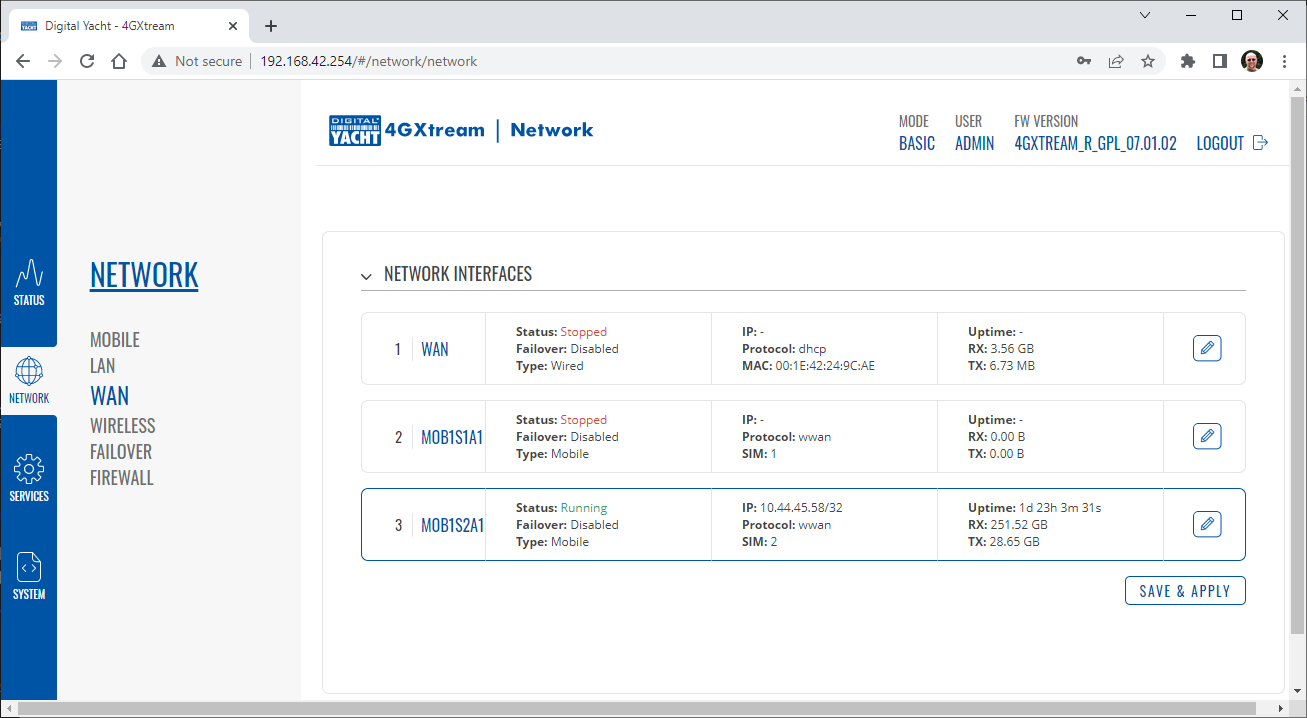
Are the APN Settings Correct?
Are you using the right 4G Xtream model in the right region?

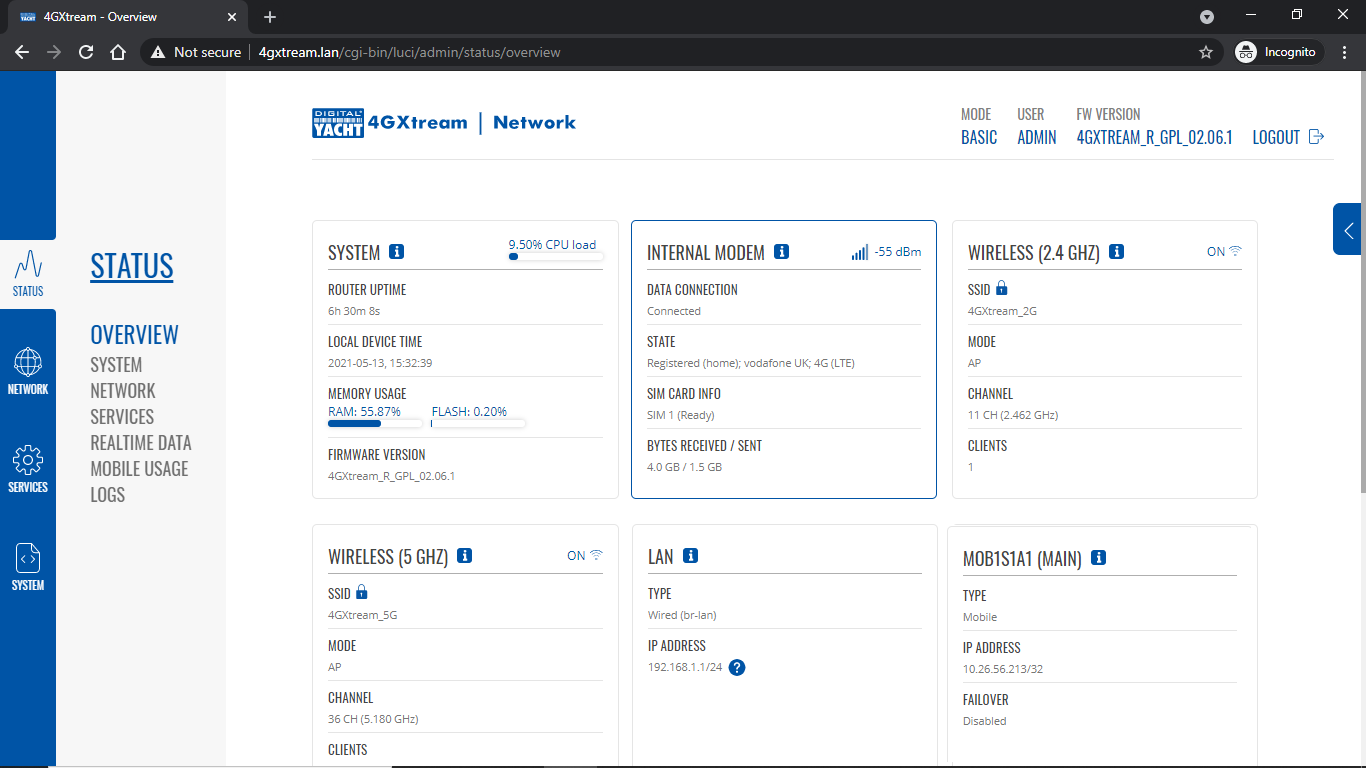
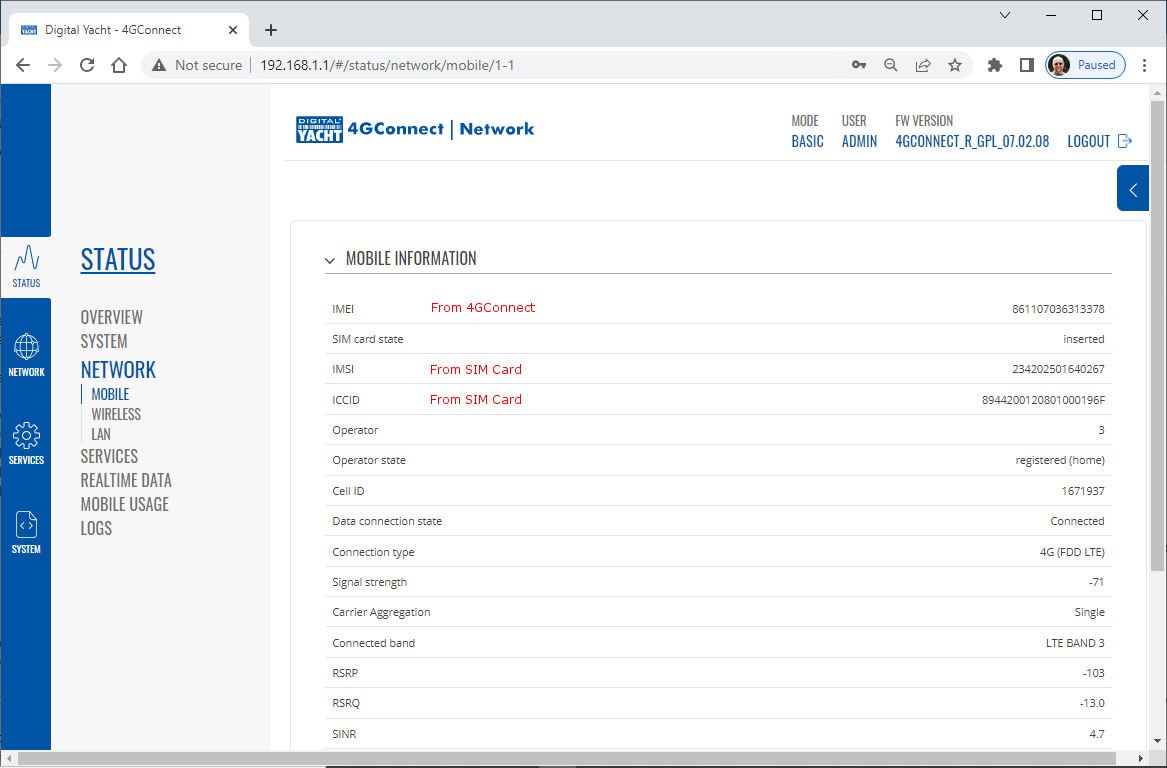
Is the 4GXtream reading the SIM card correctly?
Is 4G Xtream getting a good signal strength?