How to configure Apps & Software
You can find out how to configure your navigation app or software to receive NMEA, GPS and AIS data from one of Digital Yacht’s NMEA to WiFi server, NMEA to USB converter or AIS receiver/transponder with built-in WiFi
This list only includes apps & software which can receive external NMEA data and display real time AIS targets from an AIS receiver/transponder. If you are a software/apps editor and your app/software is not in the list below, please contact us.
Aqua Map Marine
Aqua Map Marine is an iOS/Android app. To receive external NMEA and AIS data, you need to purchase the Master functions.
Once you have connected your tablet or smartphone to the WiFi of the NMEA to WiFi server or the AIS transponder/receiver, open the app. Aqua Map can receive all NMEA 0183 data such as GPS, AIS and instruments data. Aqua Map is also Signal K compatible and can receive Signal K data from our iKommunicate.
1 – Set up an NMEA connection
Go to the Settings.

Toggle the buttons next to AIS and NMEA.
Make sure your Aqua Map Master subscription is active, then click on the arrow next to WiFi Connections.

Click on ‘+’ next to List of Connections.
Then, in the next page, you can fill in the parameters to set up an NMEA connection. However, our products parameters have already been saved by the app. So, simply click on the button Select device and select Digital Yacht.
Otherwise you would have needed to add the Connection name, the protocole TCP or UDP, the ip address: 192.168.1.1 and the port n° 2000.

Choose Digital Yacht and click on Done.

Your parameters will now be saved and if you click on Edit, you can choose if you prefer the app to use an UDP protocol. By choosing UDP over TCP, you can connect up to 7 devices on the WiFi whereas only one connection can be made with the TCP protocol but TCP is more reliable.
Next to Status, you could see if the app is receiving data or not. If the status is Connected and the connection is completed, a list of the available sensors will be displayed and you will be able to define which to use with your Aqua Map.
Go back to the main menu by clicking on the arrow in the top left corner.
Your NMEA connection is now set up.

2 – Configure AIS parameters
After having configured the NMEA connection, you can now configure all the AIS parameters.
Go to the main menu and click on the arrow next to AIS.

In that page, toggle the buttons next to Collect AIS Data, Display on Map and if you want Display Moored/Lost boats. You can also choose to only display both or Class A (commercial) or Class B (leisure) AIS targets.
Under Collect AIS data, you can display a list of AIS targets and you can order AIS targets by CPA, distance and by name.
Then, toggle the button next to Collision Avoidance and you can now configure CPA and TCPA alarms. Your tablet or smartphone can set off a very loud audible alarm.

Now, go back to the main map to see AIS targets.
On the left side of the map, you will now have an AIS box showing in real time the distance and time to collision with the nearest AIS boat target. This box turn to flashing red when the collision is imminent according to the setting you predefined in the AIS setting page.
If you click on the box, you will get a list of the AIS targets (list that you can order by CPA, distance or by name).

Touch a target on the map or on the “i” icon in the AIS targets list.
A page will pop up and by clicking the red triangle icon at the bottom, this boat will become your main target and will be displayed in red on the map.
You can also set this boat as your friend and will be displayed in green on the map.

Go back to the map and now your targets will be displayed in red, green or brown if you have selected a target as your main target or friend.

Boating Navionics
Boating Navionics
The Boating app from Navionics is one of the most popular app and is available on Android and iOS.
To receive NMEA and AIS data on Navionics, the connection is automatic.
Close all your apps, connect your tablet or smartphone to the WiFi of the AIS transponders or NMEA to WiFi server, then turn on the Navionics app.
1 – Set up an NMEA connexion
Click on Menu then on Connected Devices. You will see that Navionics will automatically be connected to one of our products. If it does not connect automatically, then you will need to manually set up the connexion as explained below.
Automatic connexion
Manual connexion
If the automatic connexion does not work, then you have to manually set up the NMEA connexion. Click on the ‘+’ next to Devices. Then, at the bottom click on ‘Add Device’. You will need to enter the following details depending on the protocole mode you’ve chosen for the WLN10/WLN30/NavLink2:
If UDP:
- Name: Digital Yacht or WLN10 or WLN30 or NavLink2, etc.
- Host: 0.0.0.0
- Port number: 2000
If TCP:
- Name: Digital Yacht or WLN10 or WLN30 or NavLink2, etc.
- Host: 192.168.1.1
- Port: 2000
After having entered the details, click Save.

2 – Set up the AIS settings
After having set up the NMEA connexion, you must go to the ‘Map Options’ menu.

Click on ‘AIS Settings’

In that menu, you can now activate to display AIS targets but also to set up CPA and TCPA alarms. Depending on the values you set for CPA and TCPA alarms, your tablet or smartphone can also trigger an audible alarm.

Now, the AIS targets will be overlaid on your map. Touch a target to get its name and click ‘?’ to get more information about the AIS target.

iAIS
iAIS is a free and simple iPhone/iPad app to display AIS targets. It was the first app in the world to display in real time AIS targets.
In order to receive AIS targets in real time, you will need an AIS receiver/transponder with built-in Wi-Fi or simply connect a NMEA-WiFi server to your AIS receiver or transponder.
This post explains how to set up an NMEA connection and to receive NMEA and AIS data in the app and also explains how to configure AIS parameters and to upload Navionics charts.
1 – Set up an NMEA connection
After having closed all your apps, make sure you are connected to the WiFI and open the iAIS app.
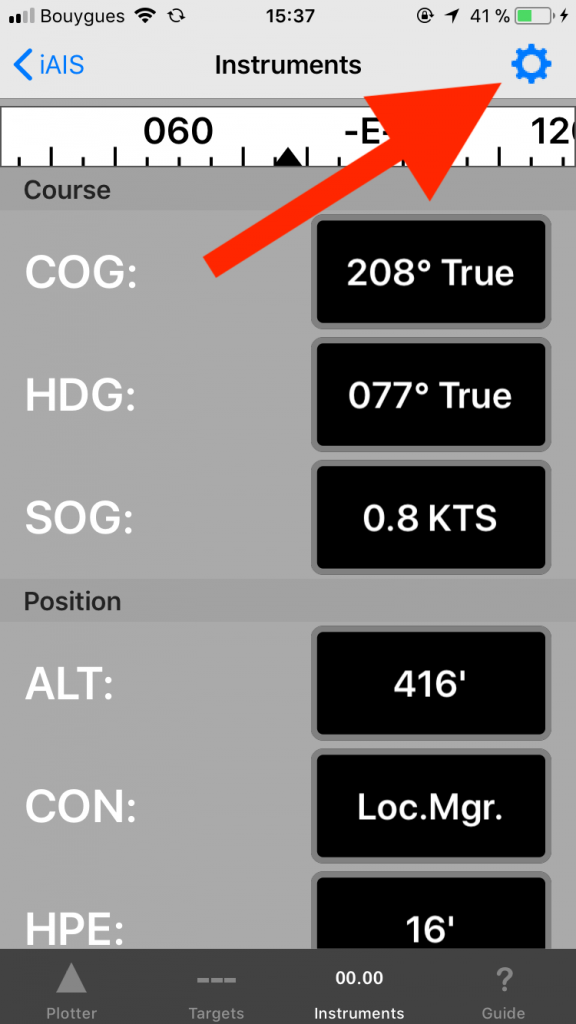
At the bottom of the app, click on Instruments.
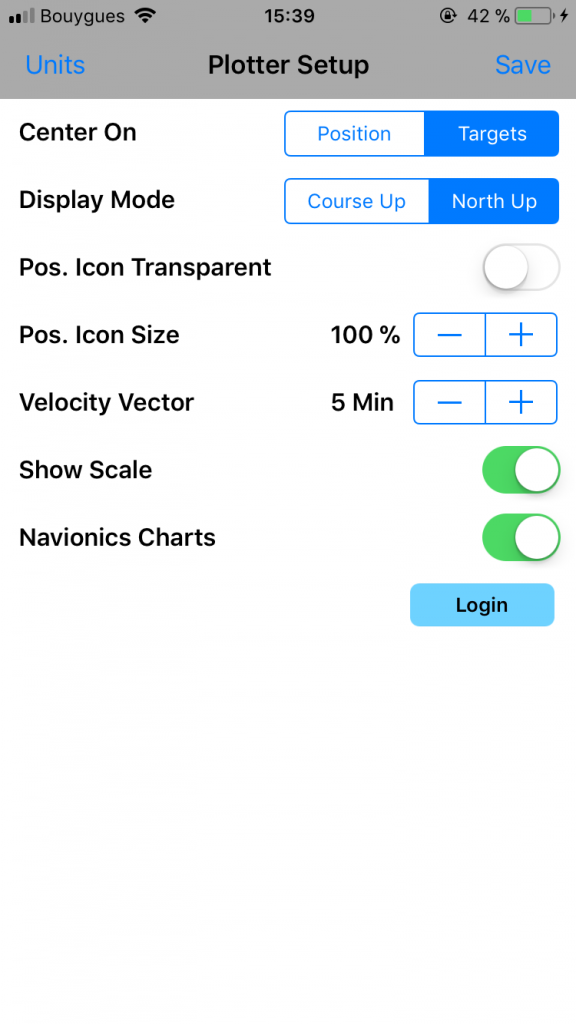
Then on the blue gear at the top right as shown in the picture below.
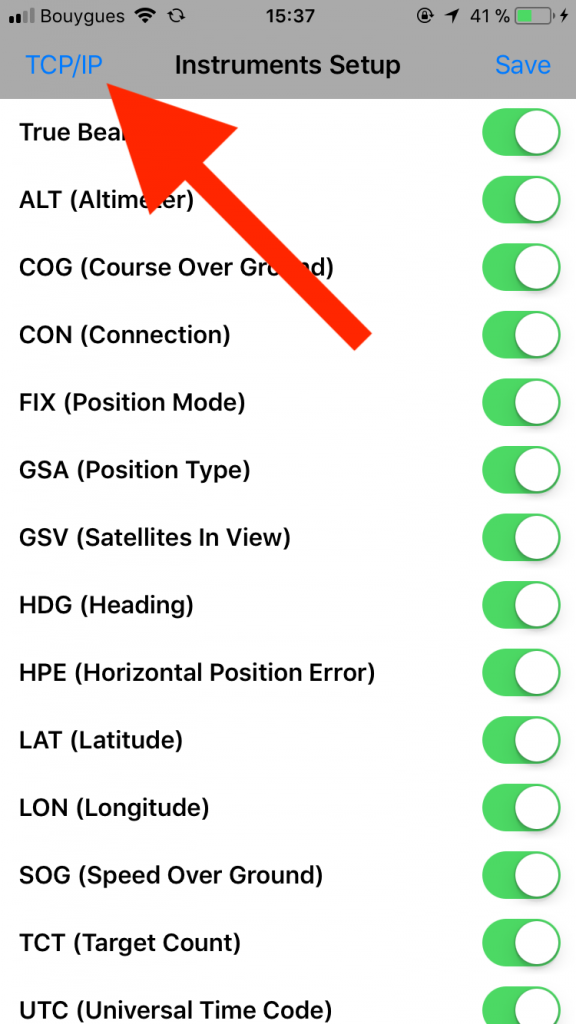
Then click on TCP/IP.
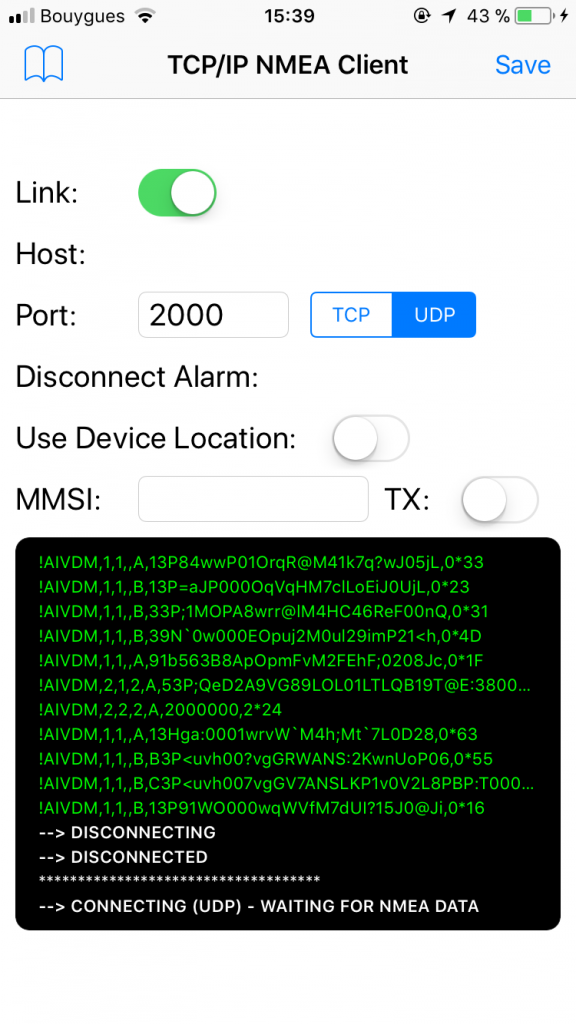
As shown in the screenshot below, you need to fill in the following parameters:
- Protocol: UDP or TCP. We recommend you choosing UDP if you want to connect other devices to the WiFI. With TCP, you can only connect one device to the WiFi whereas with UDP, you can connect up to 7 devices.
- Host (only for TCP): 192.168.1.1
- Port: 2000
In this page you can also enter your MMSI number (then click on the button next to Tx) so that the iAIS application will transmit your position to AIS sites like Marine Traffic, BoatWatch, etc. You can also use your iPhone/iPad’s internal GPS instead of the GPS data transmitted through the Wi-Fi of your AIS transponder or NMEA-WiFi server.
Then, please toggle button next to Link.
If you receive data, then NMEA data will start streaming in the black box at the bottom of the application.
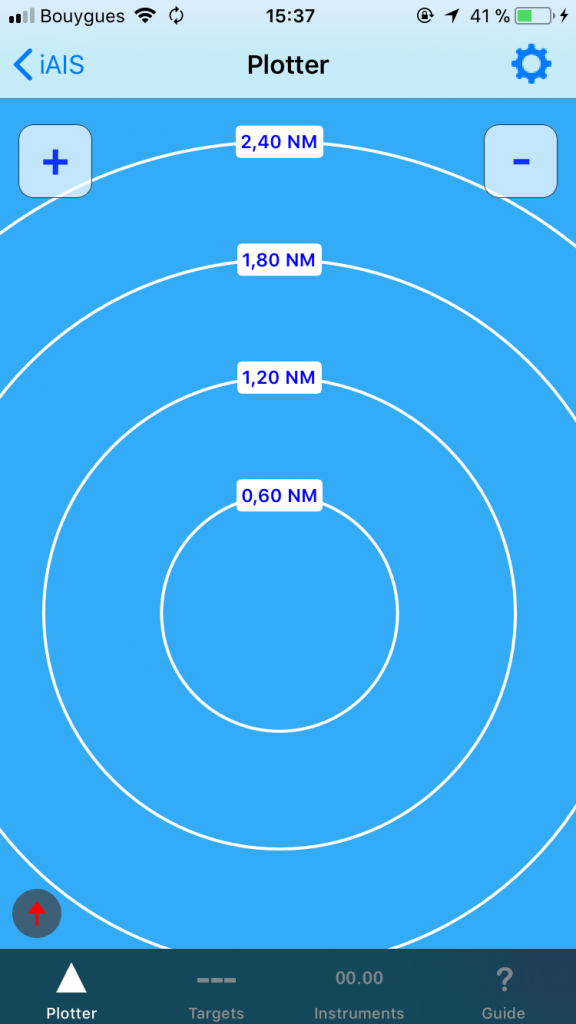
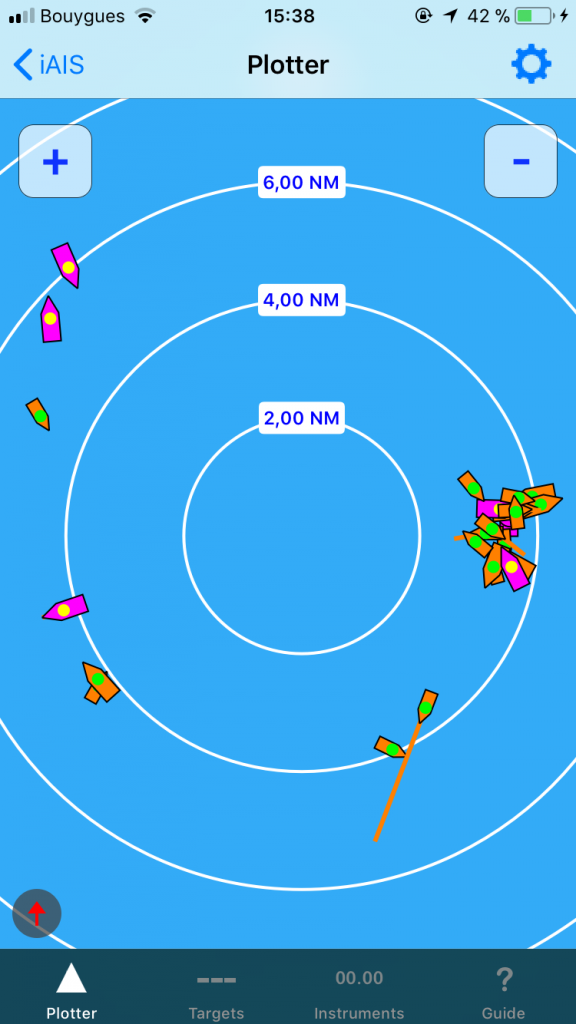
Afterwards, please click twice on Save and click on the Plotter tab. The AIS targets will now be displayed.
2 – AIS parameters and Navionics charts
Since the last update of the iAIS application, you can overlay Navionics charts. There is no need to re-purchase Navionics charts if you have already purchased them in your Navionics app.
If you have a Navionics account and you want to use them to receive AIS targets, then please click on the Plotter tab and then click on the gear in the top right corner. At the bottom of the page you will see ‘Buy Navionics Charts Add-on’. After purchasing this feature, please click on the Login button and enter your email address and password used by Navionics. After the application has found the status of your Navionics Charts subscriptions, please click on Done and then toggle the button next to Navionics Charts as shown below. Afterwards, click Save and the Navionics Charts will appear on your application.
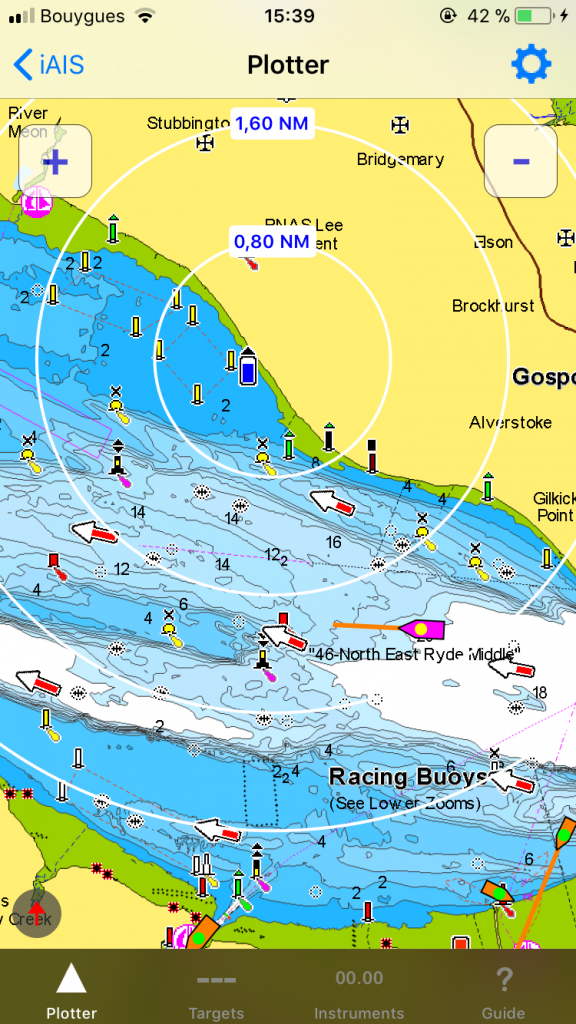
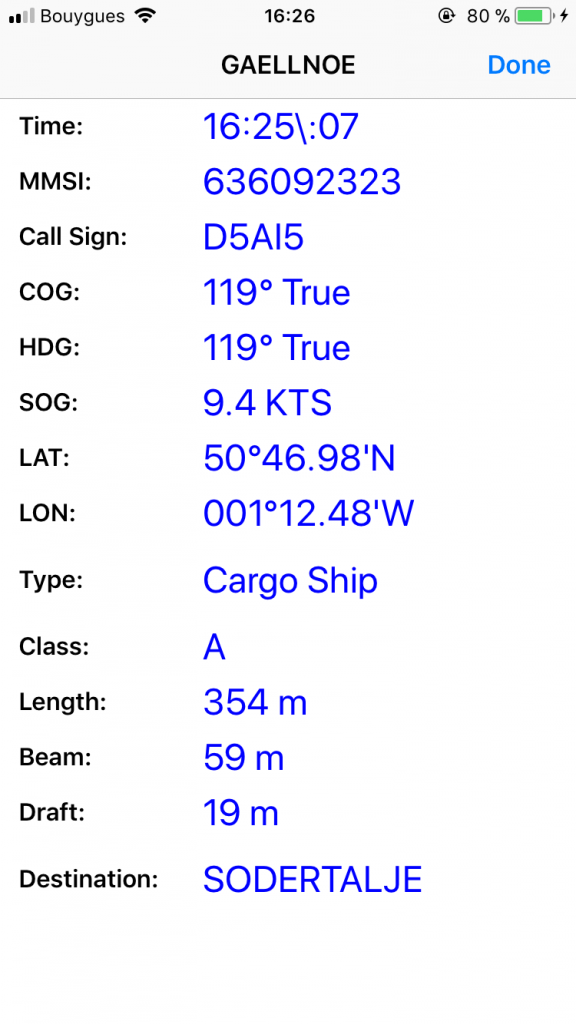
Once you have AIS targets on the Plotter tab, you can touch a target and the boat information will be displayed as shown in the picture below.
If the target has a yellow dot on it then it means that static data has not yet been received (boat name, dimensions, boat type, etc.). This data is transmitted less frequently than the position data and MMSI number. The static data is updated every 3-6 minutes.
Targets in Pink are Class B vessels (pleasure craft, etc.). Vessels equipped with class B transponders transmit static data (name, MMSI) and also dynamic data (COG, SOG, latitude, longitude, etc.).
Targets in Orange are Class A vessels (commercial, ship, passenger transport, etc.). Vessels equipped with class A transponder transmit more data such as destination, length, draught, etc.
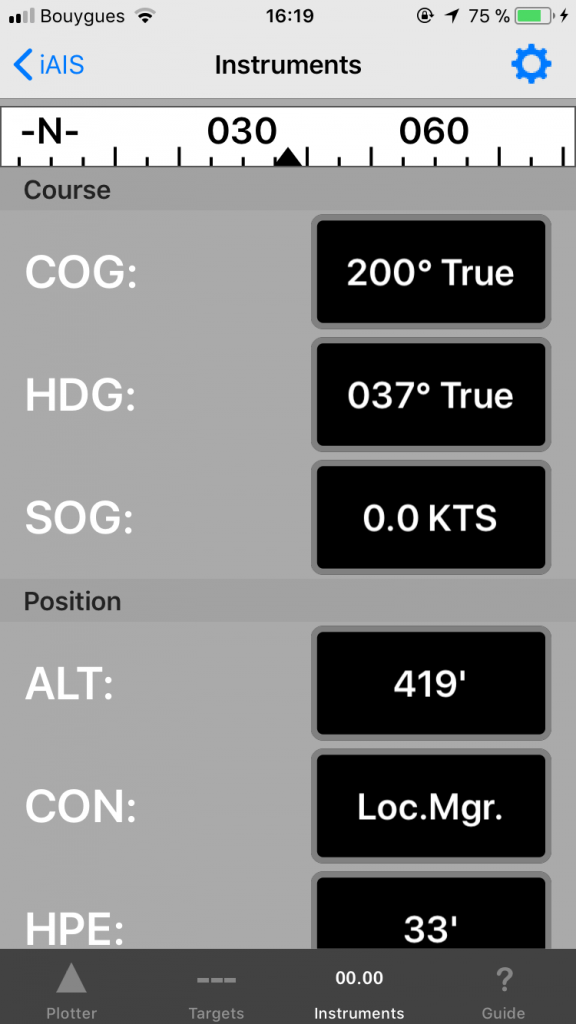
If you have instruments connected to your NMEA-WiFi server or AIS transponder/receiver with built-in Wi-Fi, then the iAIS application can display data from these instruments. To view the data from these instruments, simply click on the Instruments tab.
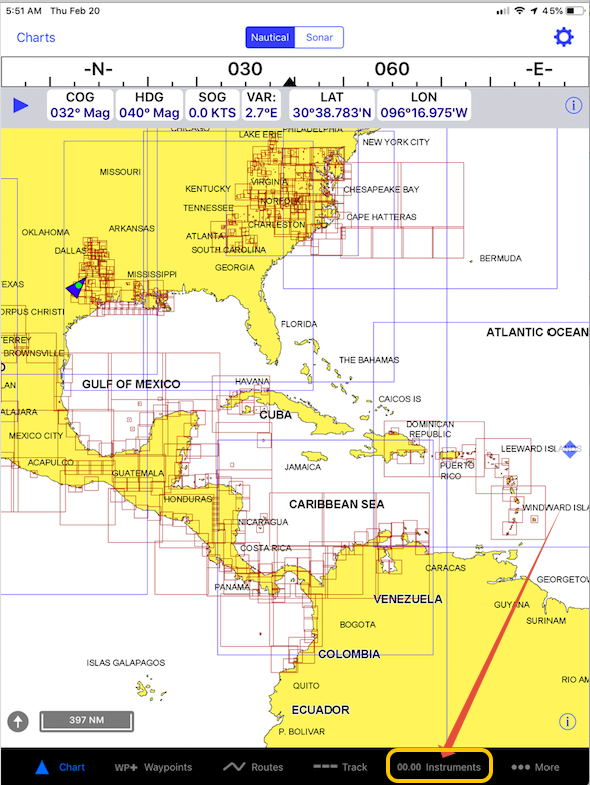
iNavX
This post explains how to receive NMEA data on the iNavX app and how to configure AIS.
In the settings app, connect your iPad or iPhone Wi-fi to the Digital Yacht Wi-fi from an NMEA to WiFI server or from an AIS transponder with WiFi.
Tap the Instruments item in the toolbar at the bottom of the iNavX.
1 – NMEA connection
Tap TCP/IP in the upper left corner of the Instruments.
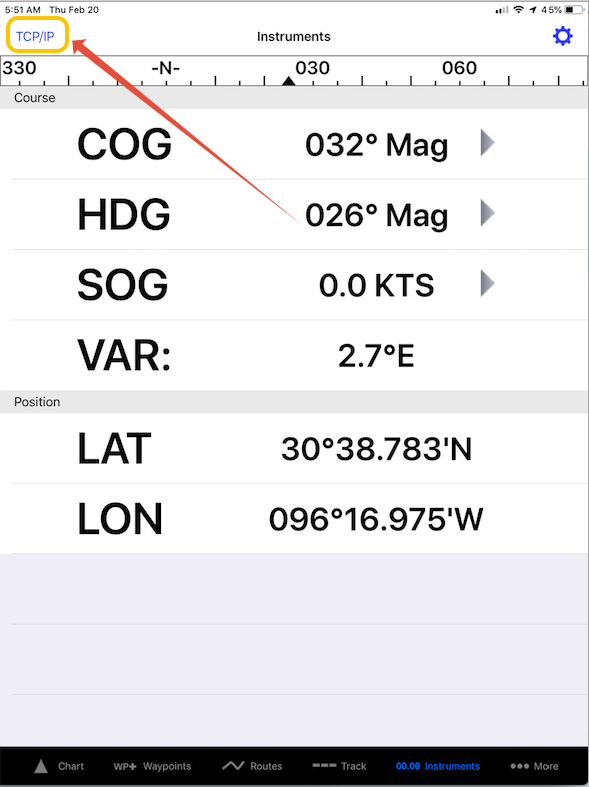
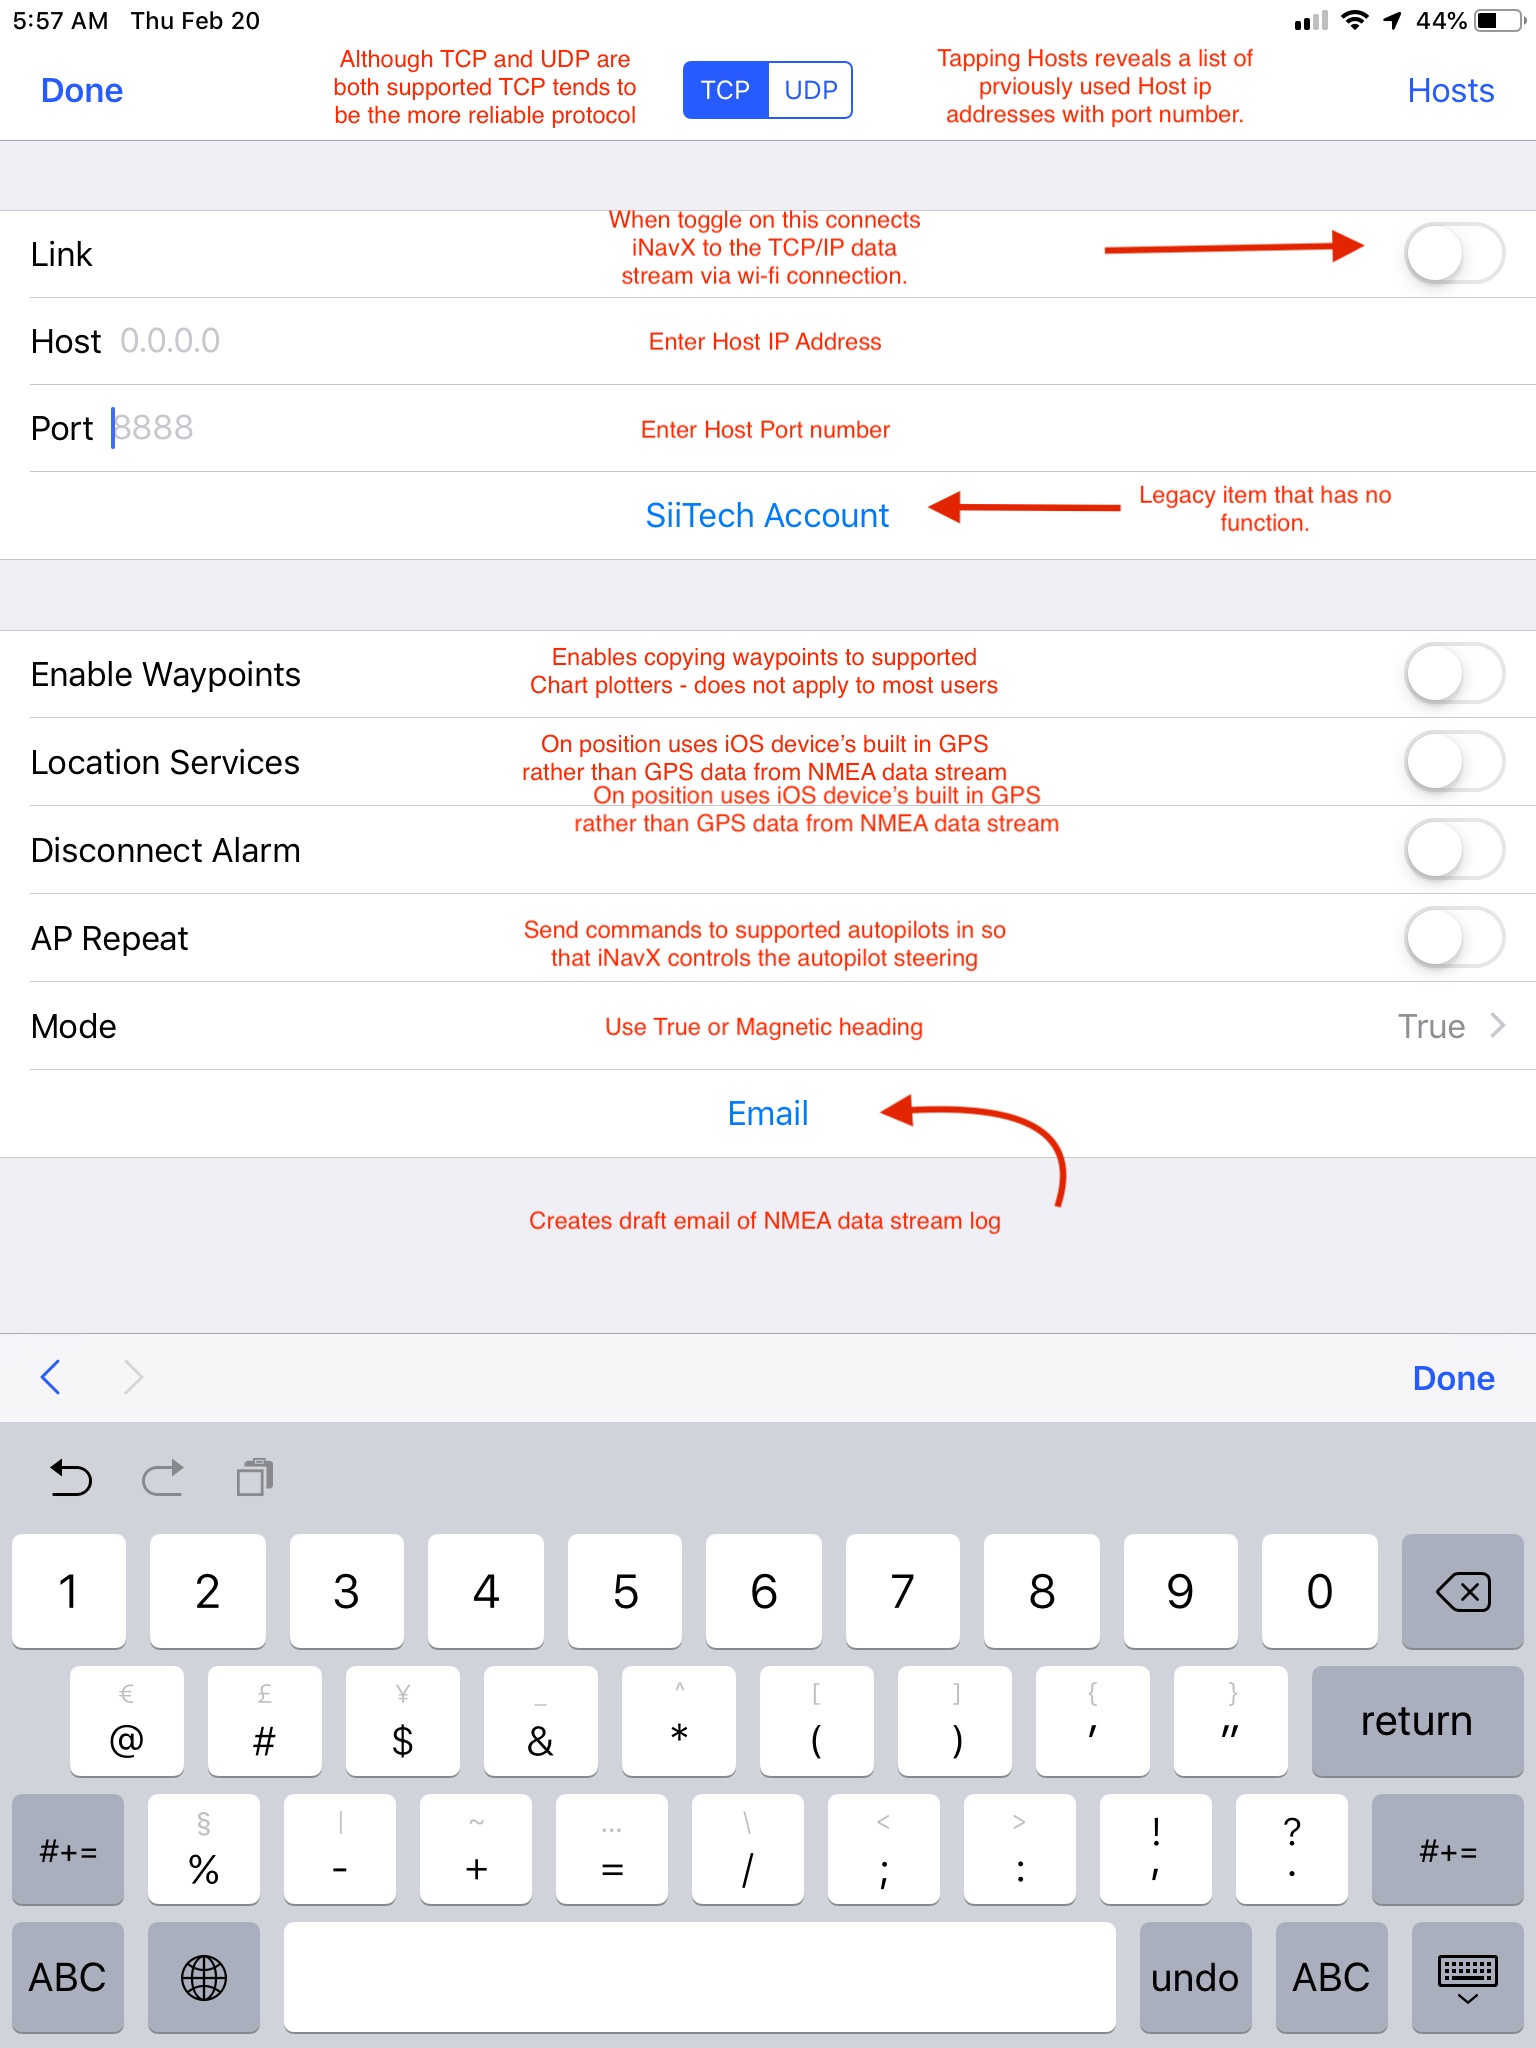
In this section, you can set up the NMEA connection with the following settings:
- Host: 192.168.1.1
- Port: 2000
- Protocol: TCP or UDP (UDP allows you to use 7 devices with the WiFi).
Below is also to set up the different NMEA functionalities such as sending data to an autopilot. Once all configured, toggle the link switch to the On.
Once toggled on there should be NMEA data sentences streaming in the console indicating that iNavX is receiving NMEA data.

2 – AIS Parameters
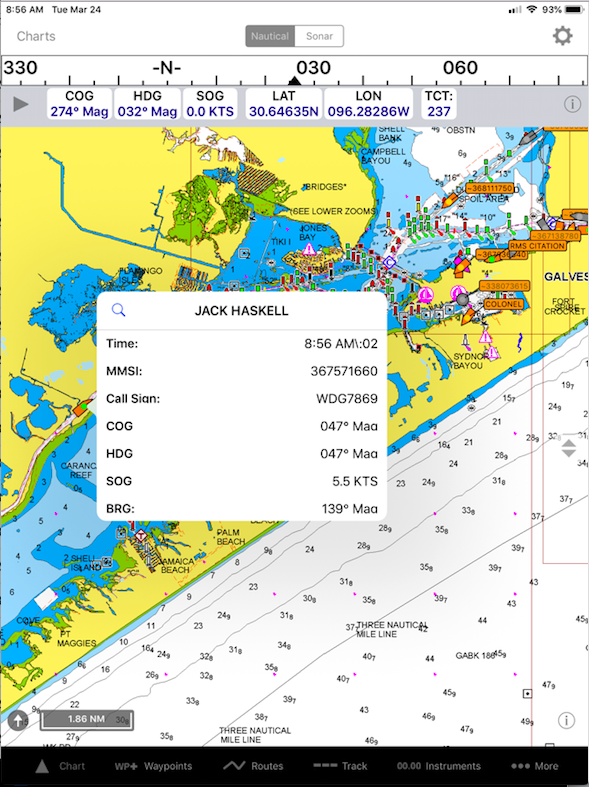
There are settings that can toggle how any AIS targets are displayed on the charts in iNavX on the Chart Settings page. You can access the chart settings page by tapping More in the iNavX toolbar, then Settings in the upper right corner, then Chart on the Settings page. Scroll down to show the 3 different settings for how AIS targets are viewed.

AIS targets appear when viewing a chart. The obvious limitation is the range capability of the AIS device in the onboard network. Also AIS Targets can be viewed as a list on the Targets page by tapping the TCT instrument in the instrument banner. This list can be sorted by Range, CPA and Alpha by tapping the sorting icon in the upper right corner. MMSI numbers will resolve to vessel names after appropriate refresh of data from the station broadcasting the data.
Tapping individual targets by either tapping the icon on a chart or by tapping it in the list will open an information window about the specific target. Tapping the magnifying glass icon will highlight the target so that it can be more easily followed when in chart view.
You can also configure AIS alarm. The setting is on the More page found by tapping the More item in the iNavX toolbar.
IRegatta (iOS)
IRegatta (iOS)
To receive NMEA data in iRegatta, the app has the settings in the iOS settings app.
Go in your iPhone/iPad settings menu and scroll down to the iRegatta app. Then, you need to scroll down to the “WIFI NMEA” section.
Turn on “WiFi instrument data”, and fill in the IP address: 192.168.1.1, port: 2000 and choose UDP for TCP/UDP.
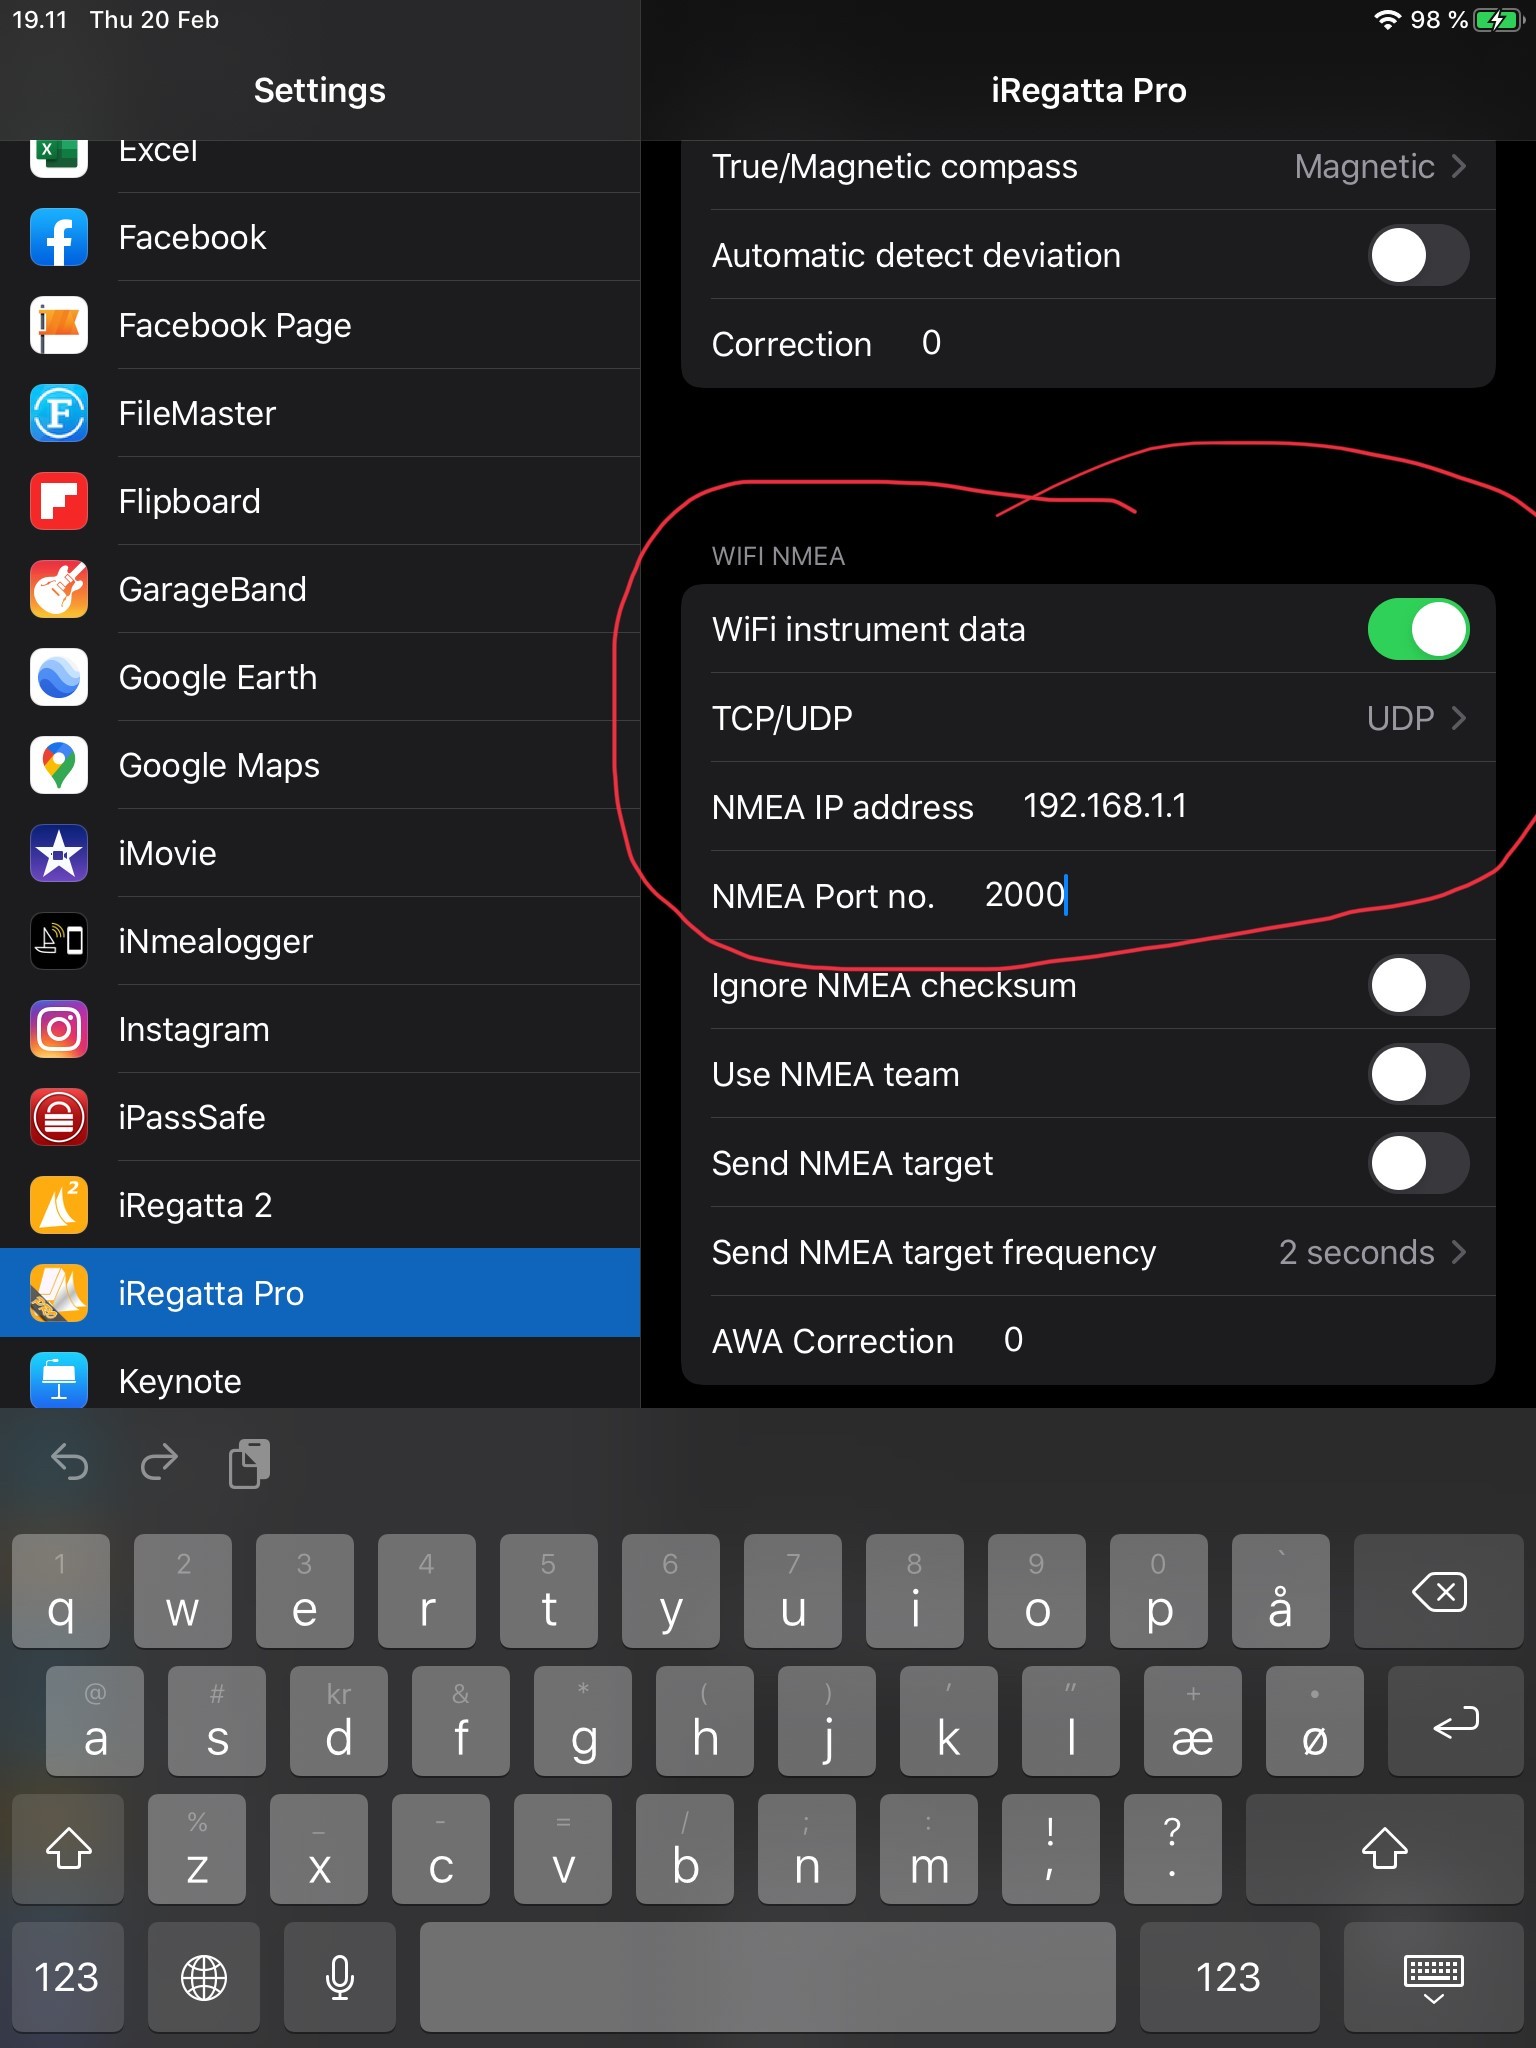
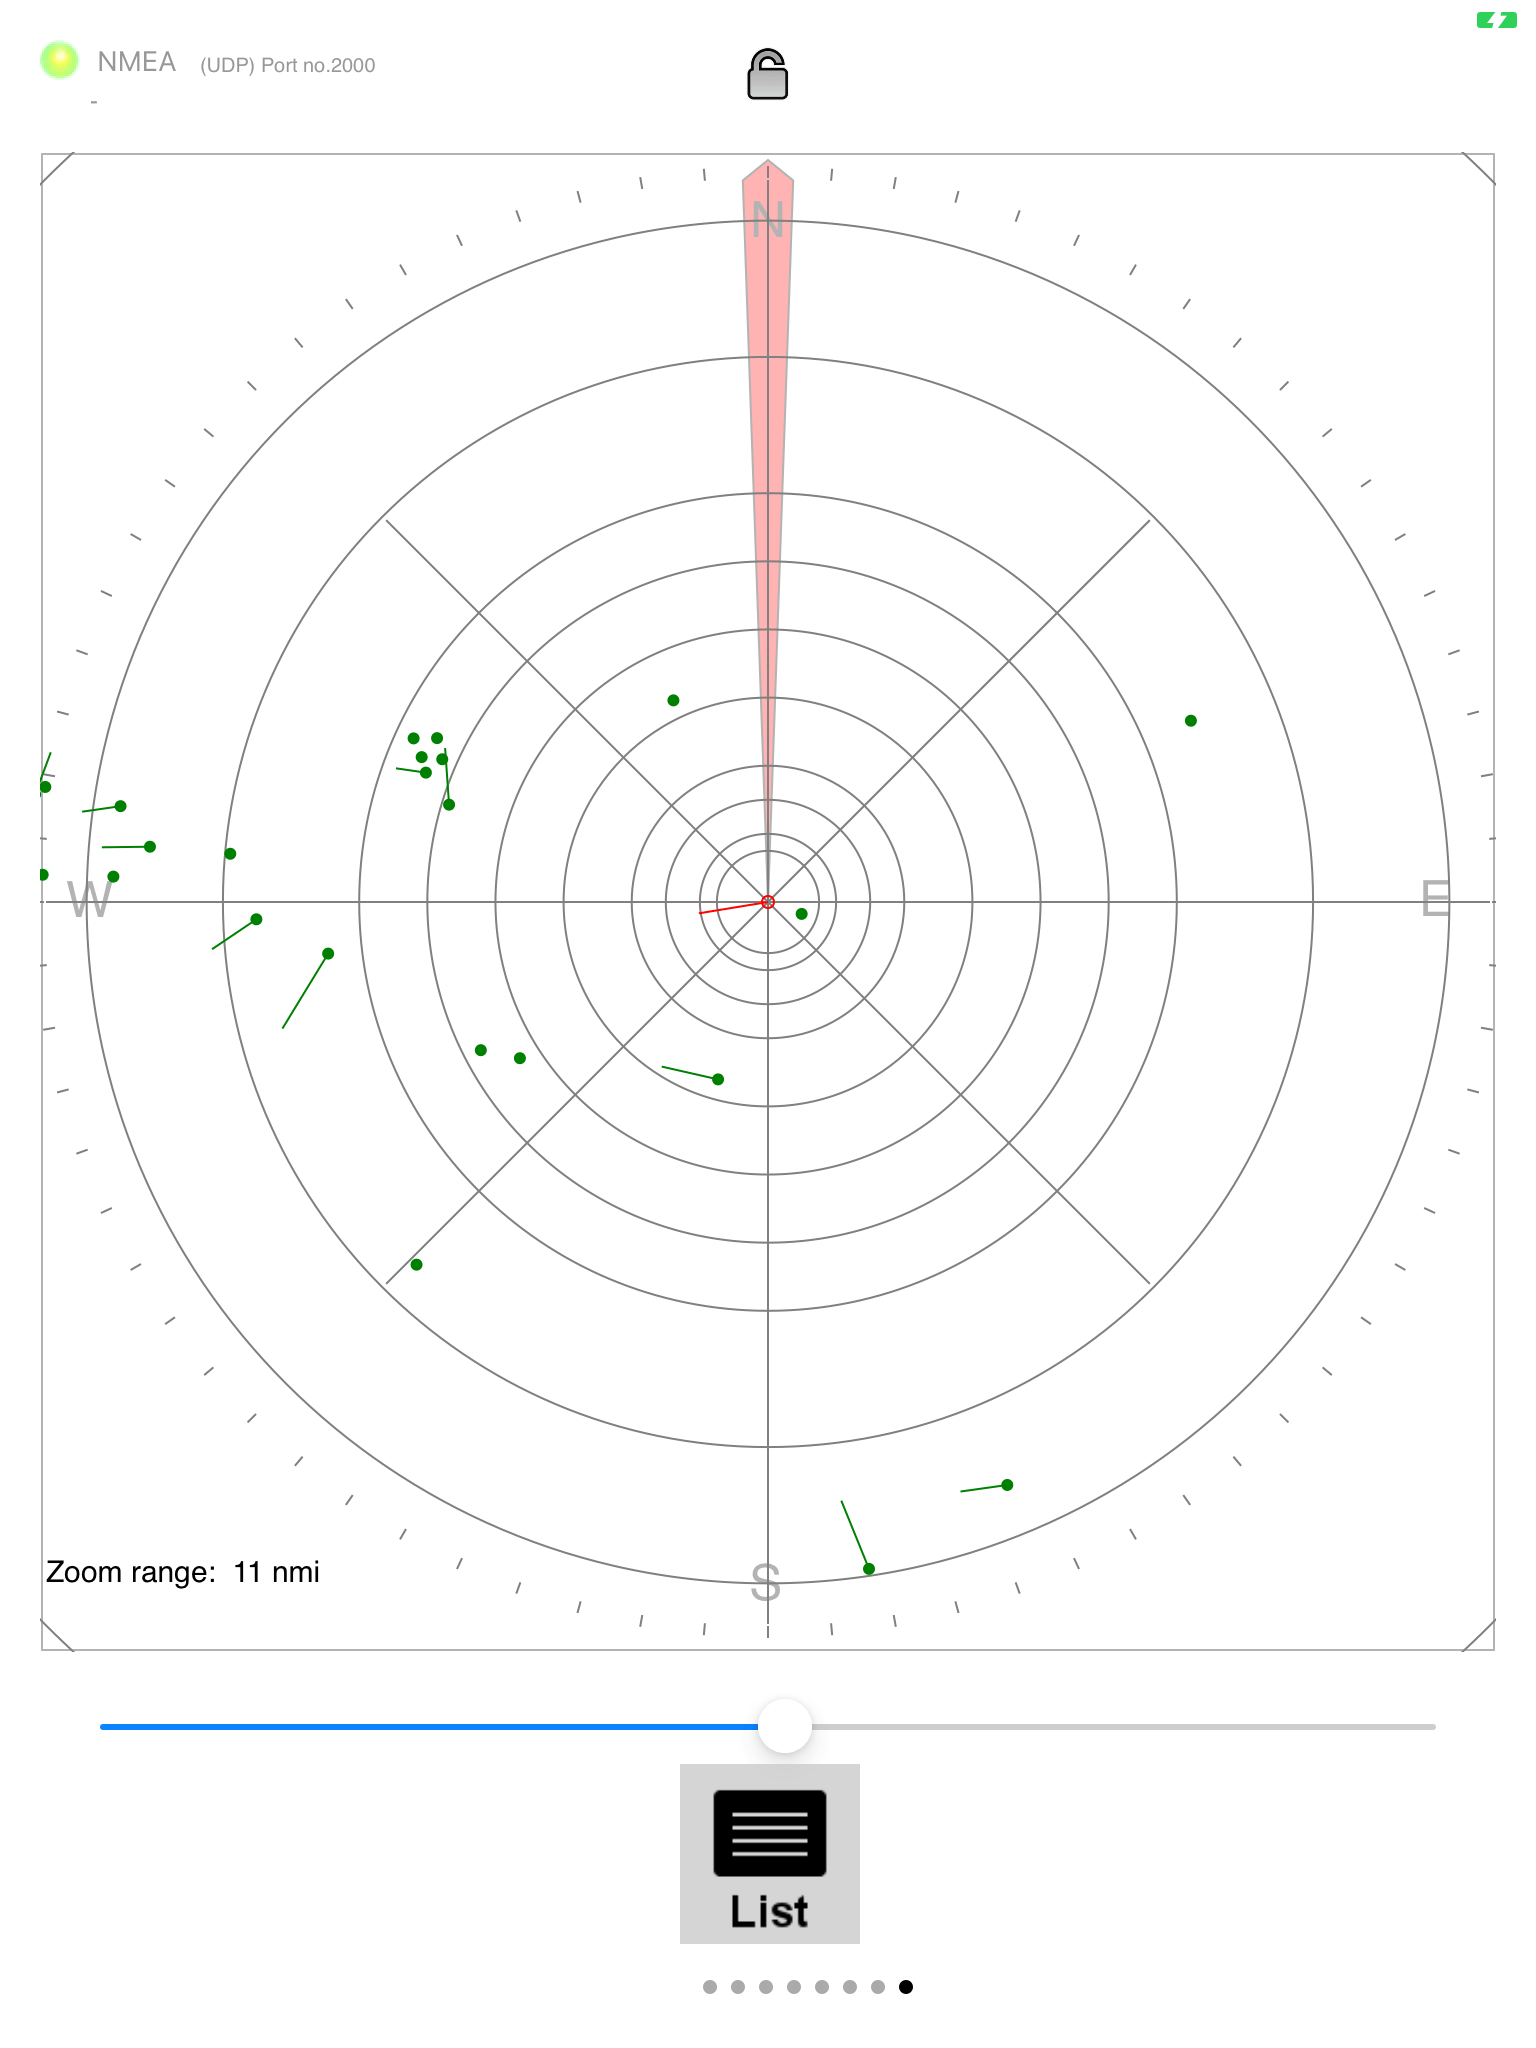
Showing AIS in iRegatta require an in-app-purchase. AIS will be shown as a radar view.
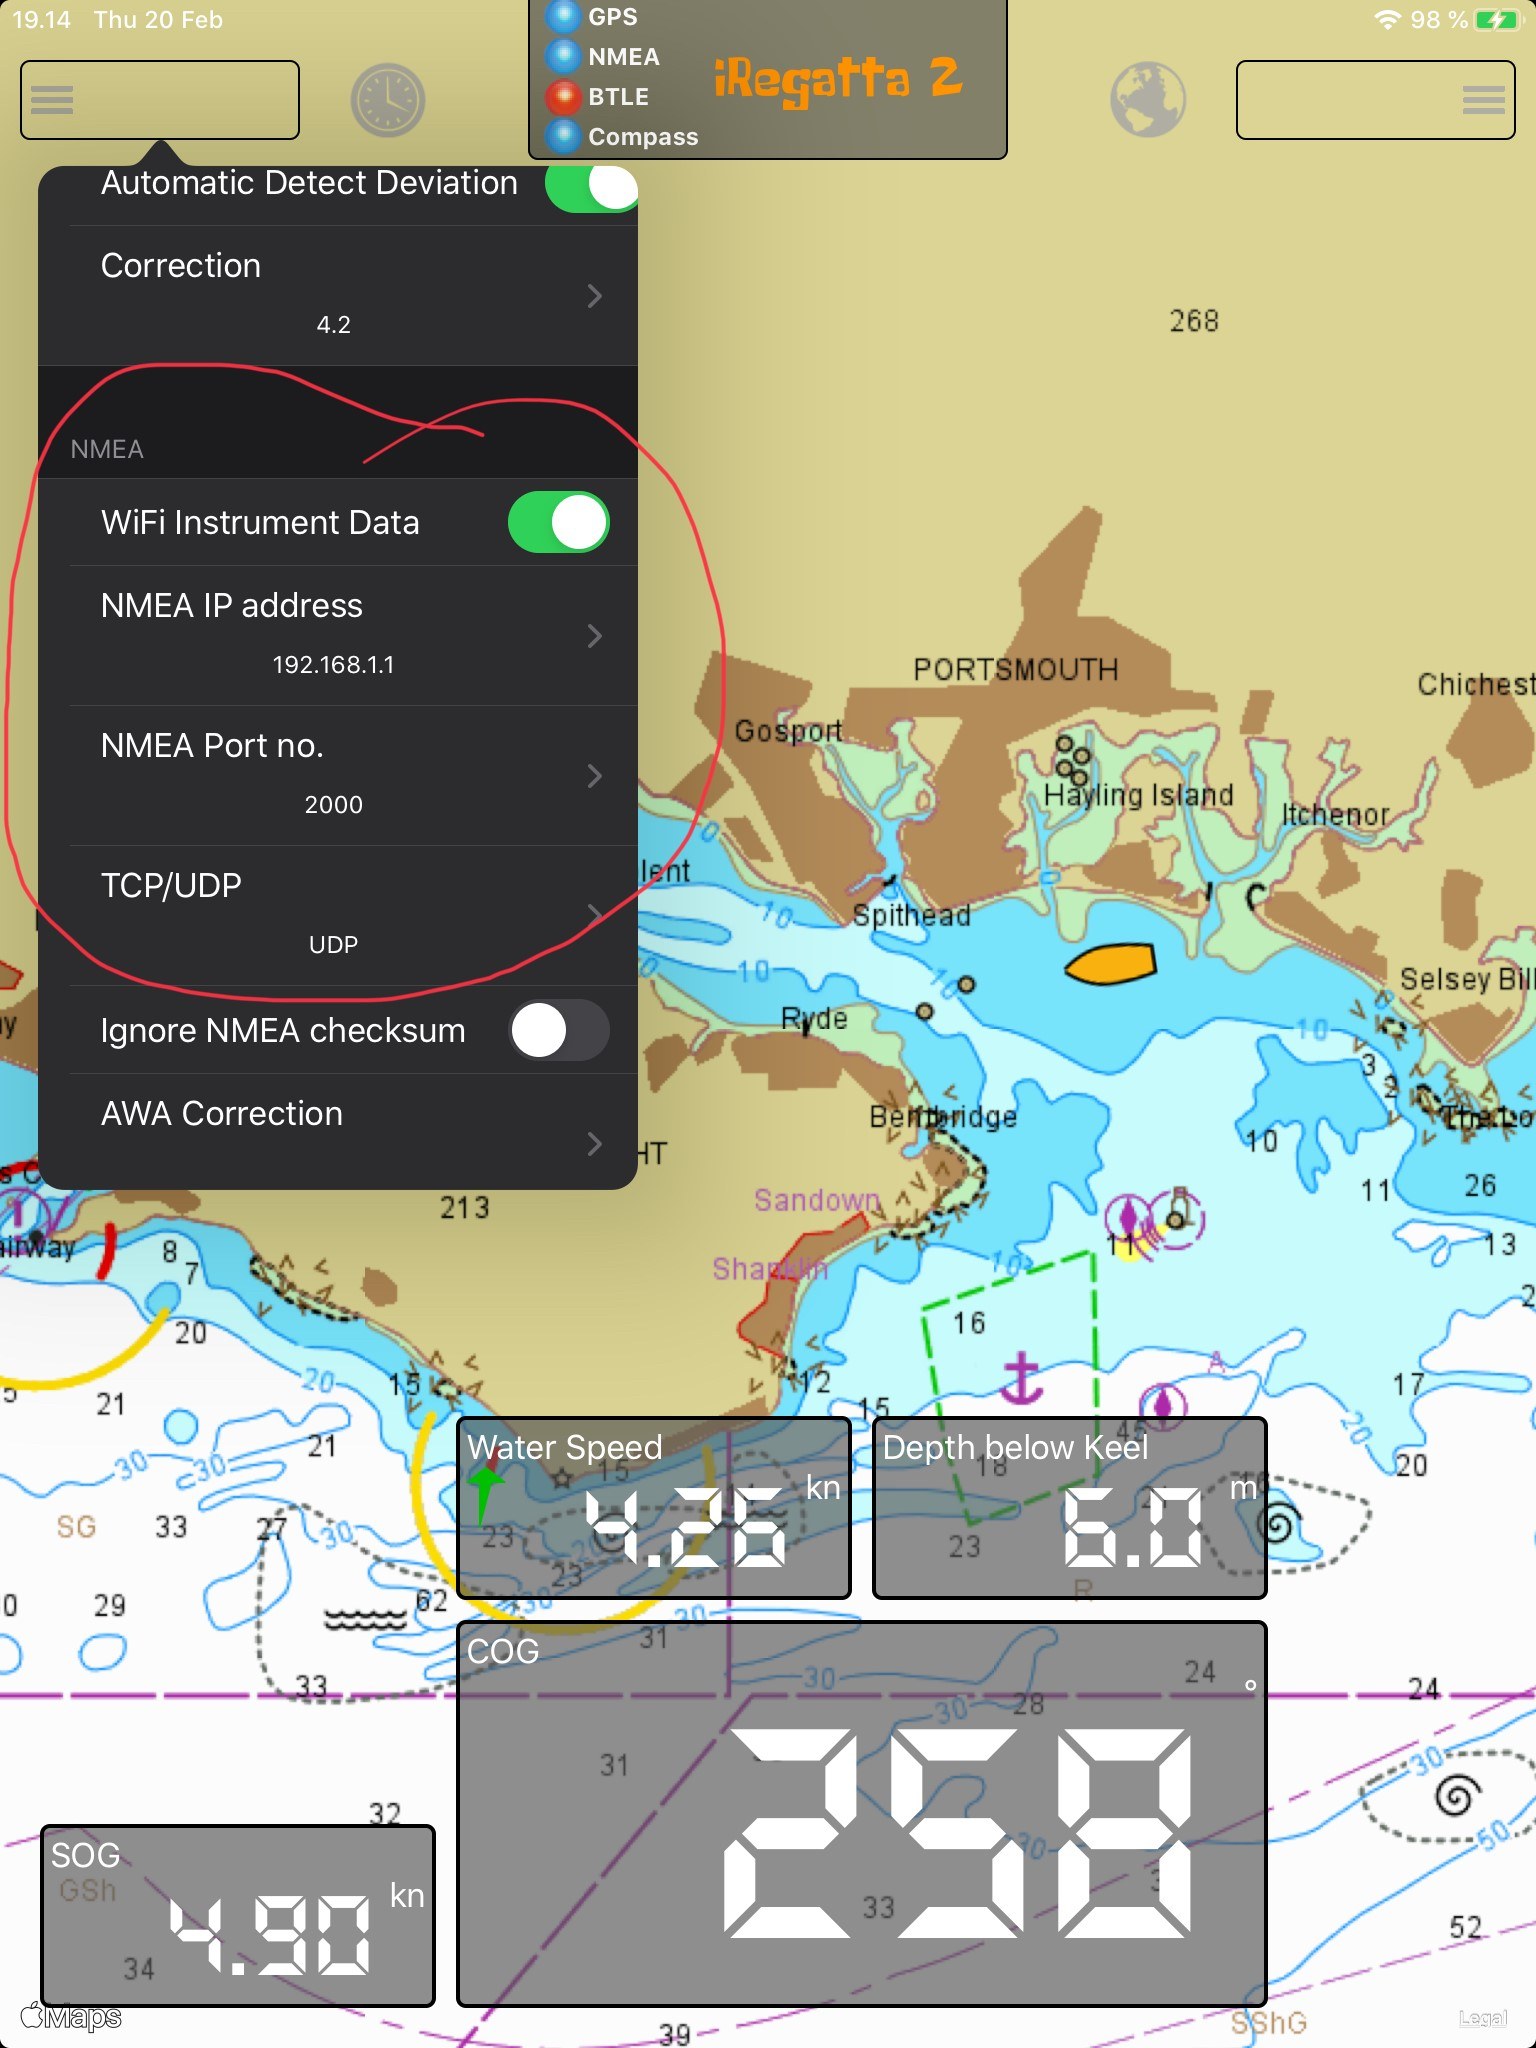
iRegatta 2 (iOS)
To receive NMEA data in iRegatta 2, the settings are inside the app.
Tap the menu button in the upper left corner.
Then, you need to select “Settings” in the menu.
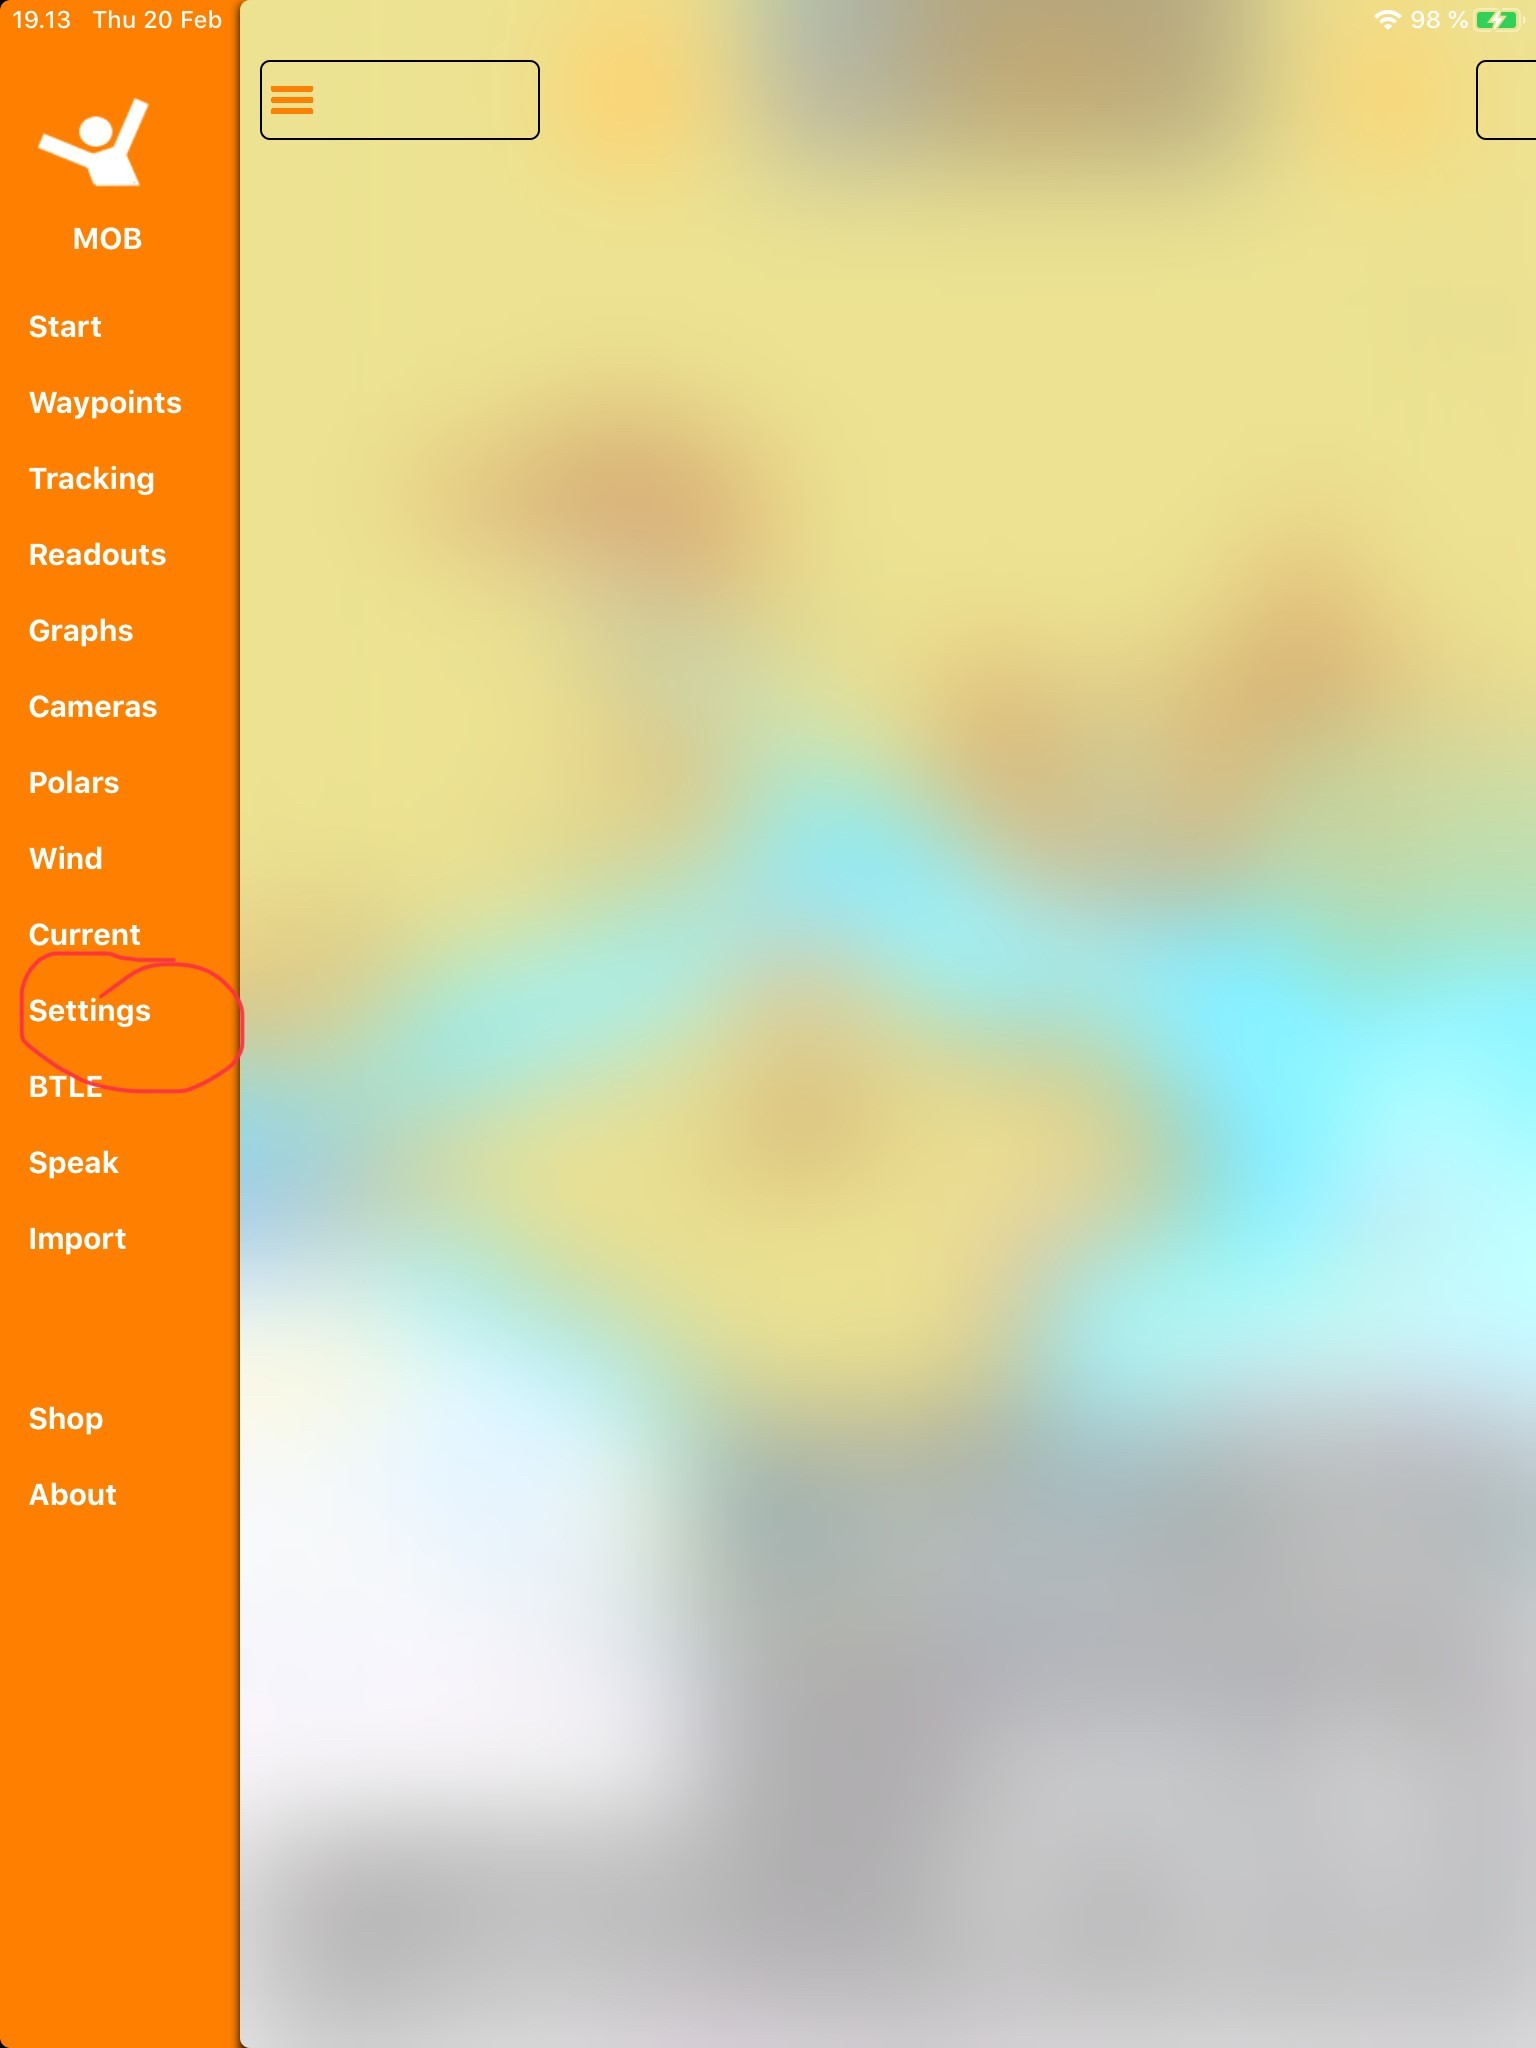
Then, scroll down and Enable the button next to WiFi Instrument data and enter the following:
NMEA IP address: 192.168.1.1
NMEA Port no.: 2000
TCP/UDP: UDP
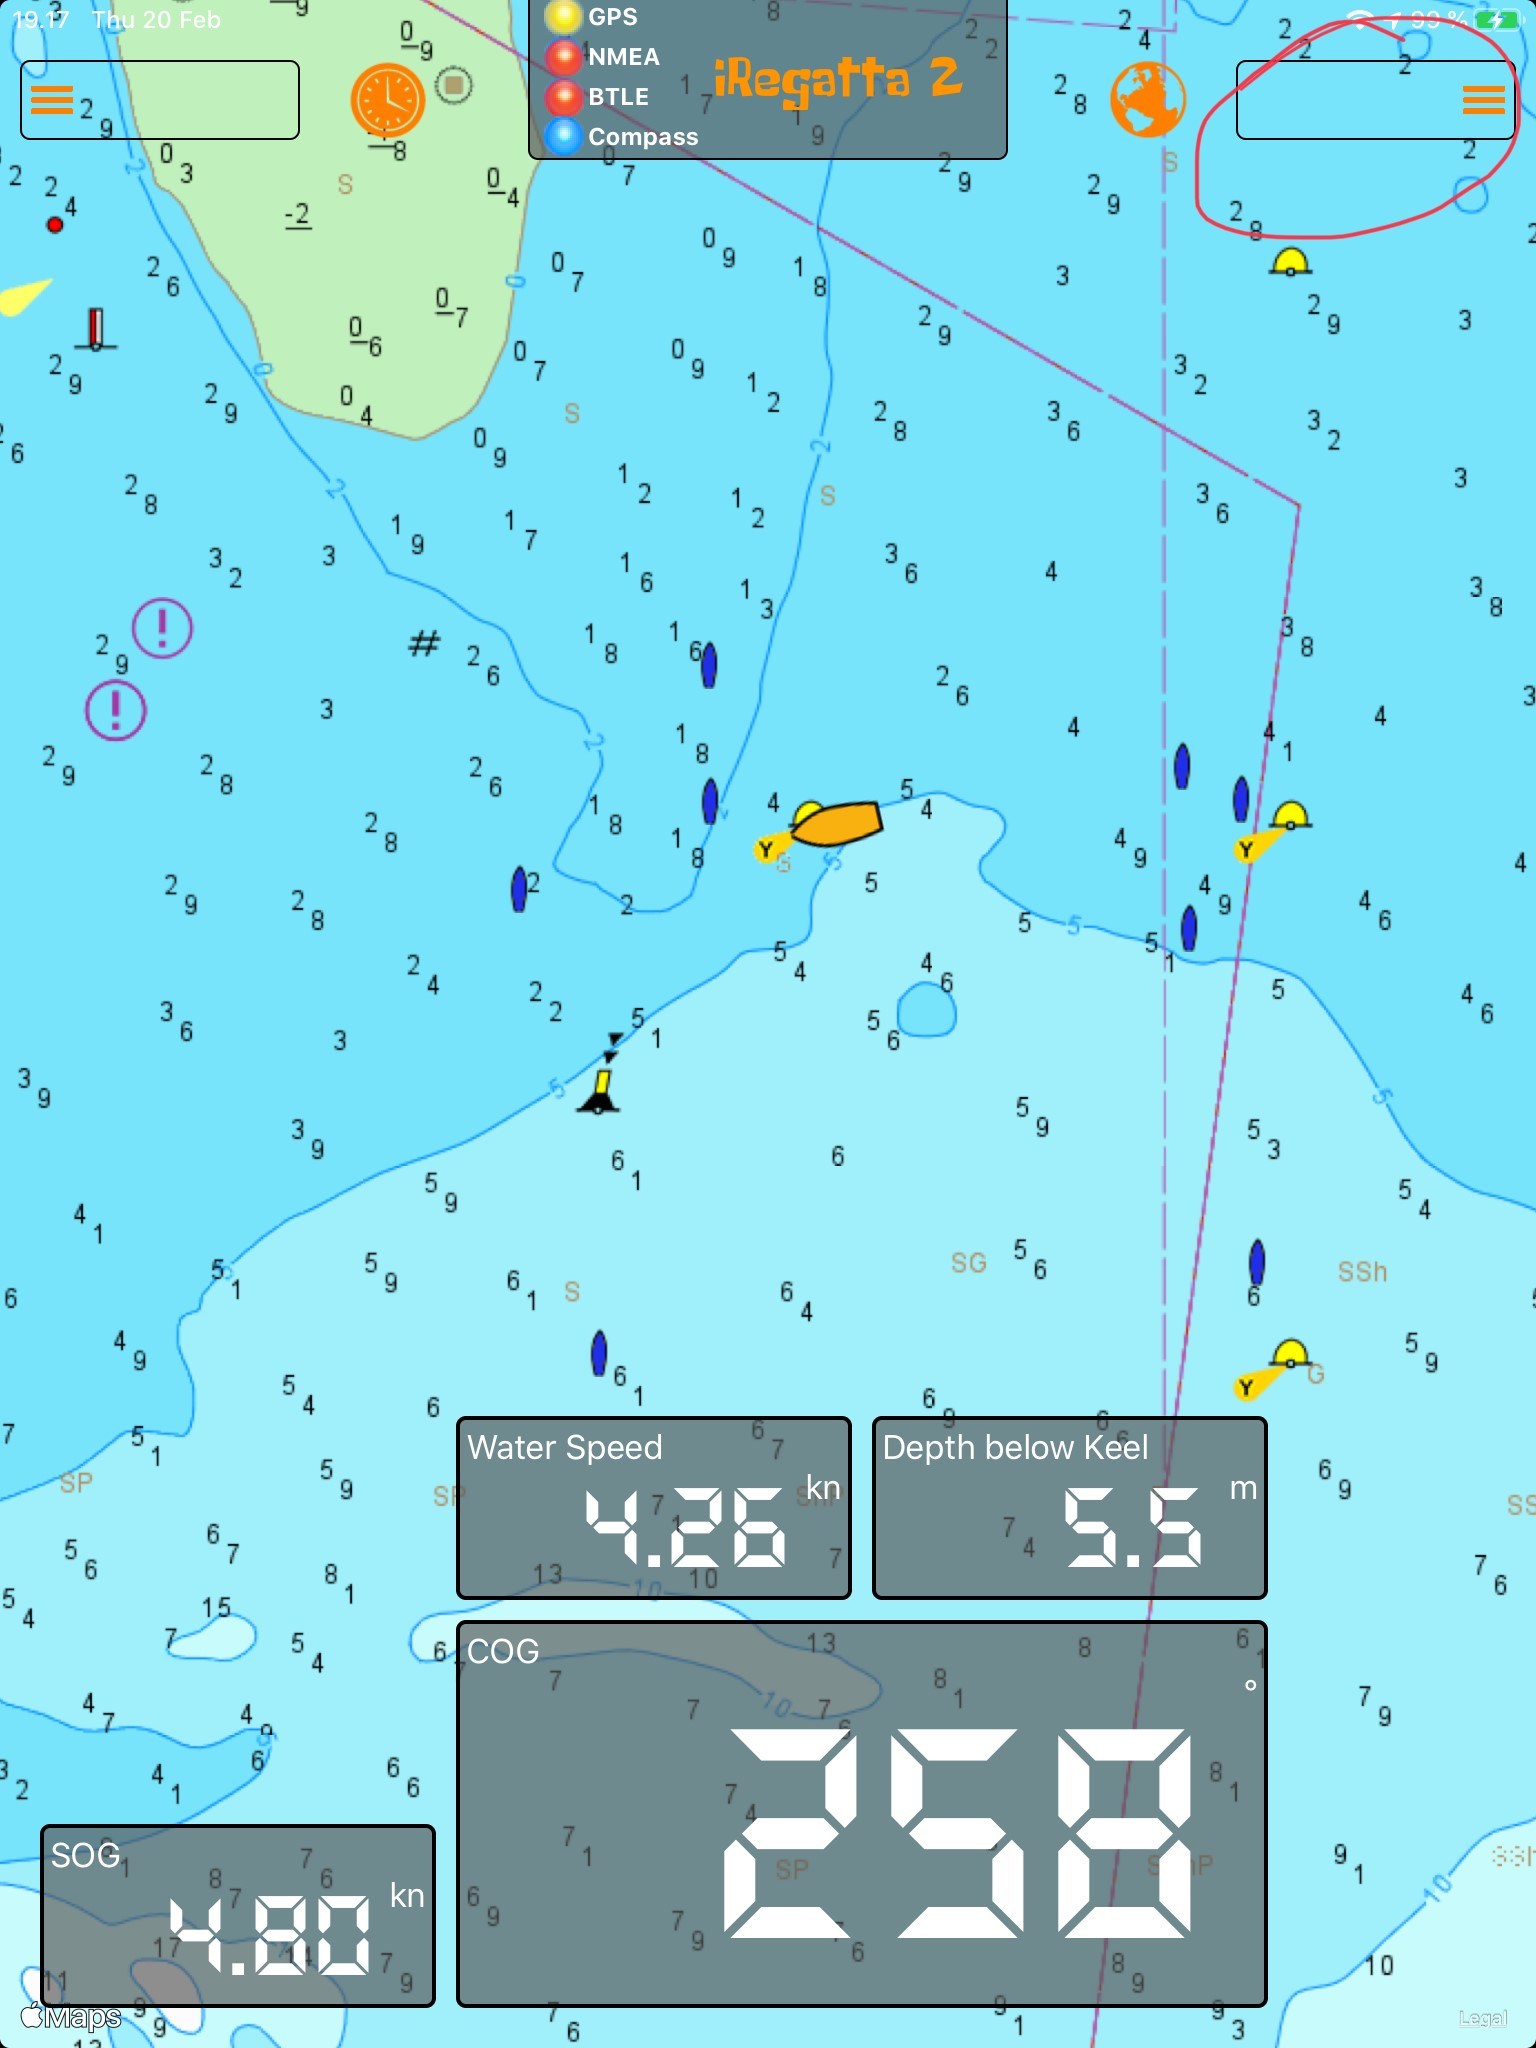
If you have an AIS receiver/transponder with built-in WiFi or an NMEA to WiFi server connected to an AIS, you can overlay AIS targets on the iRegatta app.
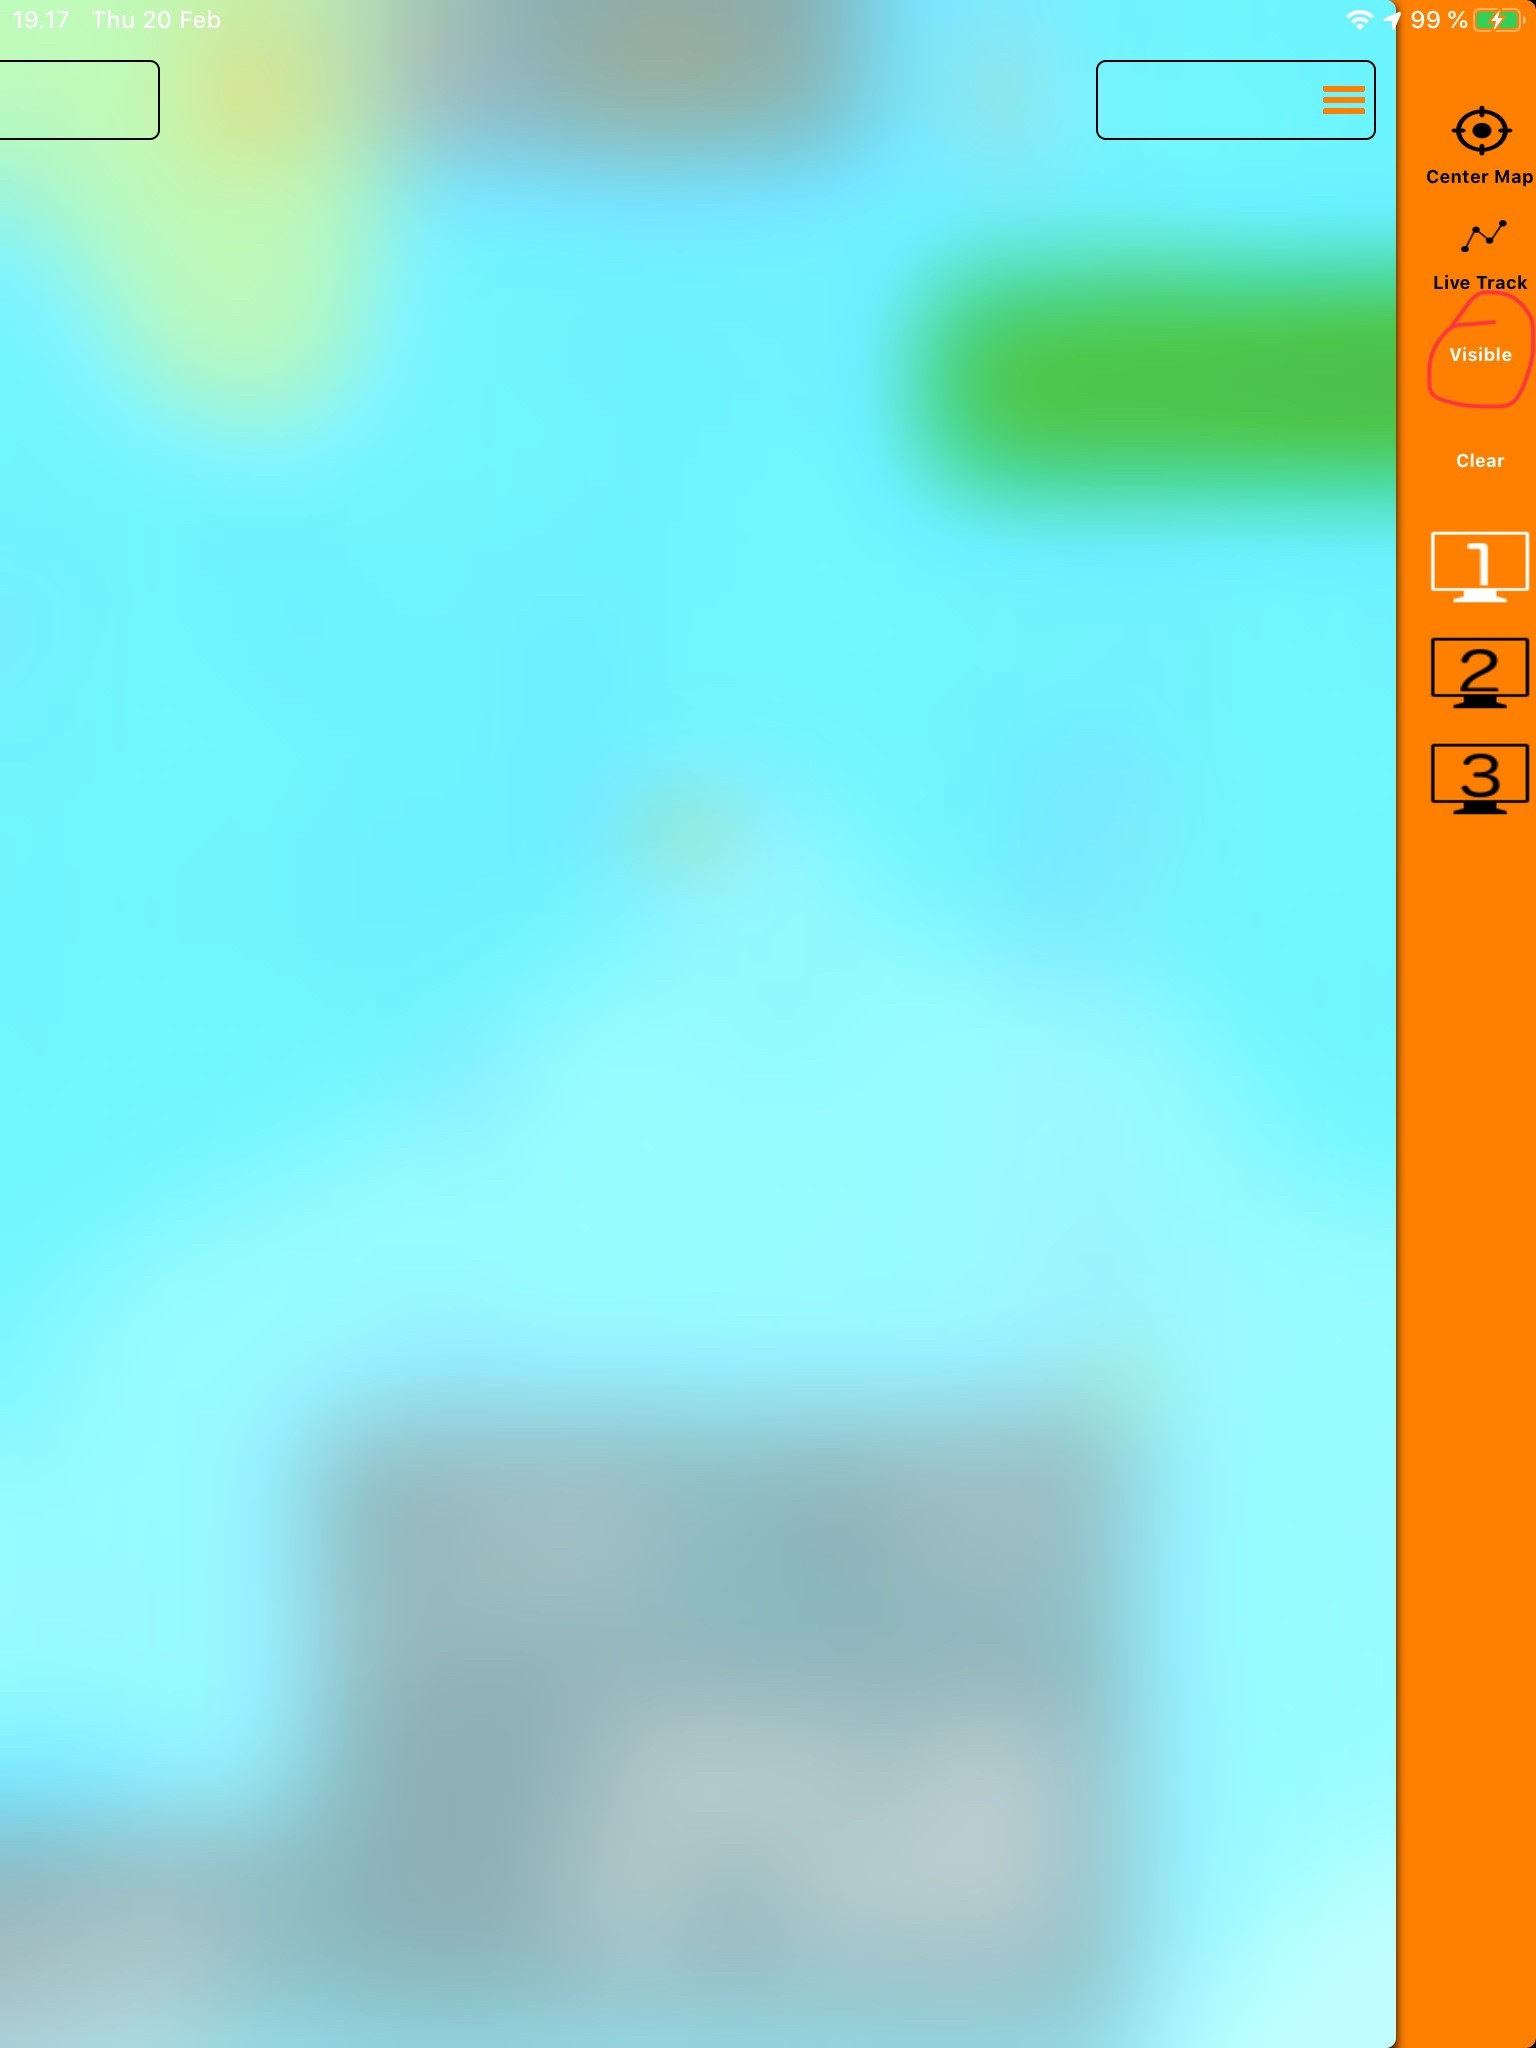
You need to open the right menu.
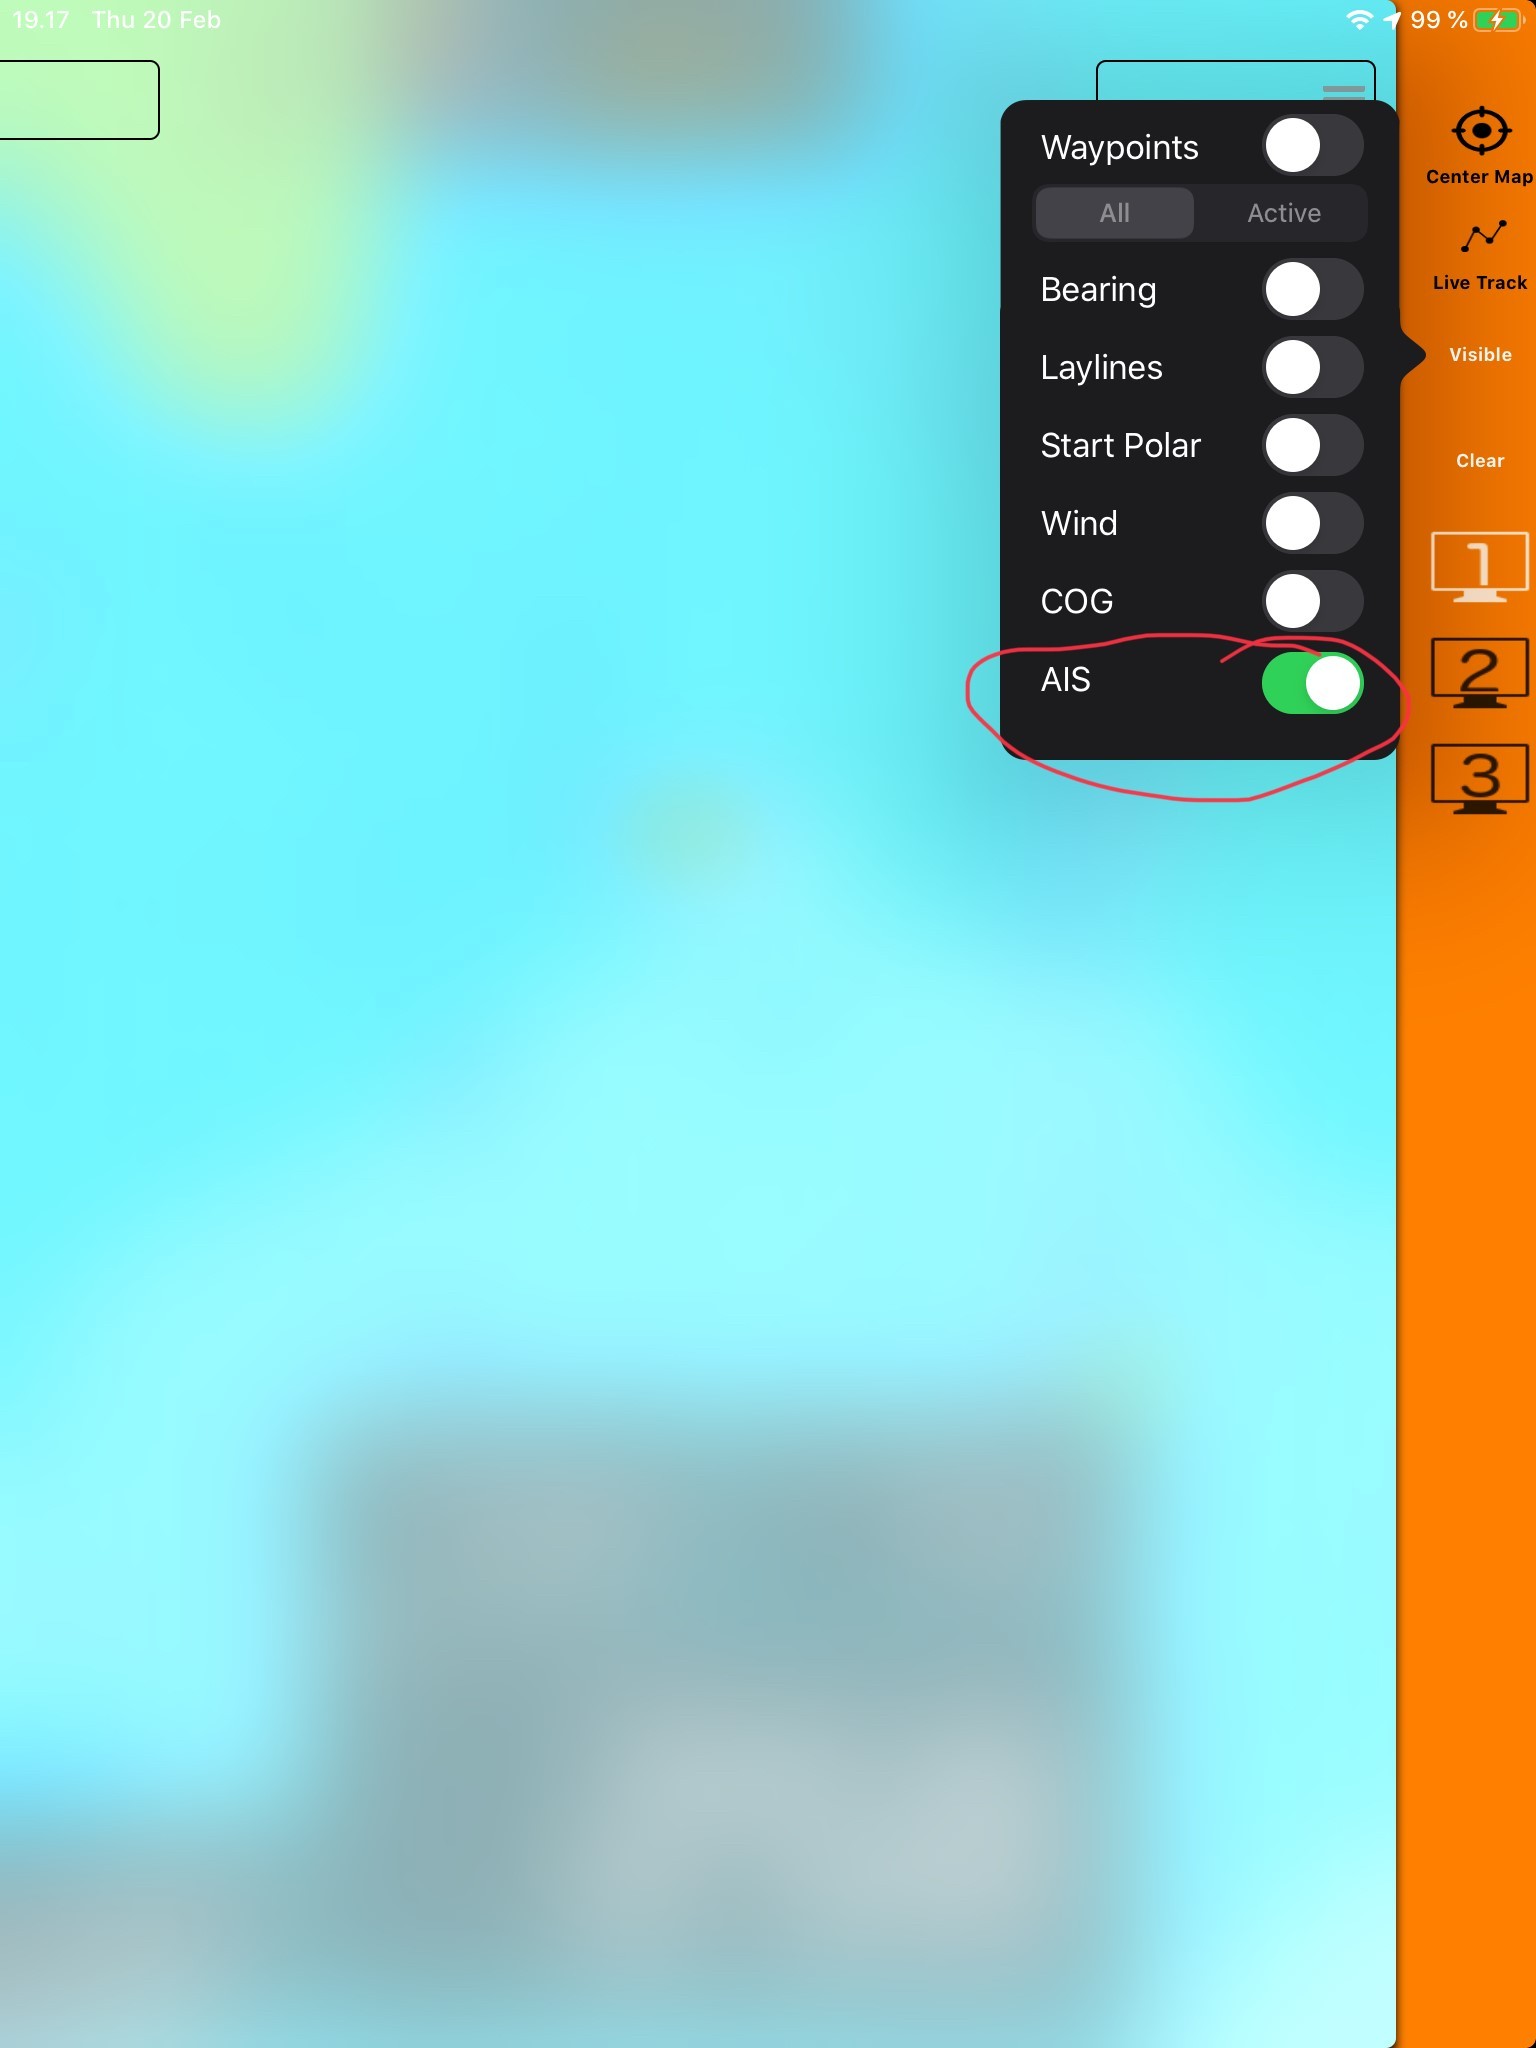
Select “visibility”
Then turn on AIS.
iSailor
Here is the instruction, how to connect the external Wi-Fi AIS or NMEA to WiFi servers to the iSailor app:
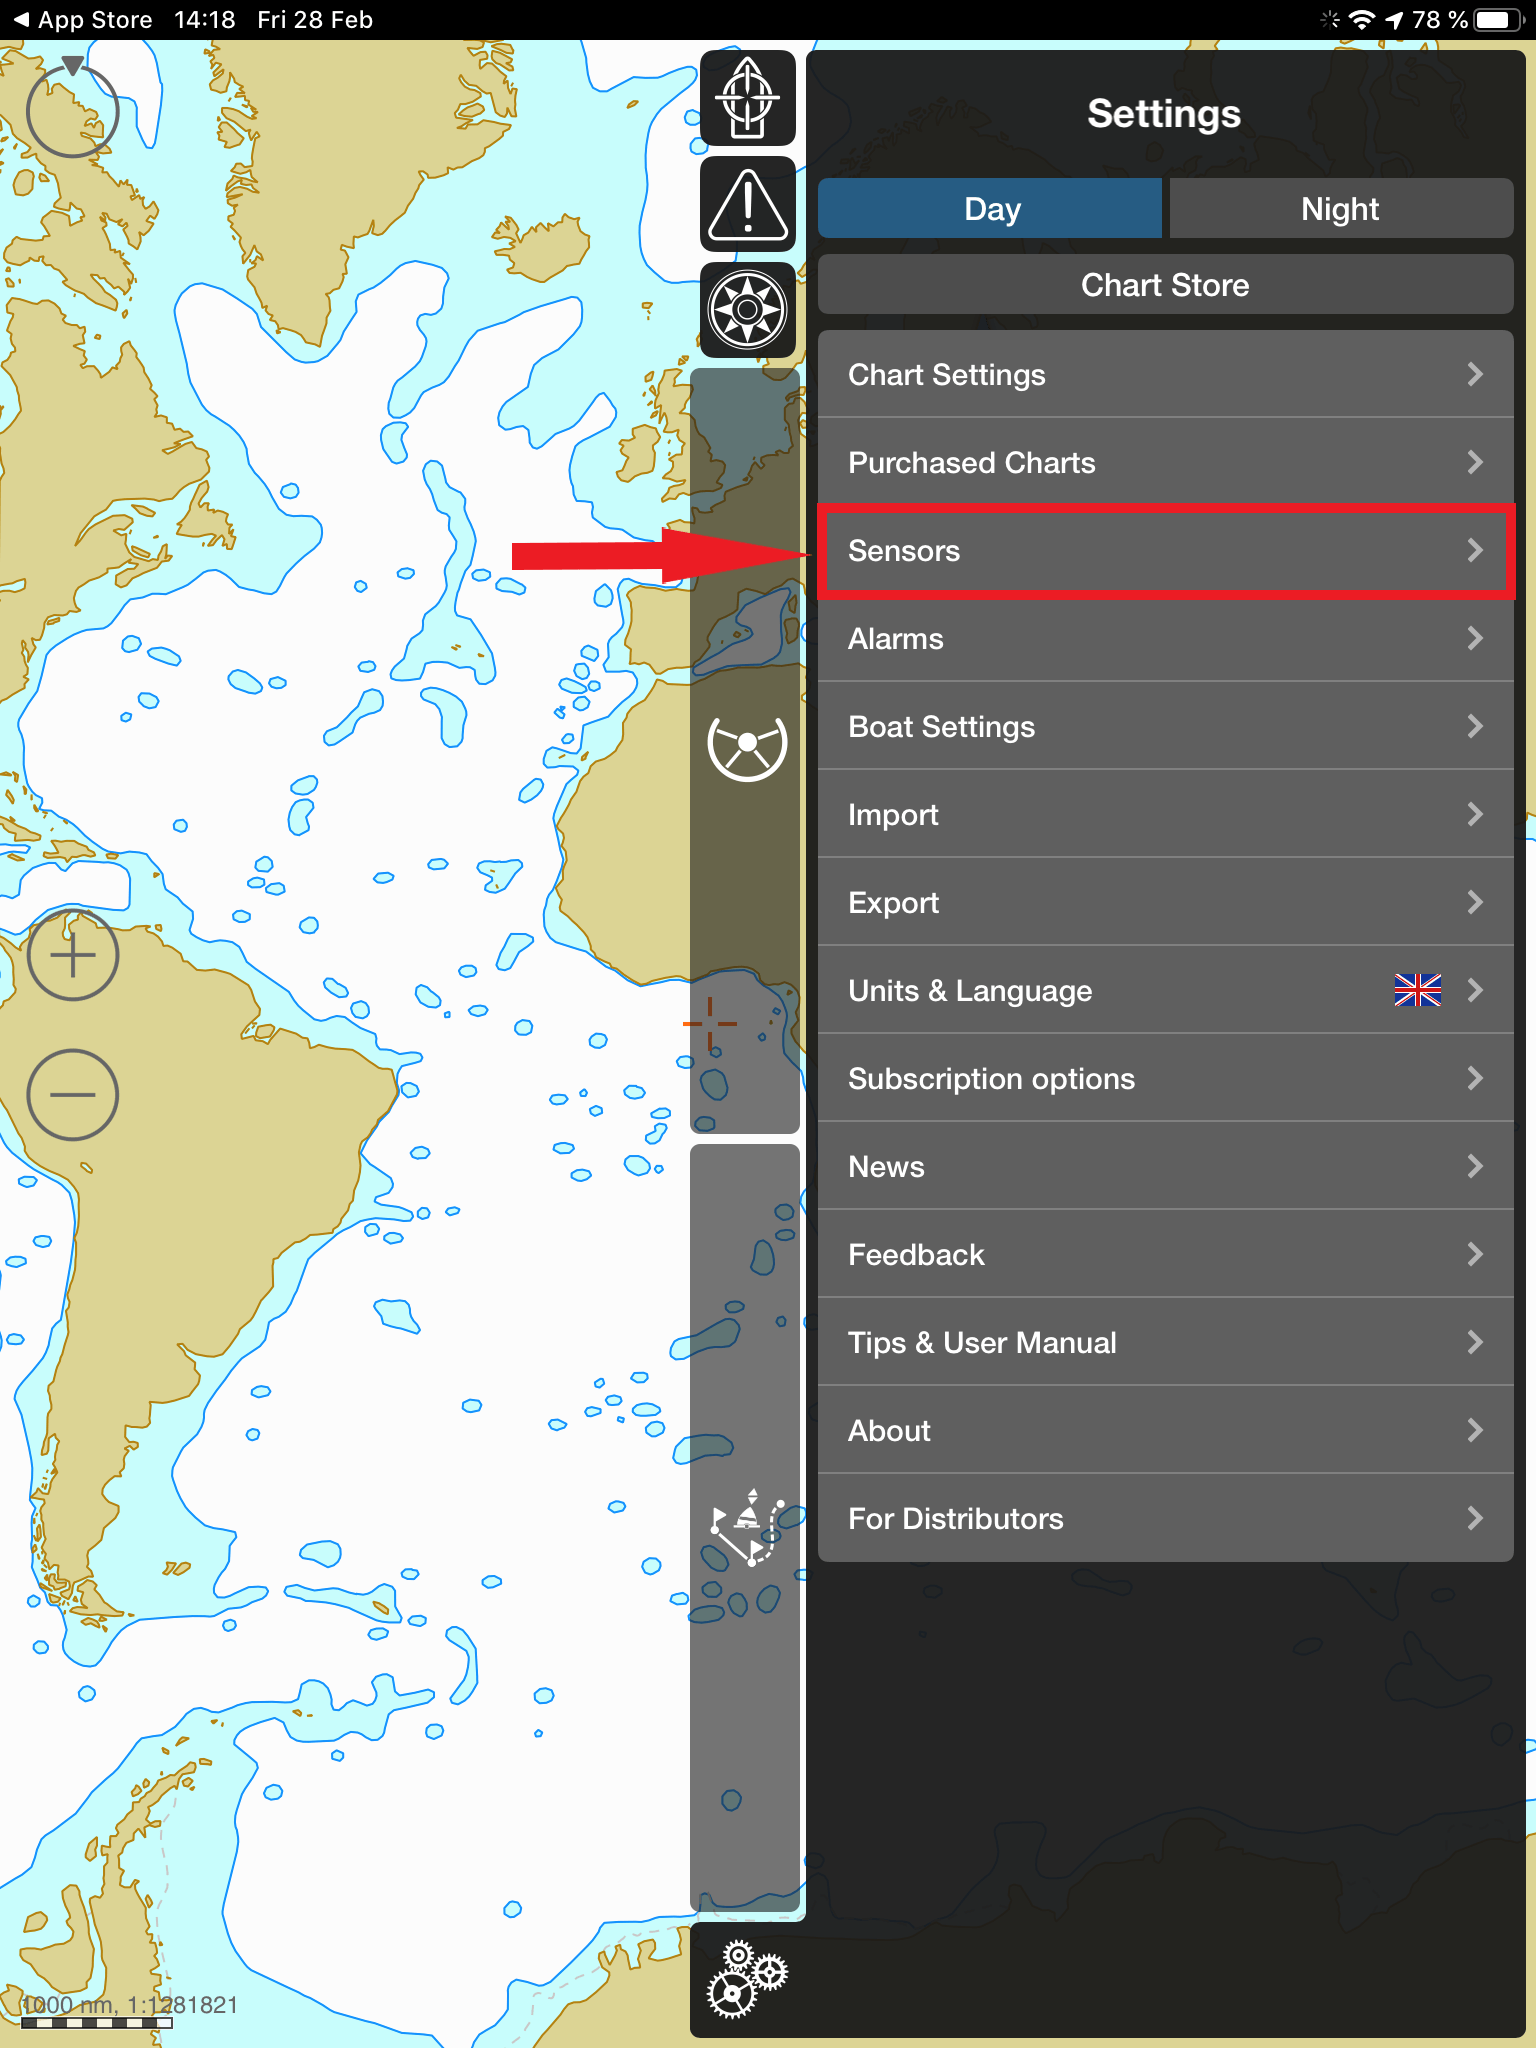
Run the iSailor app and tap on the “Settings” tab. The Settings menu is needed to adjust user settings, purchase, restore charts and for other functions.
Tap the “Sensors” menu item
In that menu, there are some in-app purchases. The NMEA section is needed for filtering purposes of the incoming NMEA data. The AIS section is needed for operation with AIS targets. Tap on the section you require and choose the options you need if you have not already purchased those options. If you have already purchased those options then go to the next section:
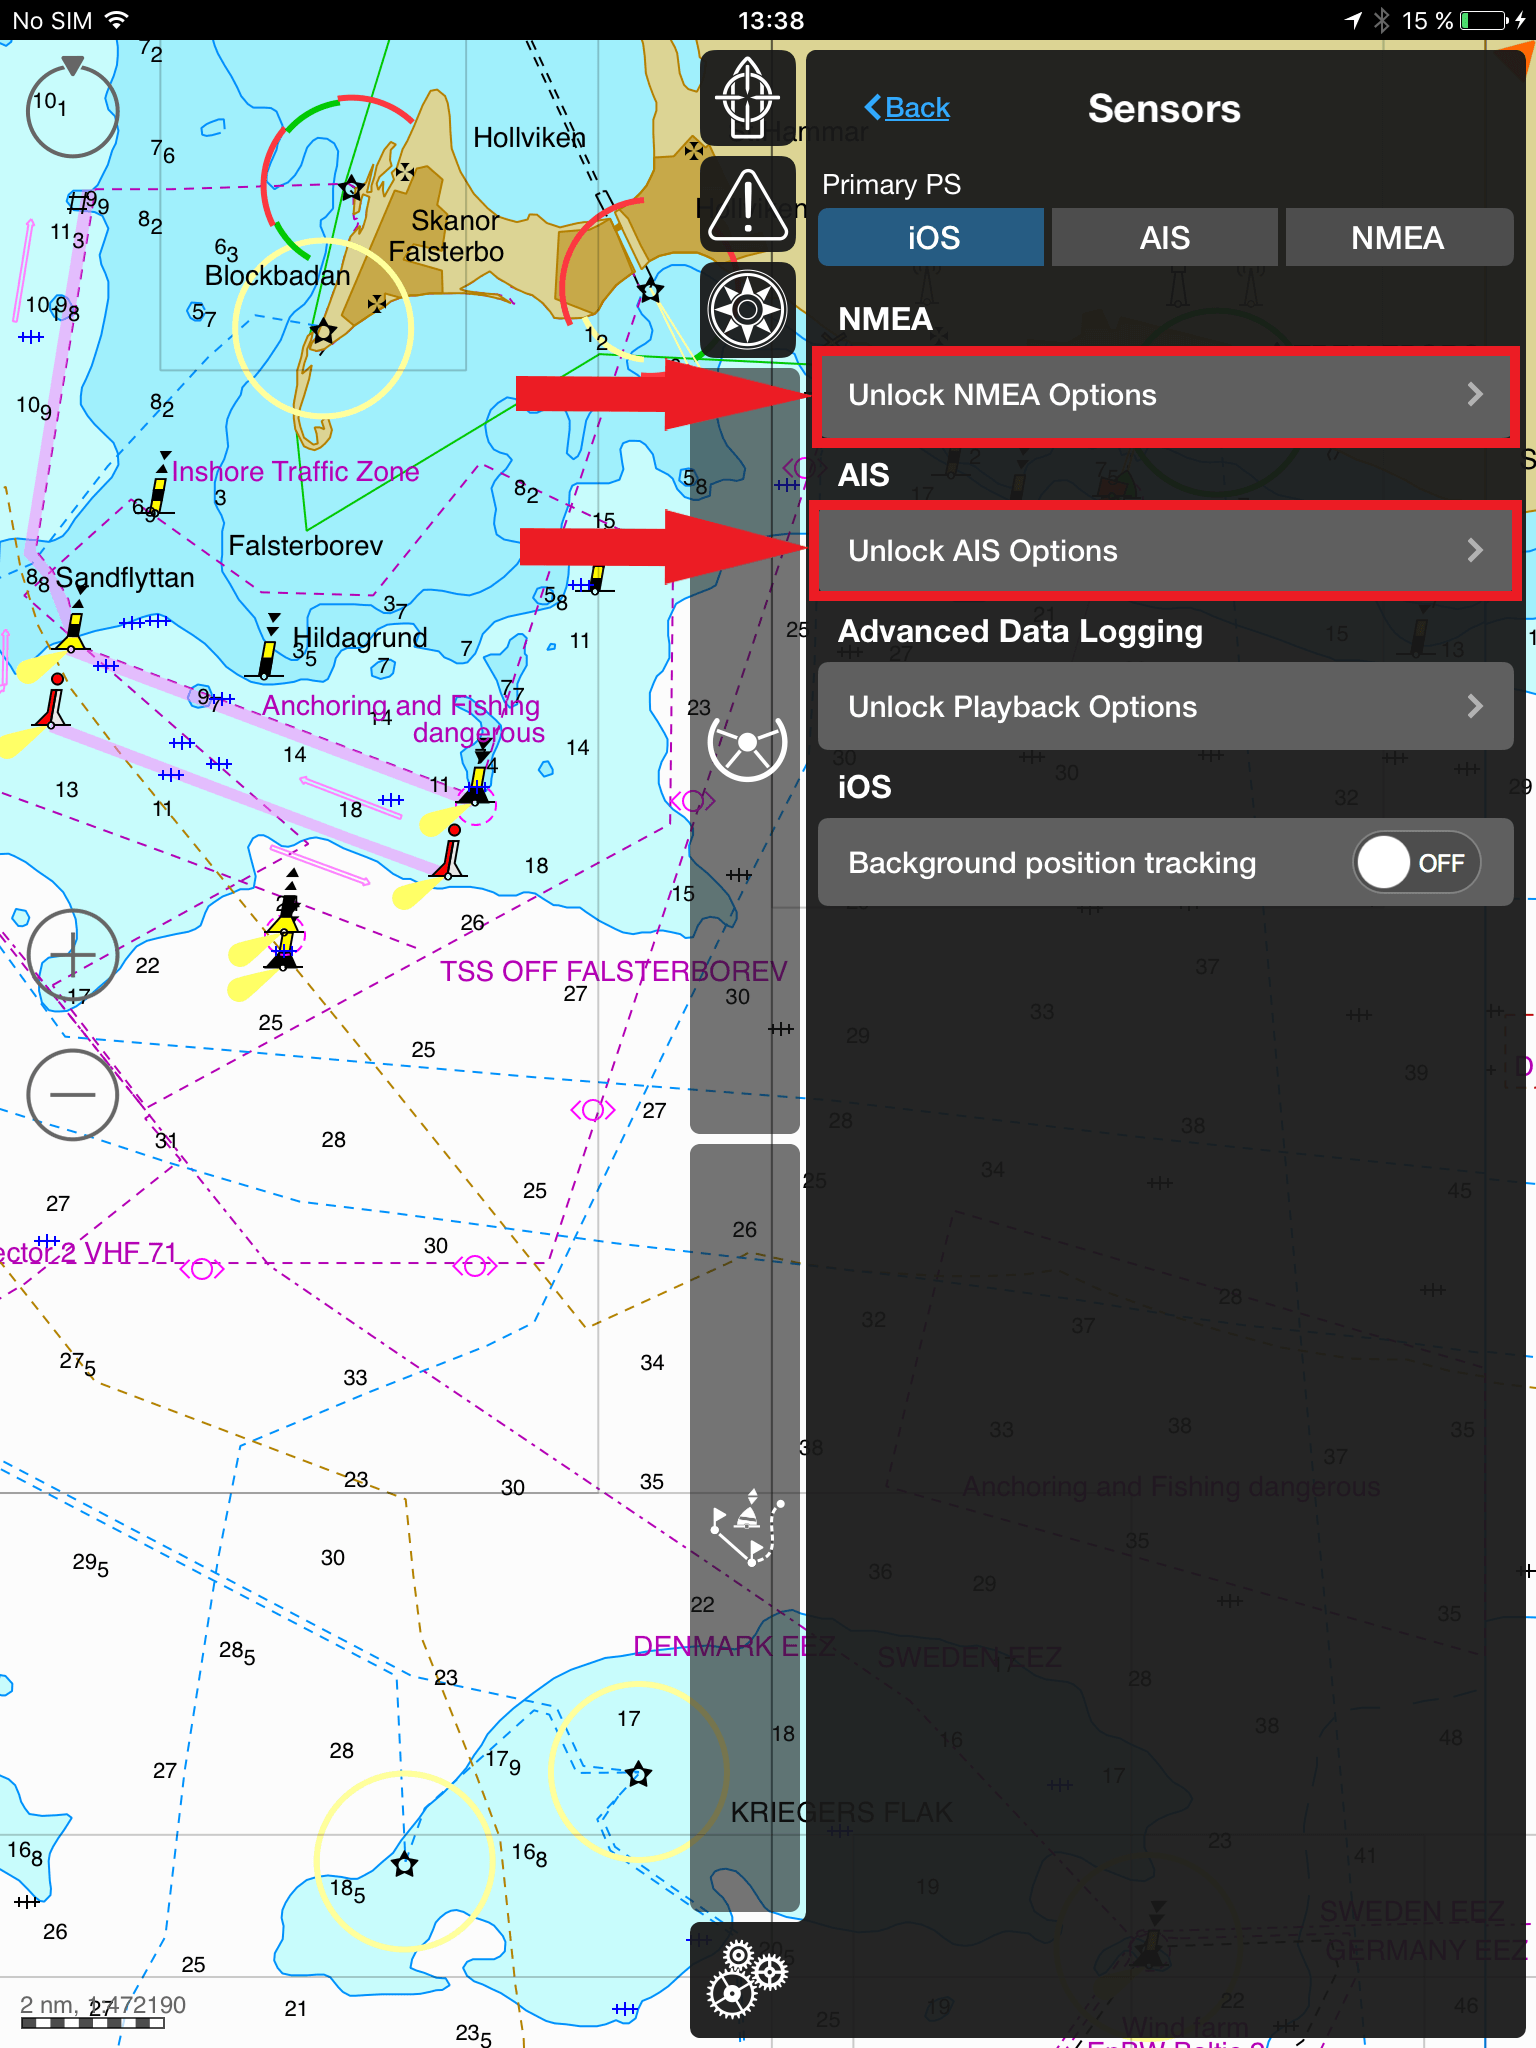
Once you have purchased the right options, go back to the “Sensors” tab -> you will see the advanced settings appears (according to the purchased options).
Tap on the “Connection Settings” on the “AIS & NMEA Connections” section.
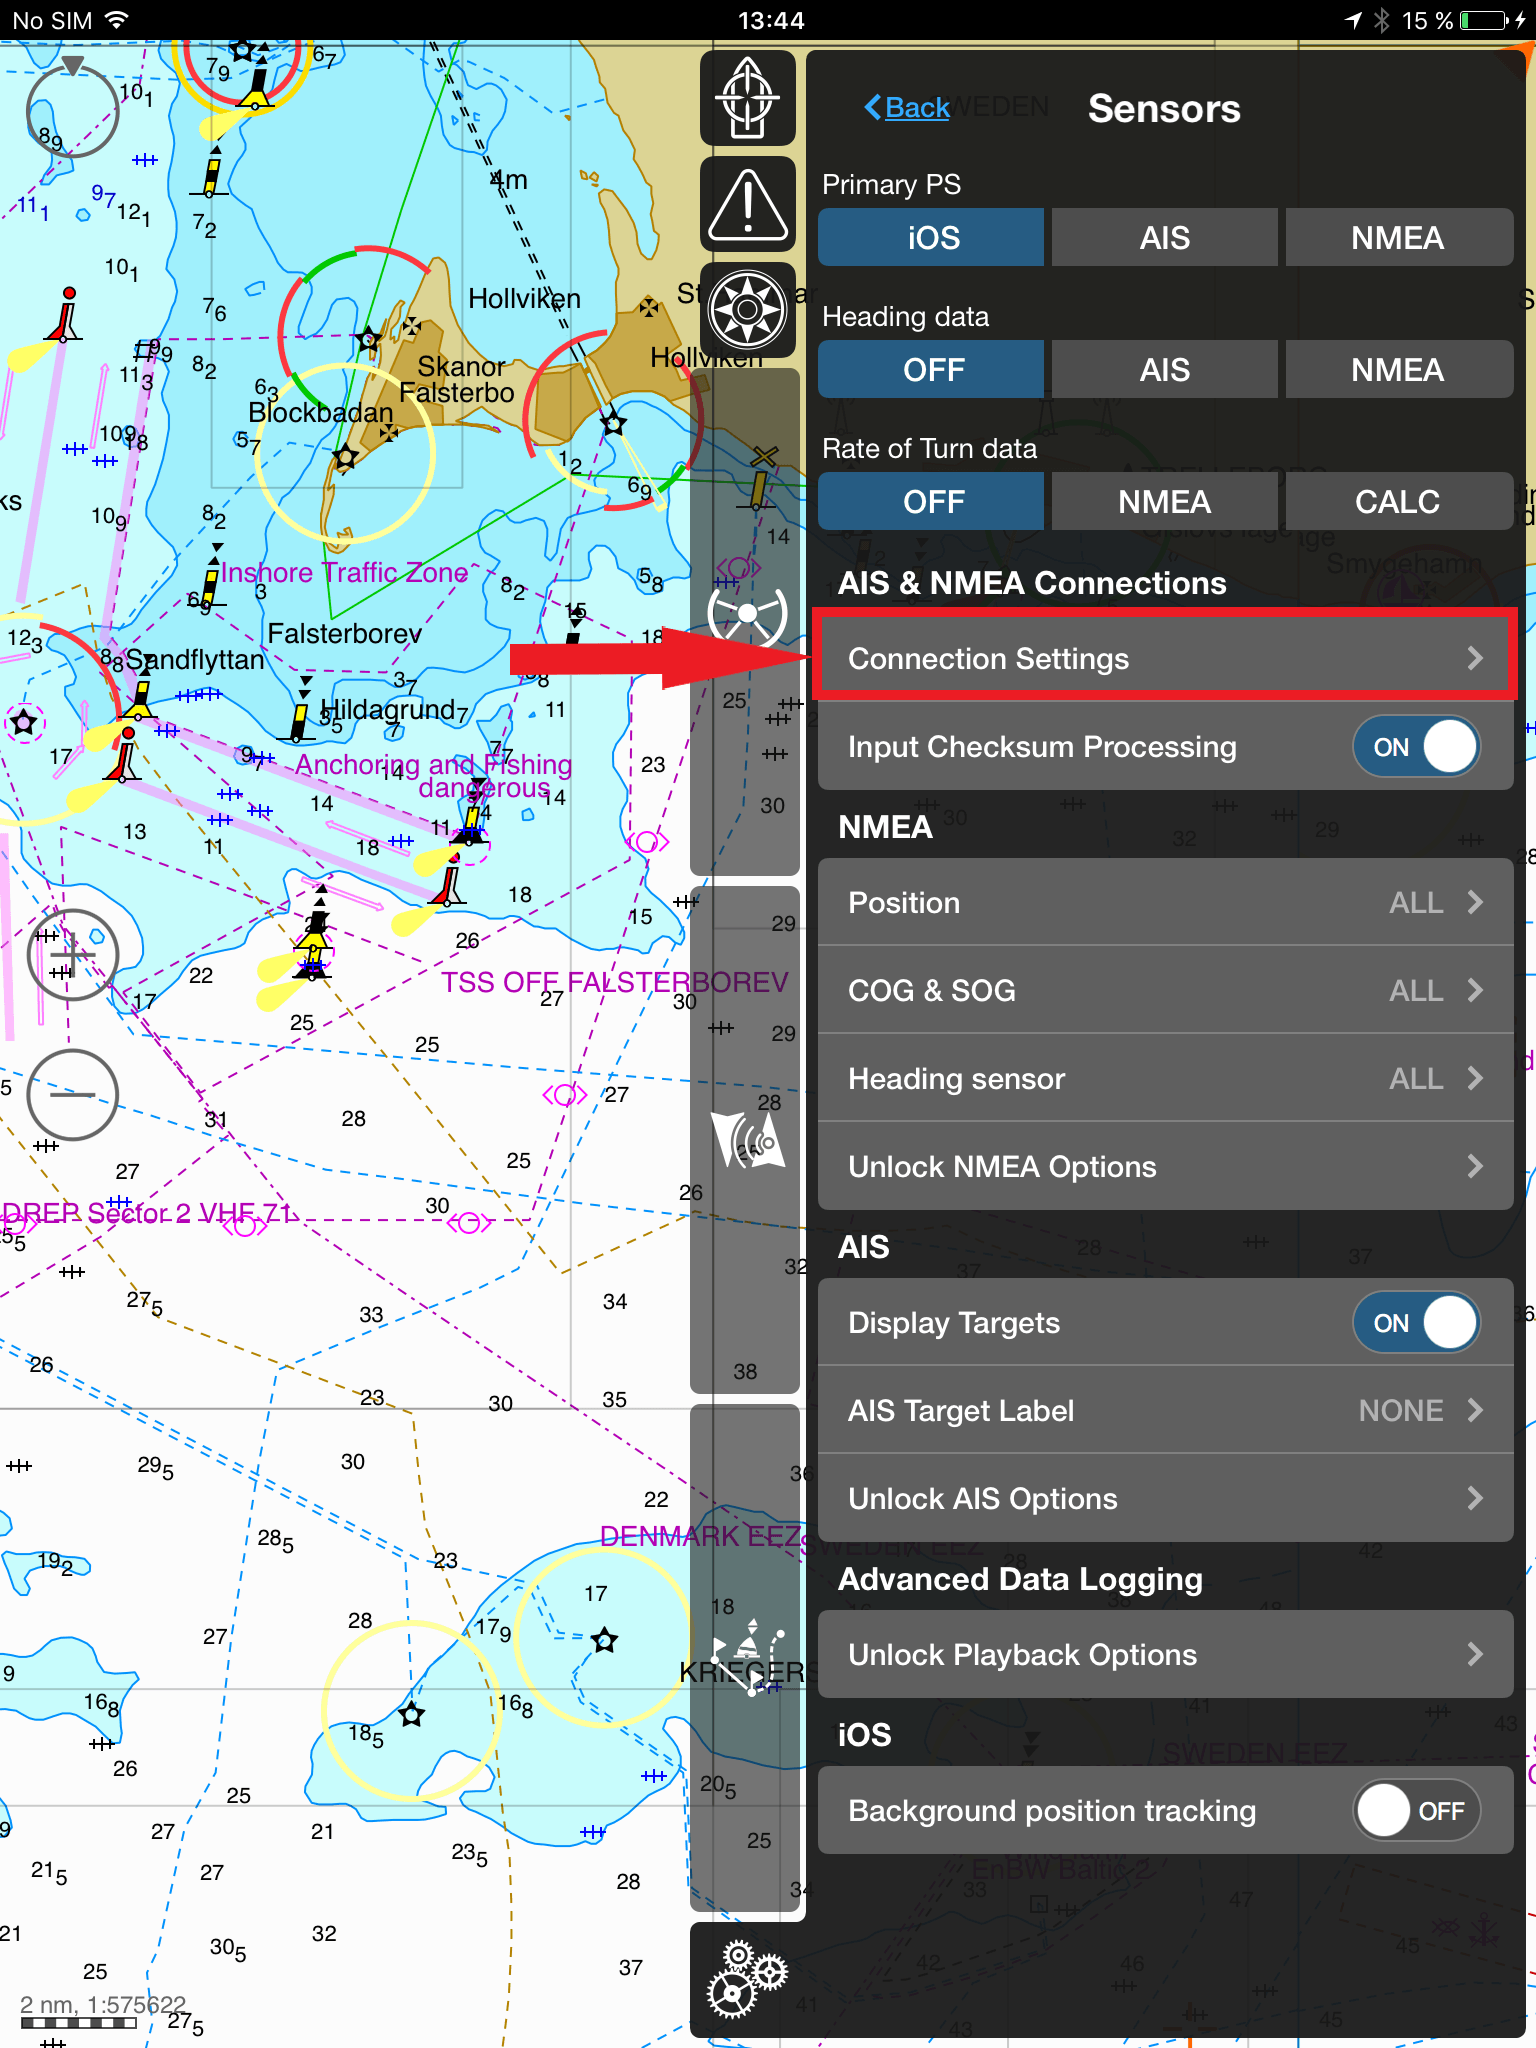
Click on Add Connection.
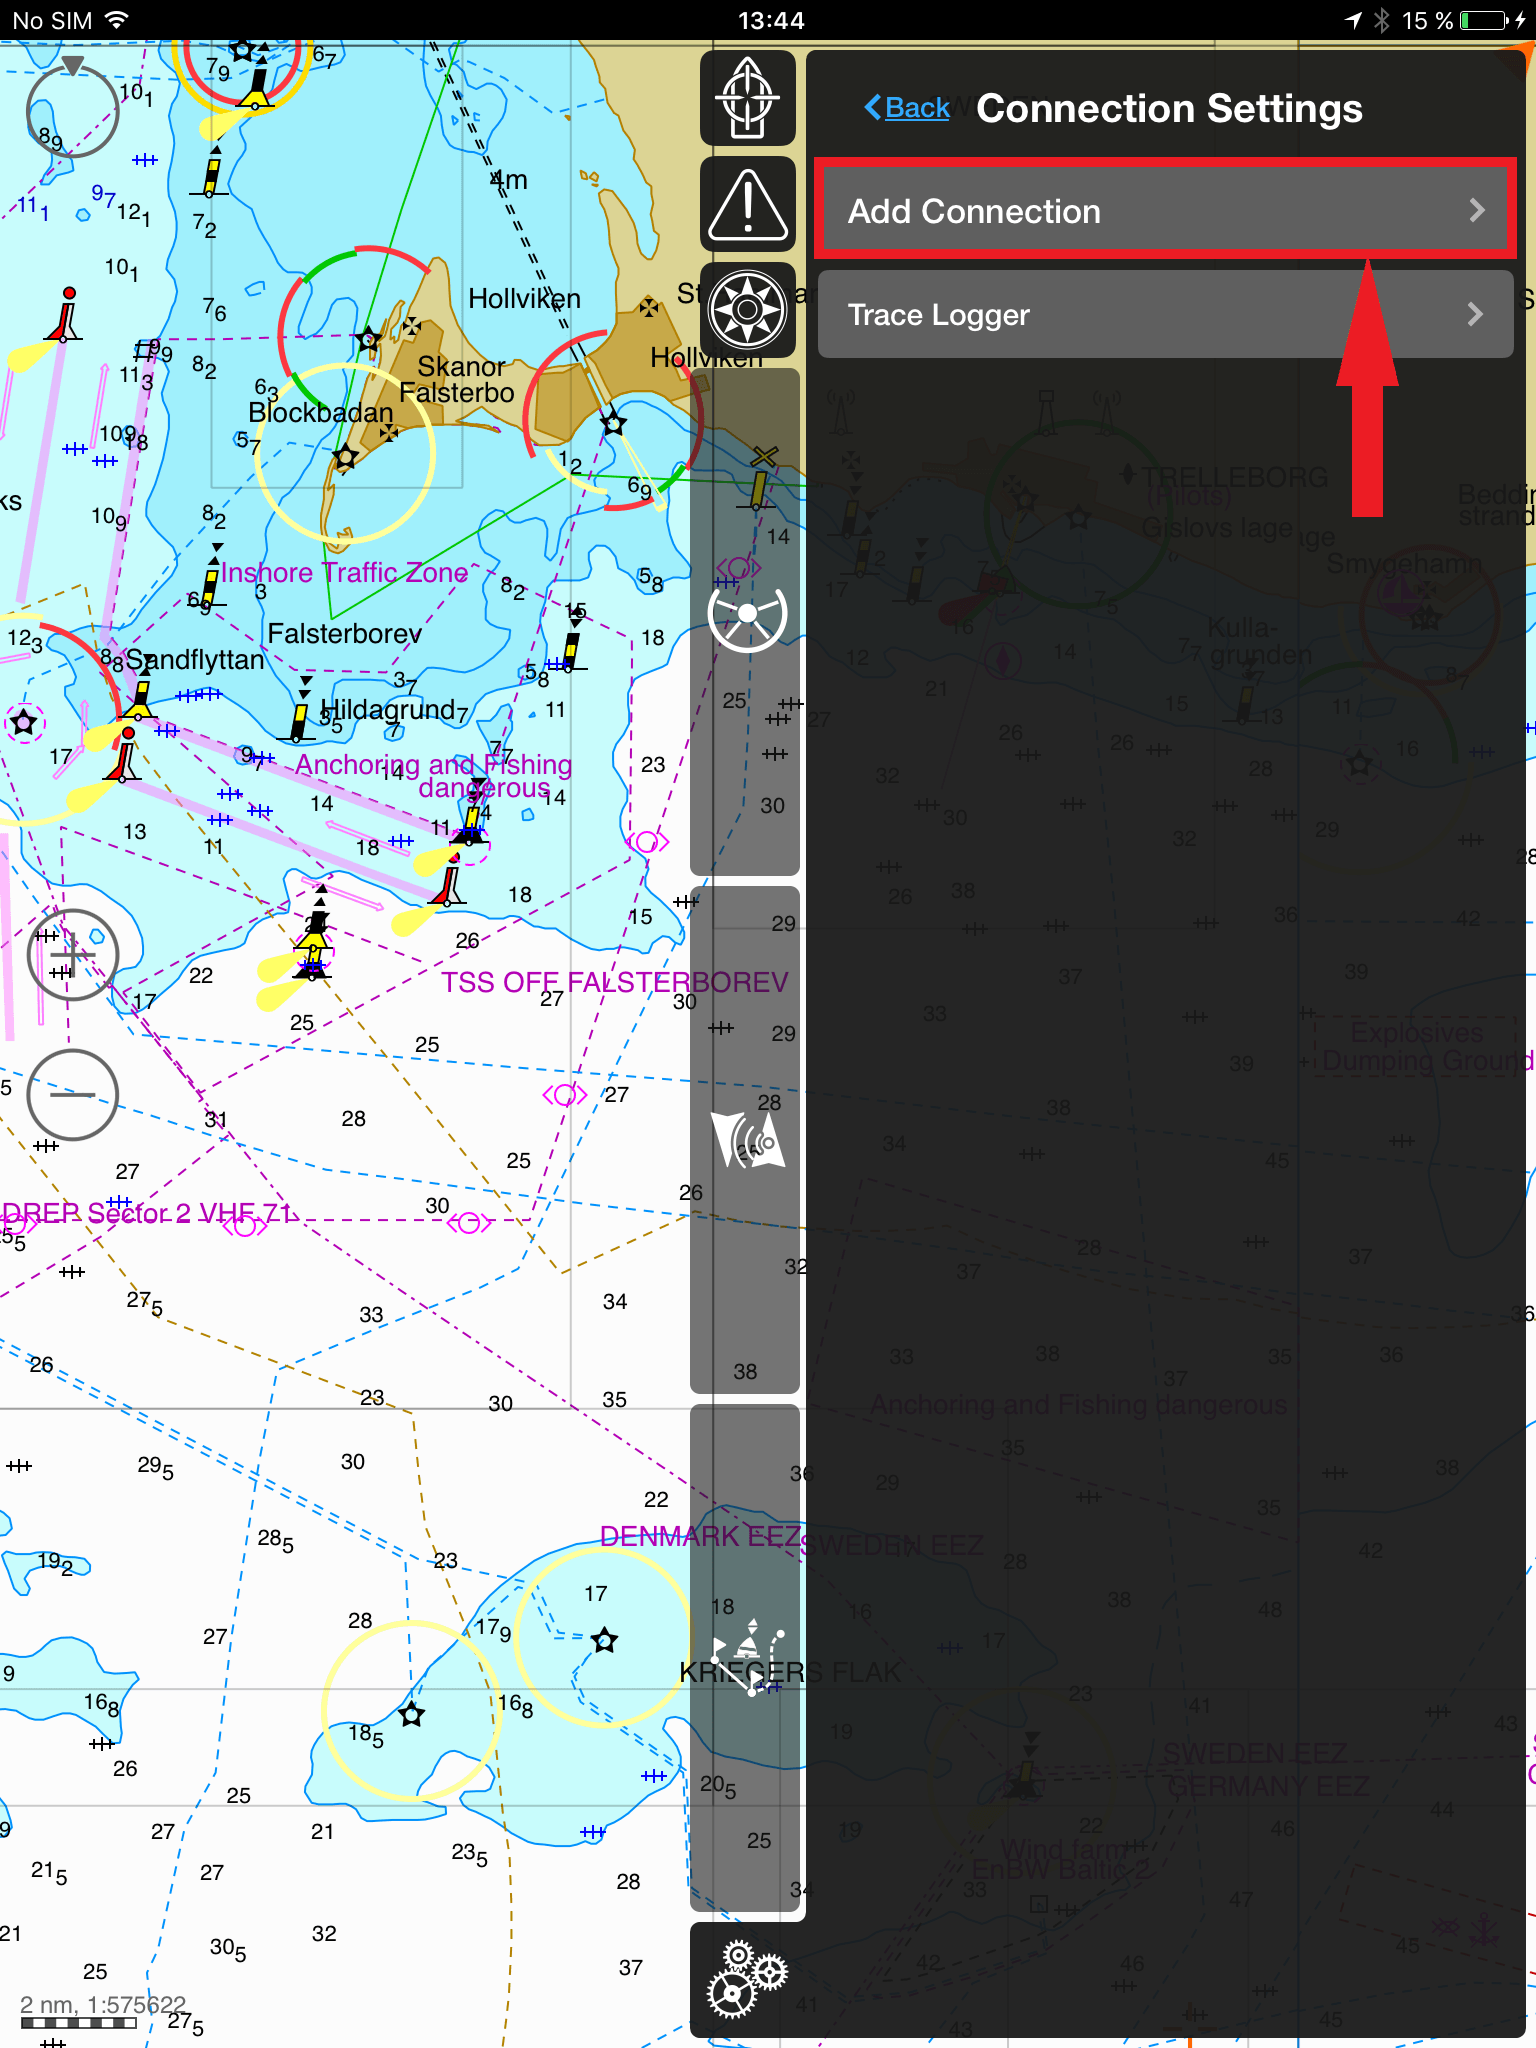
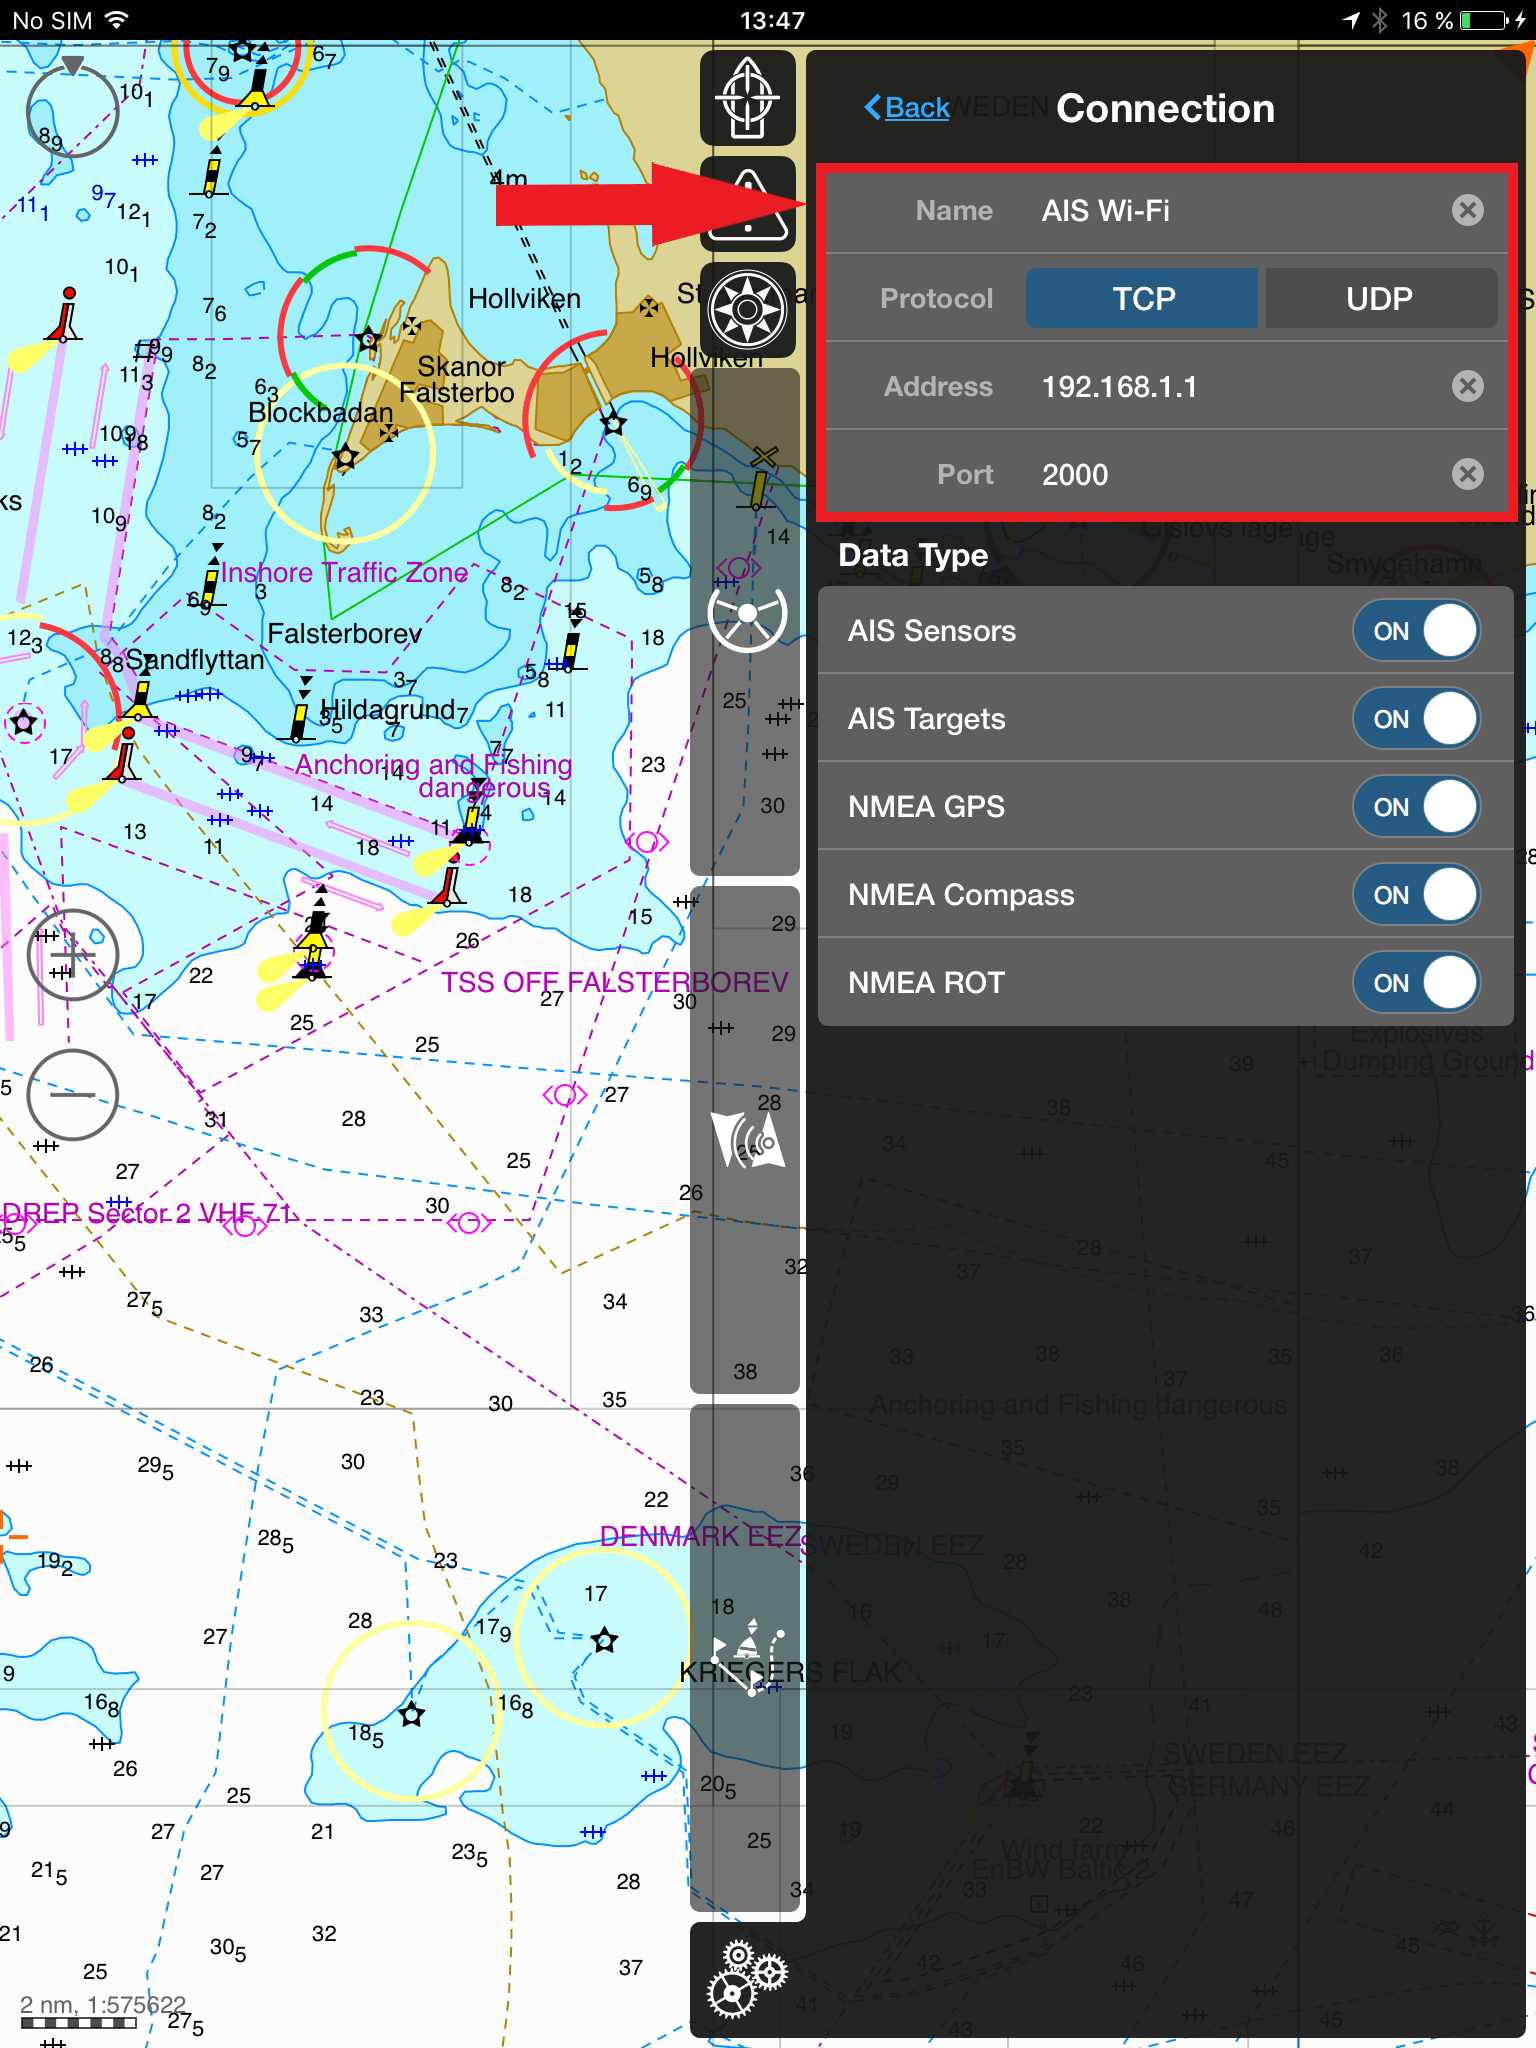
Fill in the Connection table:
– input the connection Name. For instance, Digital Yacht AIT3000 or Smart WLN10, etc.
– Choose the protocol type (we always recommend using the UDP protocol).
– set the Address “192.168.1.1”.
– set the Port “2000”.
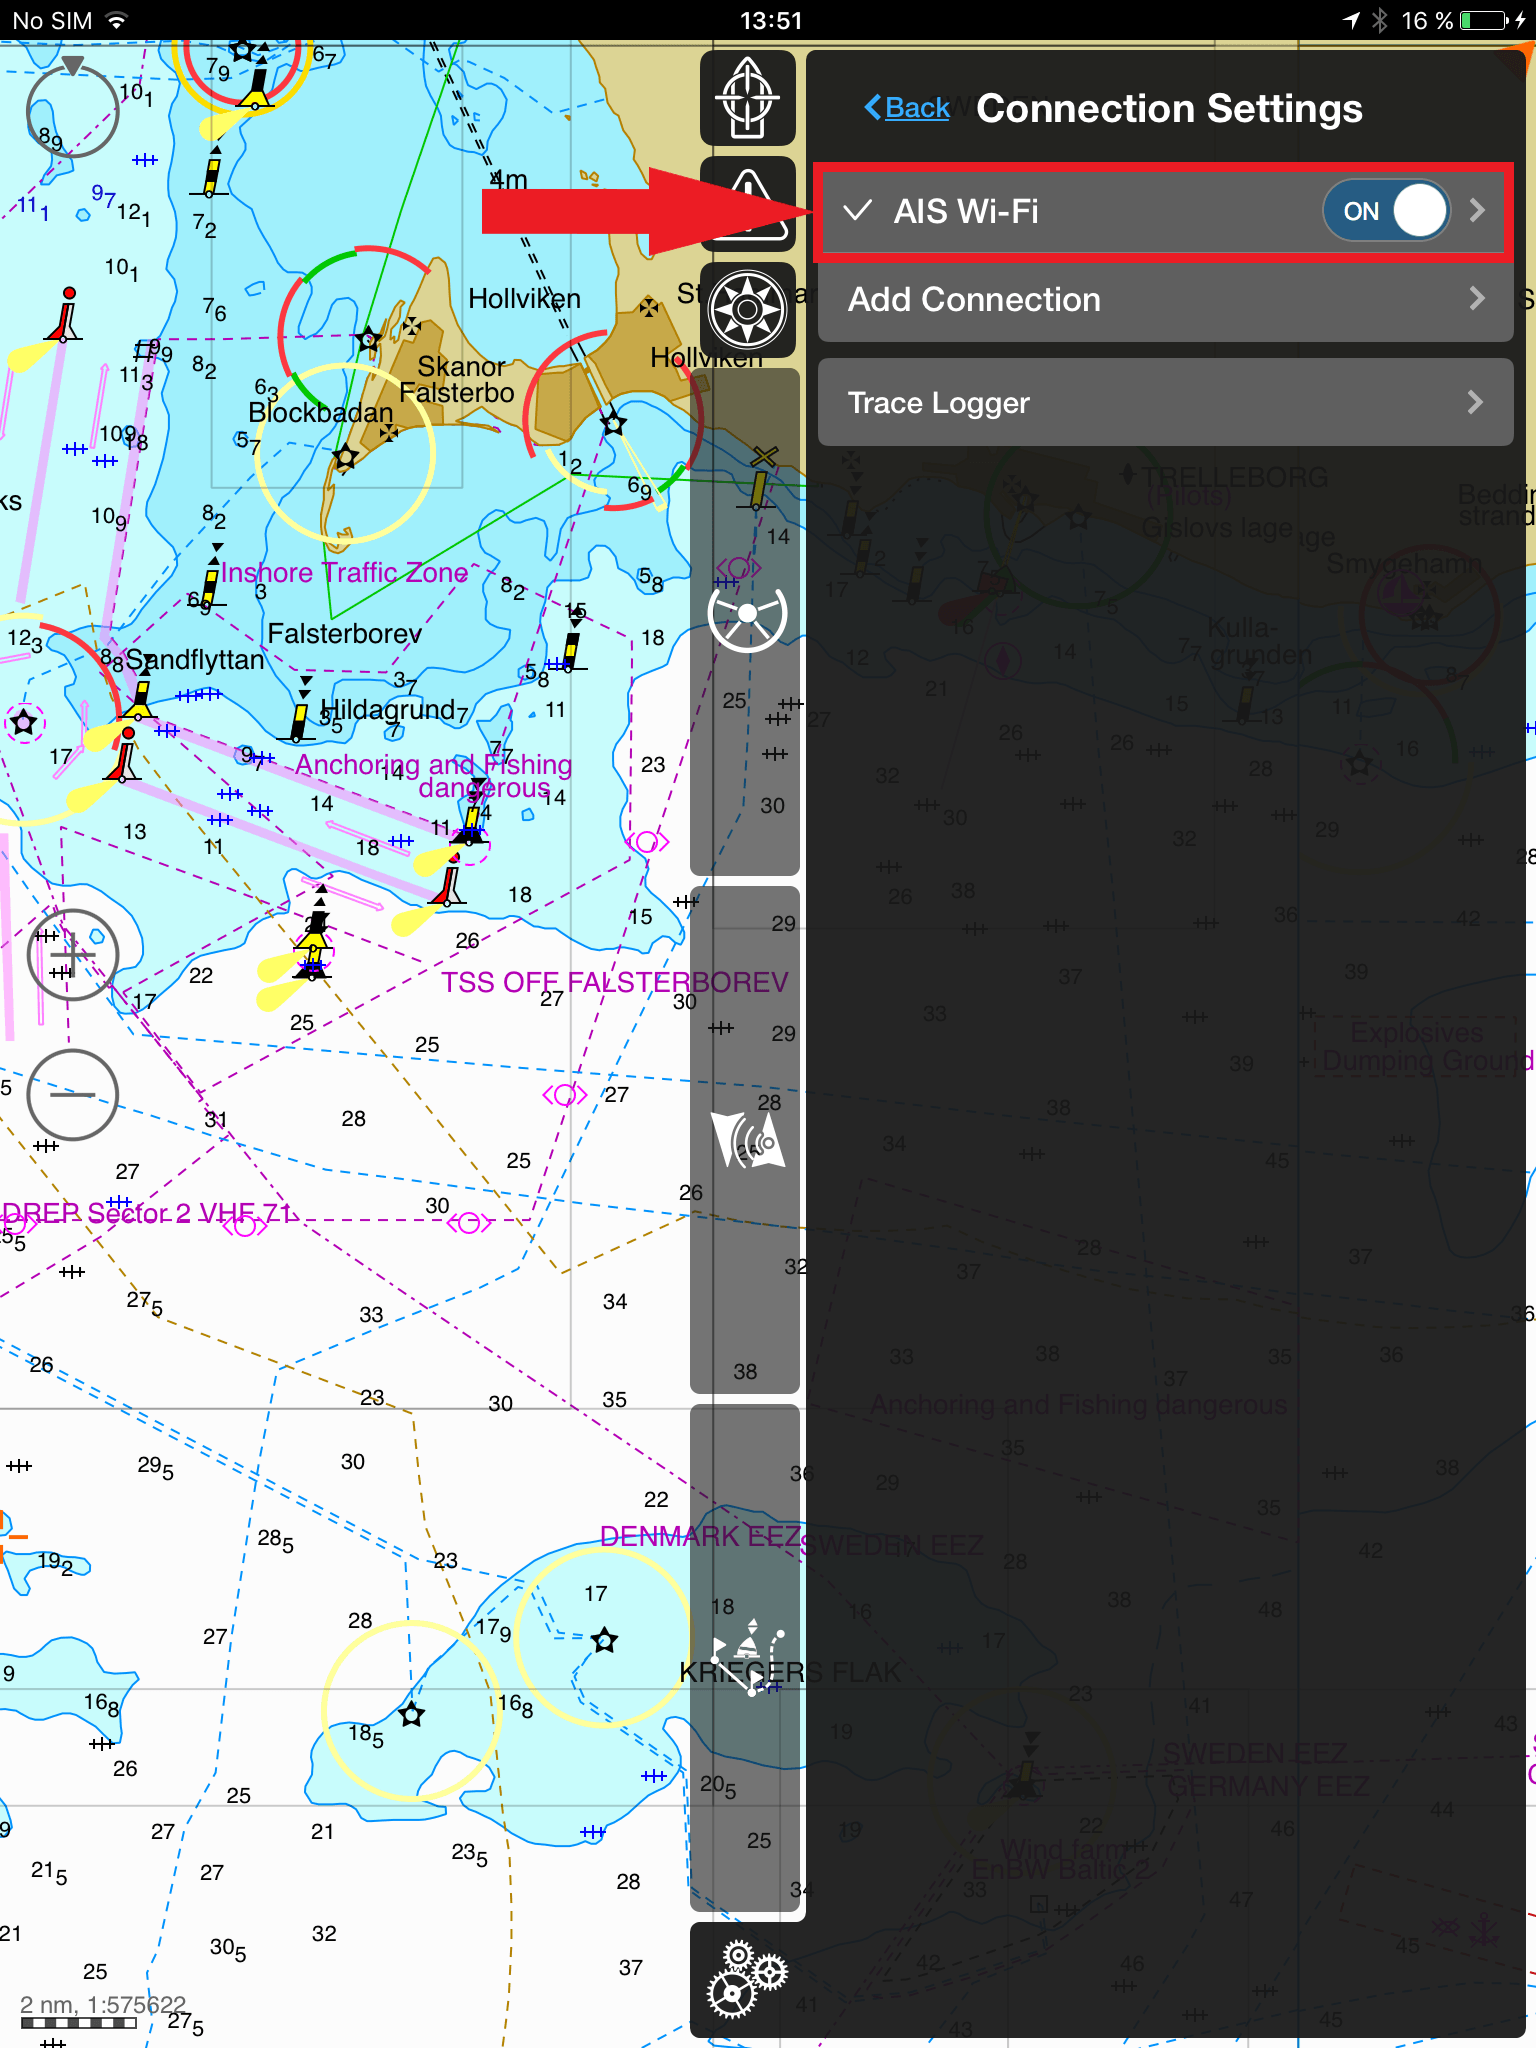
Go back to the “Connection Settings” -> if the connection was established, there will be a check mark on the tab.
Go to the “Sensors” tab and set the appropriate settings (Primary PS – AIS/NMEA, Heading data – AIS/NMEA, etc.)
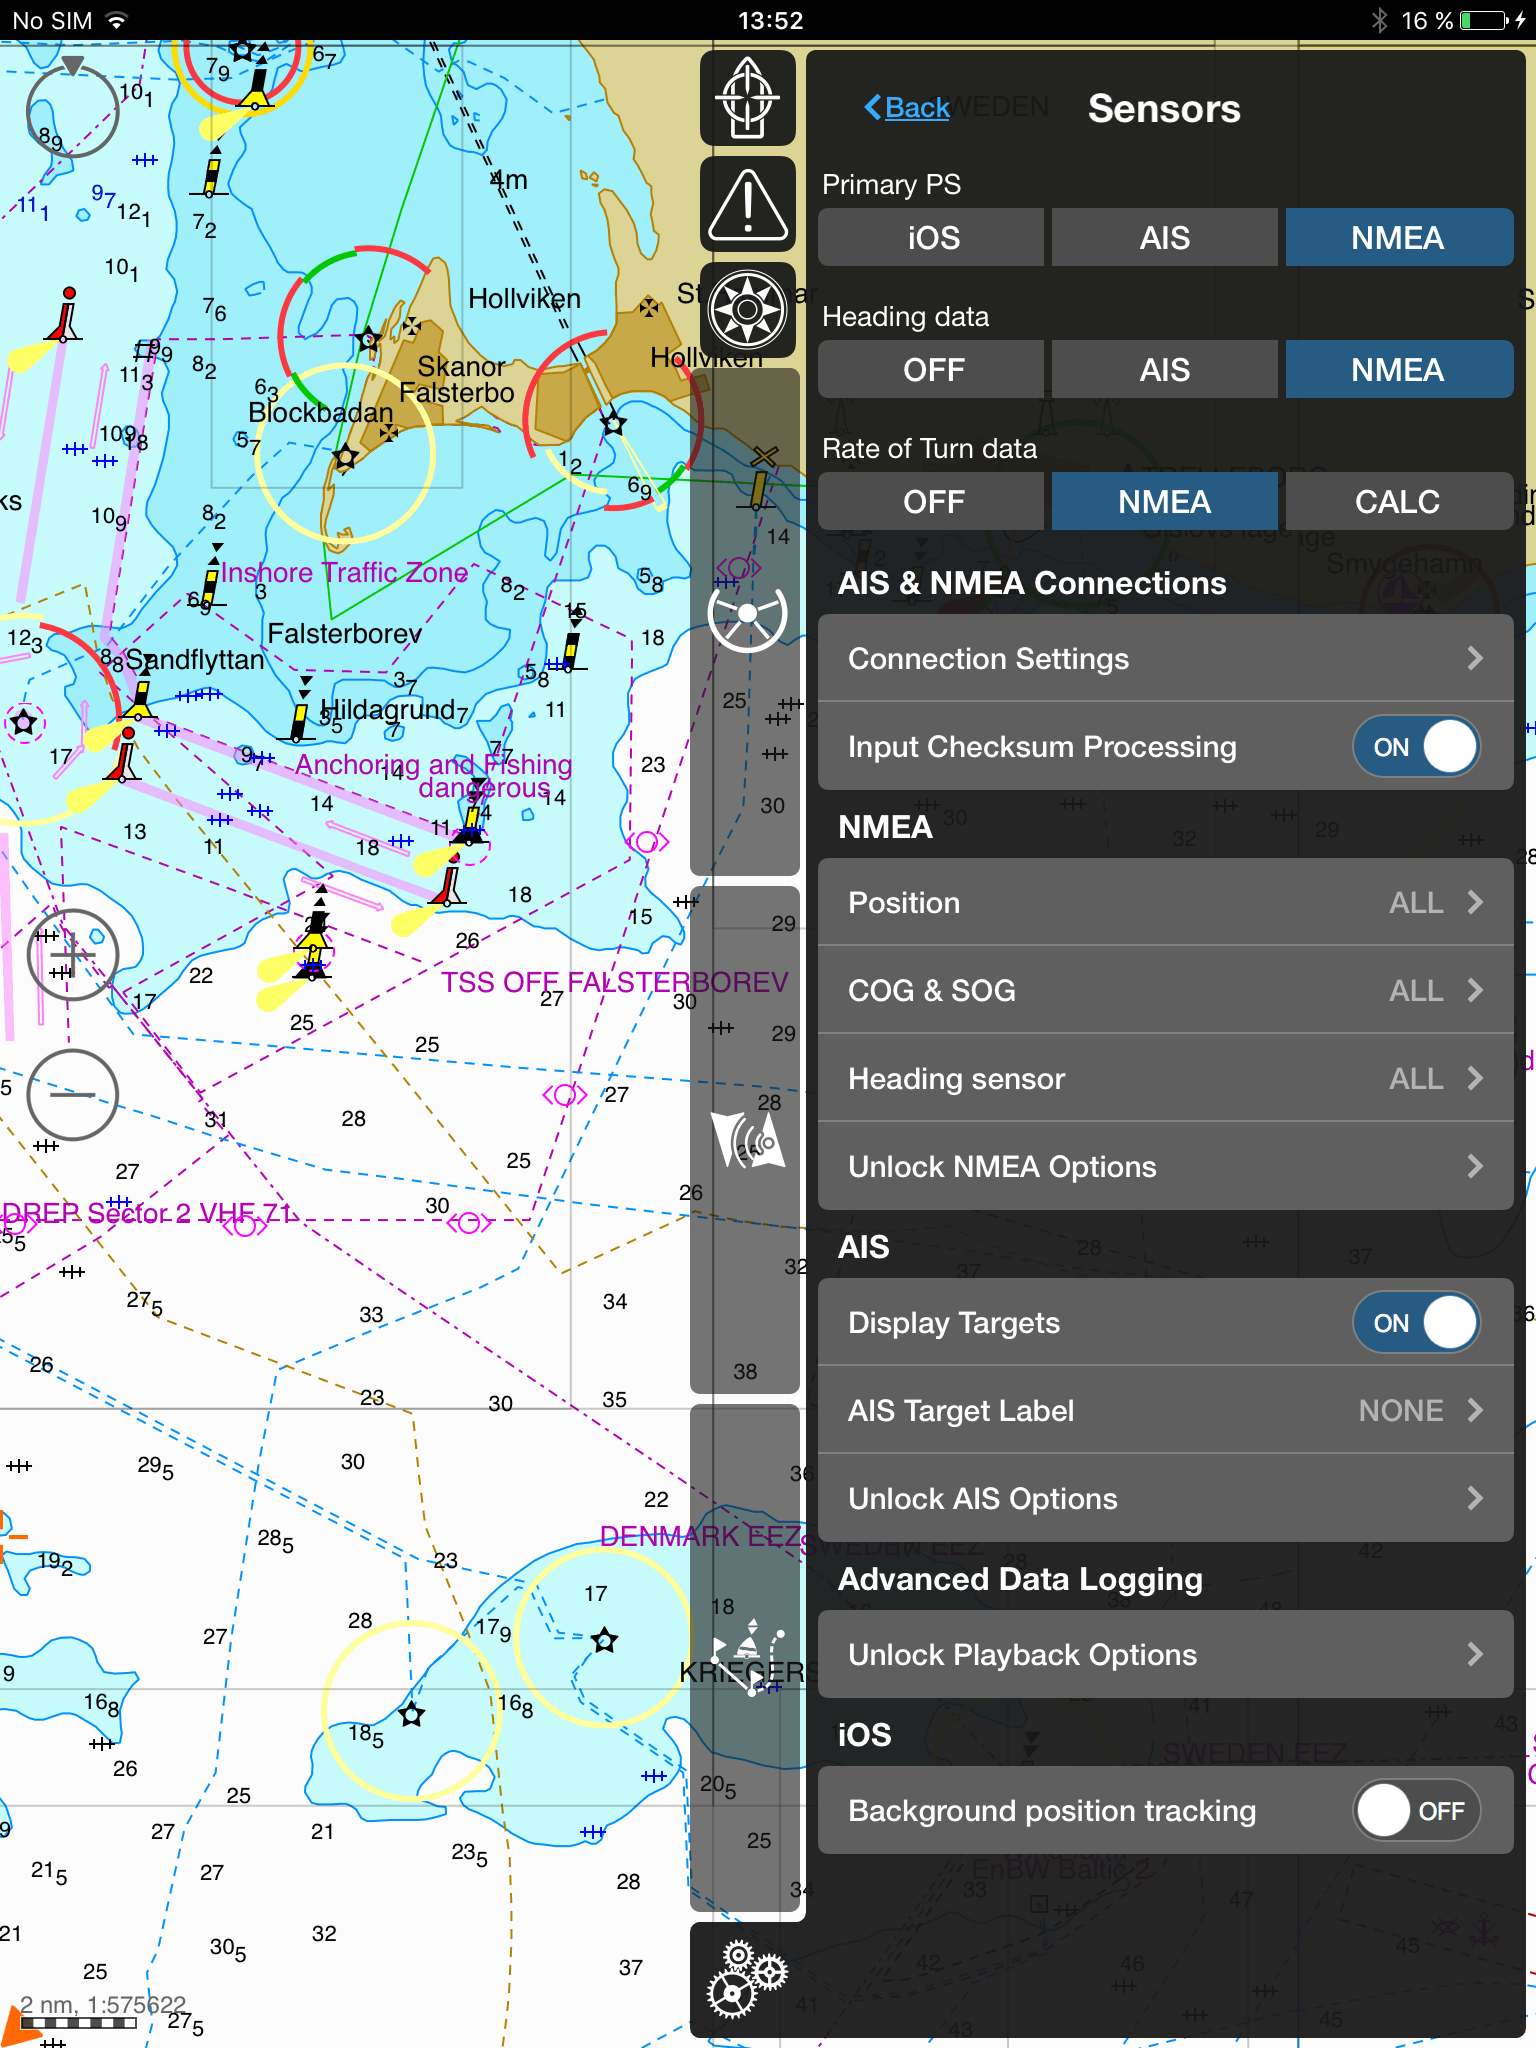
On the “Monitoring page” you can check the following data: position, sensor, route and schedule, track recording.
NavLink (iOS)
NavLink (iOS)
NavLink is a low cost app designed for use with an iPhone or iPad. It transforms your iPad into a full function chart plotter with detailed electronic charts and an overlay of your boat’s position, track and heading.
This post explains how to receive NMEA data and to display real time AIS targets on Navlink.
In the settings app, connect your iPad or iPhone Wi-fi to the Digital Yacht Wi-fi from an NMEA to WiFI server or from an AIS transponder with WiFi.
Open the app.
1 – Set up an NMEA connection
Go to the Navlink’s settings menu.

Go to the ‘AIS, GPS & NMEA Link’ menu

Whether you are using an iPad or iPhone, you need to enter the following parameters:
- Host: 192.168.1.1
- Port: 2000
- Protocol: TCP or UDP (UDP allows you to use 7 devices with the WiFi whereas one connection only with TCP. However, a TCP connection is more reliable).
If the NMEA connection is valid and complete, you should start seeing NMEA data sentences streaming in the console indicating that NavLink is receiving NMEA data.

2 – AIS Configuration
After having configured your NMEA connection, you must activate AIS targets.
Go back to the main menu and go to Manage Chart Layers.

Then, toggle the button next to ‘AIS Ship Layer’

Go back to the main menu and go to ‘My Boat Details’ menu to set up your preferences for CPA and TCPA alarms.

Go back to the map, AIS targets will now be overlaid on your charts. Touch a target and touch the ‘i’ to get more information.

After having touched the ‘i’, you will obtain more information about the target including the CPA and TCPA alarms.

Your iPad/iPhone can trigger an audible alarm for the CPA and TCPA alarms that you’ve set before.

NV Charts
Besides editing charts, NV Charts have also developed an Android/iOS/Windows/Mac app.
After having connected your tablet, PC or smartphone to the WiFI of our AIS transponder or NMEA to WiFi server, open the NV Charts app on your device.
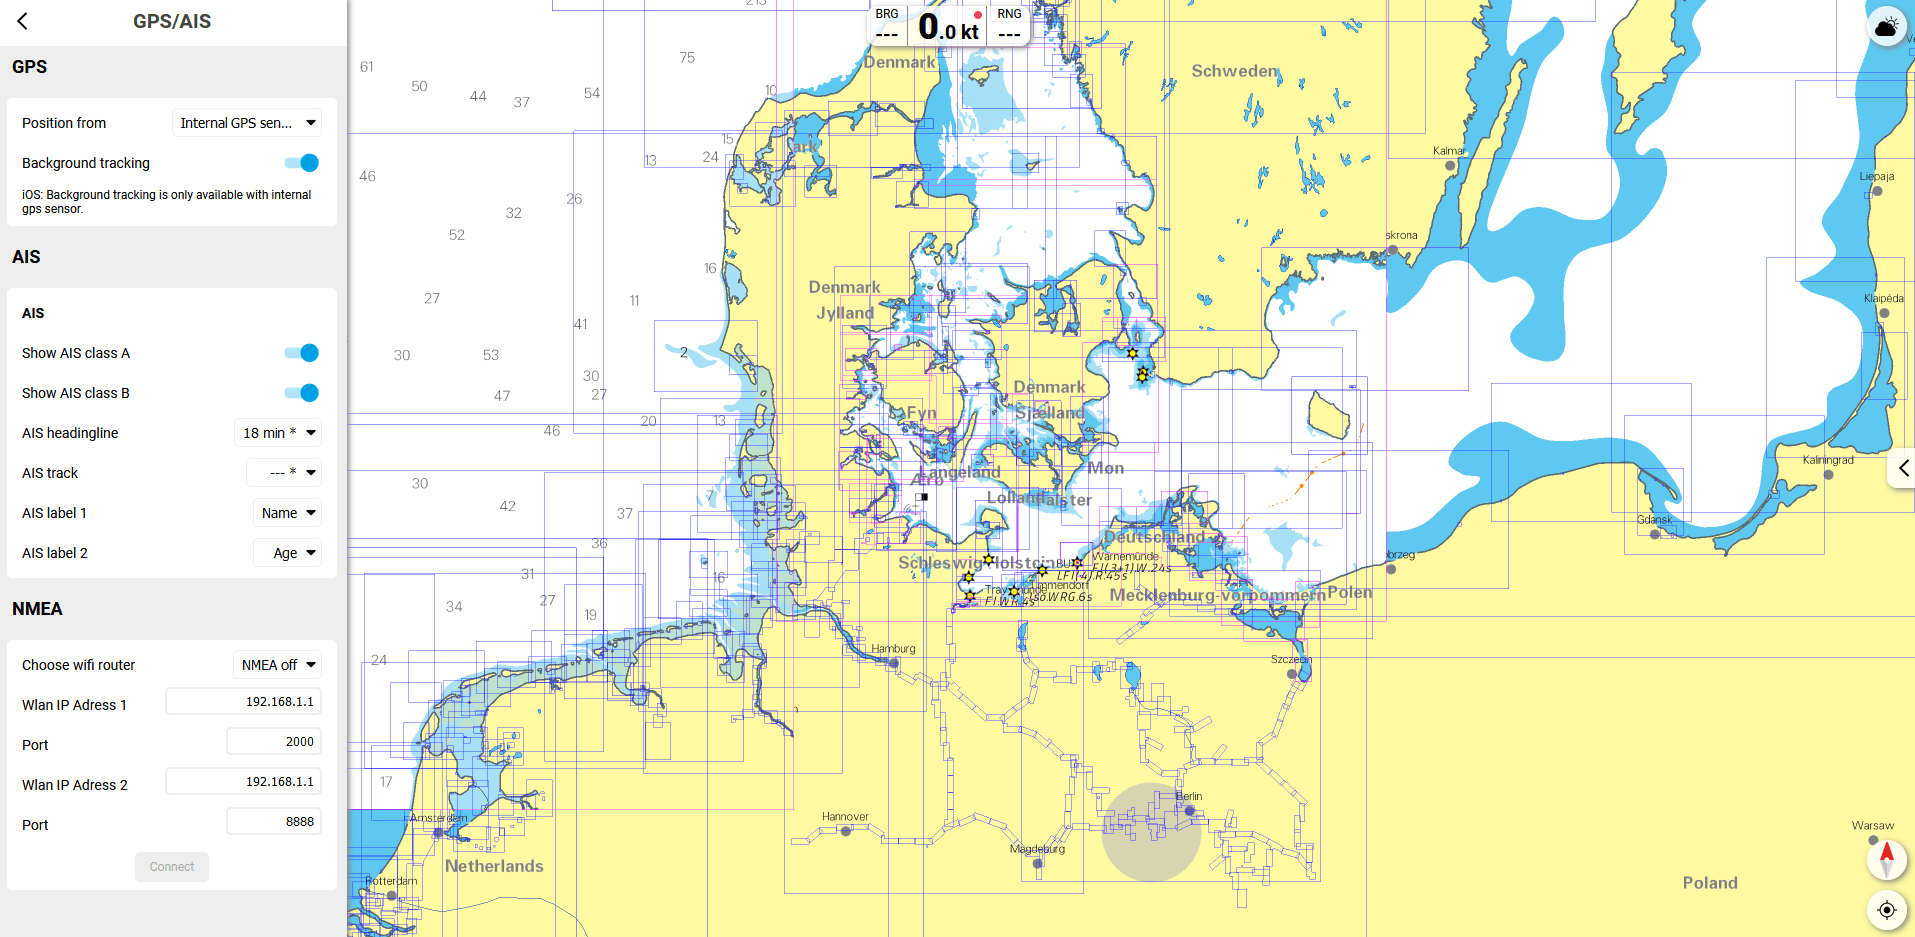
Reach the settings menu by pressing the setting button and click on GPS AIS.
Here in this section, as shown in the image below, you can set up the external NMEA source, GPS position and all the AIS parameters.
1 – For GPS source
You can choose to receive the position from the internal GPS sensor or from NMEA. You can receive the GPS data from NMEA if you have a GPS antenna connected to the NMEA to WiFI server.
2 – For AIS
Here you can toggle buttons to show Class B and Class A AIS targets.
3 – For NMEA settings
In this section, scroll down to NMEA and enter the following settings:
- Choose WiFi router: Use a drop-down menu to select whether you want to save one or more routers.
- IP Address: 192.168.1.1
- Port: 2000
Once you have entered the data above, tap the ‘Connect’ button at the bottom.
OpenCPN (USB)
OpenCPN is one of the most popular marine navigation software packages and is completely Open Source, meaning that Windows, Mac and LINUX users can install and use the software for free!
This section explains how to receive NMEA data in OpenCPN V3.2 or higher from an NMEA to USB adaptor or from a sensor with USB output like our GPS antenna.
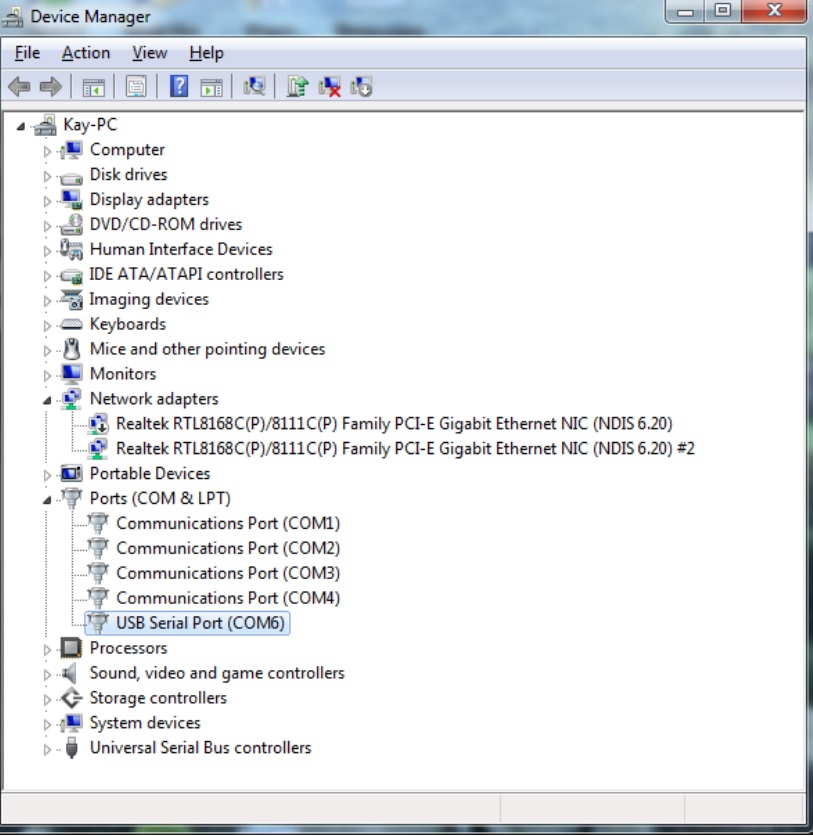
1 – Discover the device name
First of all, make sure that the relevant USB driver for your Digital Yacht product, is installed on the computer.
During the “Discovery” process, the operating system will allocate a device name to the USB connection. On Windows PCs these are always “Virtual COM Ports” and will be numbered COM1 through to COM256, while on MACs and LINUX PCs these will be device names “tty.usb1”. Before you can setup OpenCPN, you need to know what device name has been allocated to your Digital Yacht Product and this varies between operating systems:
– For Windows PC, to find out what COM Port number has been allocated, you will need to run the “Device Manager”. The Digital Yacht unit will be displayed as “USB Serial Port (COMxx)” and it is the number (in this example 6) that we are interested in.
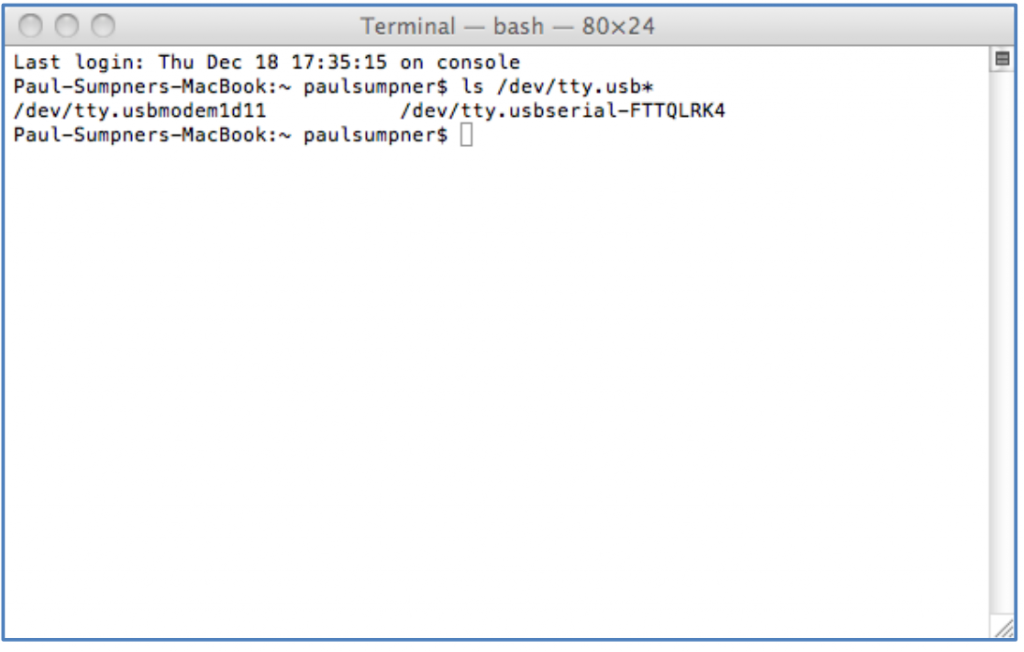
– For Macs, in Finder, click GO>Utilities and run the Terminal.app program. Then type “ls /dev/tty.usb*” which will then display the device name given to the Digital Yacht product, in this example “/dev/tty.usbmodem1d11” is our AIT2000 and “/dev/tty.usbserial-FTTQLRK4” is one of our NMEA to USB adaptor cables. Make a note of the device name(s) as we will need to enter this in OpenCPN.
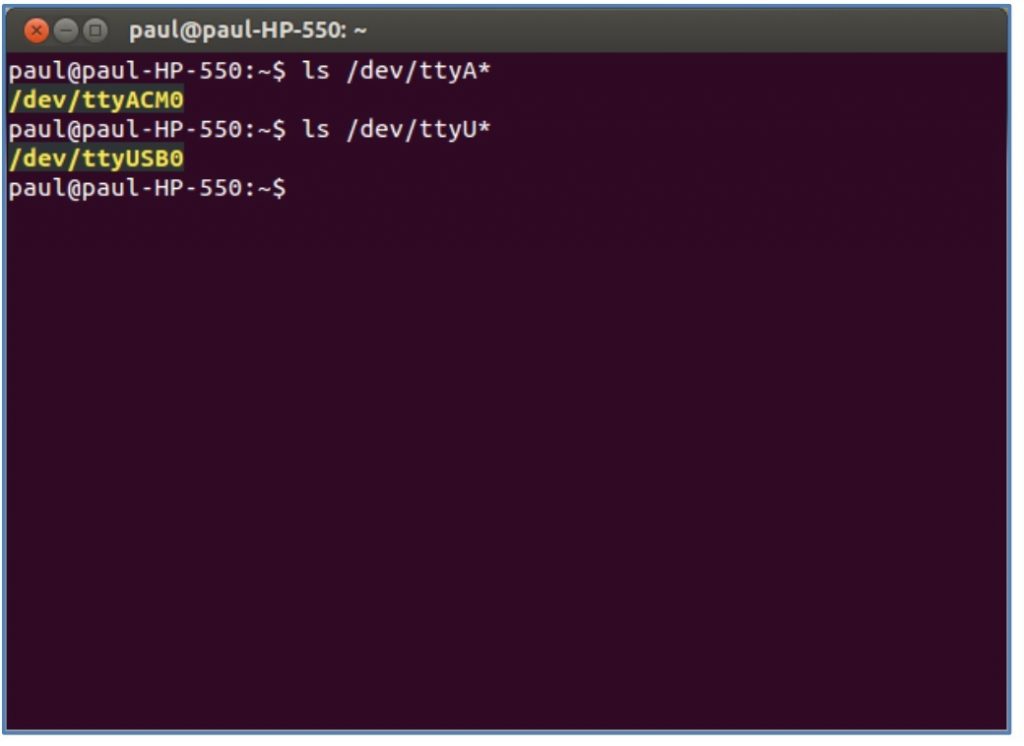
– For LINUX PCs, the exact command you use will depend upon which LINUX distribution you are using but for Ubuntu, click “Applications>Accessories>Terminal”. At the command prompt, enter the command;
ls /dev/ttyA* for AIT1500/AIT2000/AIT3000 and other AIS transponders products
ls /dev/ttyU* for all other products such as NMEA to USB adaptor, GPS with USB output, etc.
This will display the device name given to the Digital Yacht product. In this example below we have an AIT2000 connected that is given the device name “/dev/ttyACM0” and a GPS160USB that was given “dev/ttyUSB0”. Make a note of the device name(s) as we will need to enter this in OpenCPN
2 – Set up a NMEA connection in OpenCPN
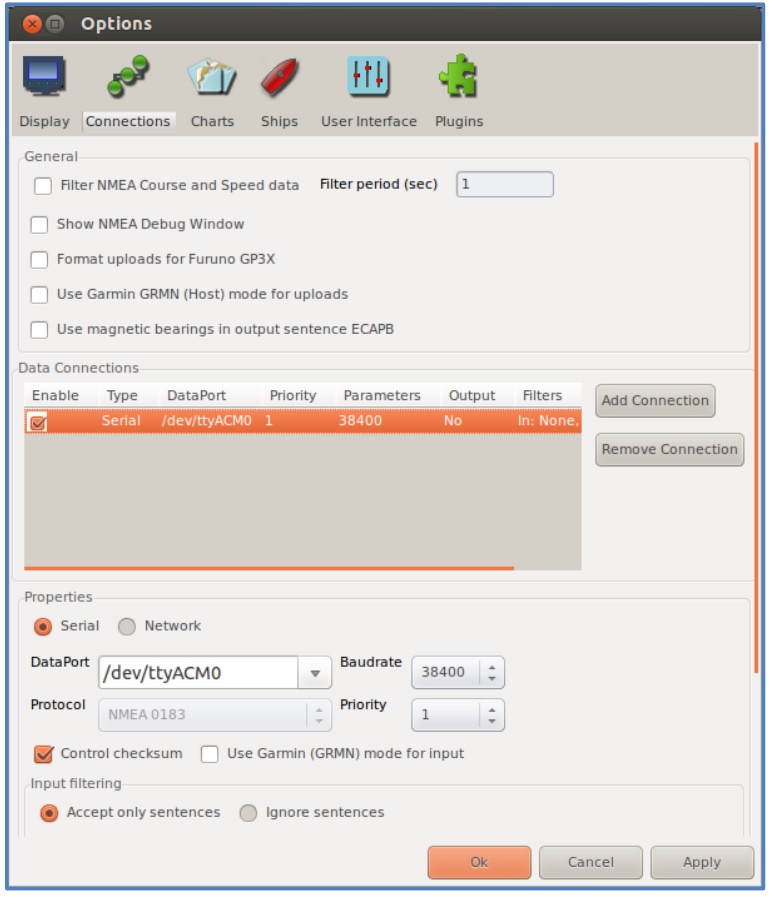
With the latest V3.2 and higher versions of OpenCPN you can have multiple data connections and to create a new connection you must click on the “Settings” icon (spanner) and then click on the “Connections” tab. As you can see, we currently have no Data Connections setup and so we click on the “Add Connection” button. Now we click on Serial then on the “DataPort“ drop down list and see what serial ports are available. Find the device name that matches the name noted earlier for your Digital Yacht product and select that device.

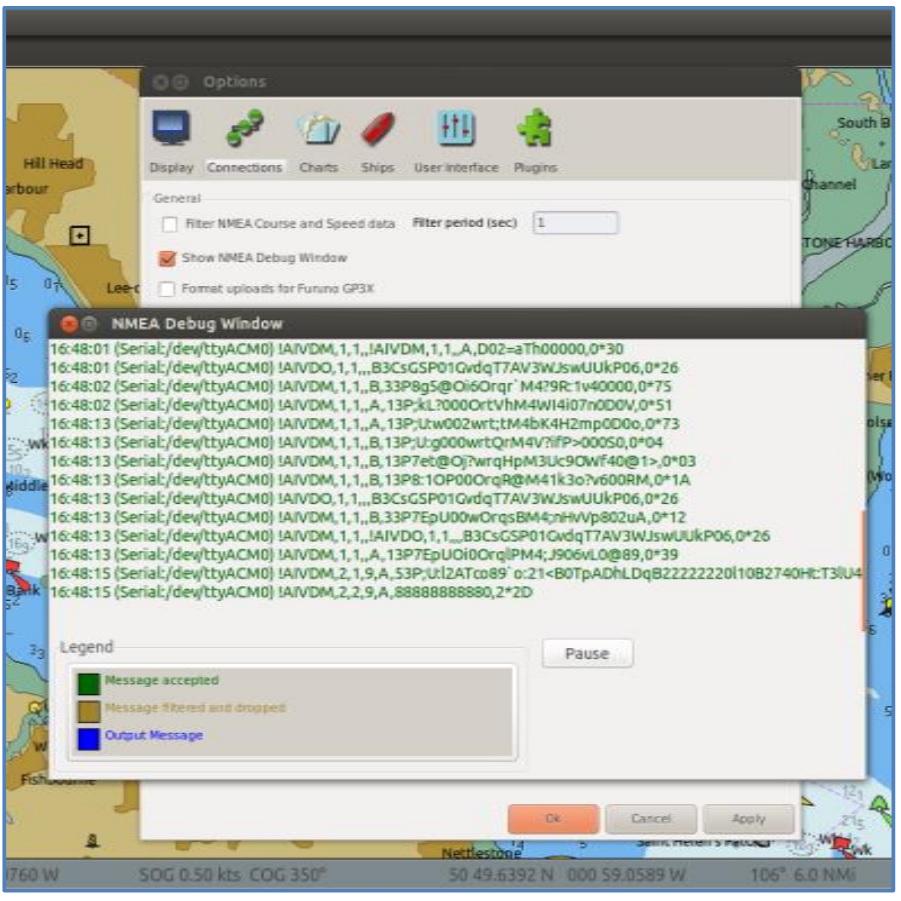
The default baud rate (data speed) is 4800baud which is the standard speed for most NMEA0183 devices, but if you are connecting one of our AIS products, you will need to change the Baudrate to 38400 baud.
None of the other settings usually need to be changed and once you are happy that everything is correct, click on the “Apply” button to save the settings and you will see the new connection now in the list. If you wish to test the connection, click on the “Show NMEA Debug Window” tick box and a new window will appear with the raw NMEA data scrolling down the page, showing the time it was received and the connection it came in on.
You can continue to add more data connections i.e. GPS, AIS, Instruments, etc. and once all connections are setup just click “OK” to exit and return to the Chart screen. Assuming that all of the connections are powered up and active, you should now see the Boat displayed accurately on the chart, if an AIS is connected then a series of AIS targets should be displayed on the chart and if you have the Dashboard Instrument Plugin installed, you should be able to display instrument data as well.
Important Notes
1) We have had some reports of customers having to go in to the Input Filtering “Accept Only” options and clicking the “Select All” Sentences button. There does not seem to be any rhyme or reason for this and we recommend only changing the Input Filtering if no data is being displayed and you are sure everything else is set and working correctly.
2) For Mac and LINUX users, if when you click on the drop down “DataPort” menu you do not see the device name that you had found previously in the Terminal program, you will need to manually type the name in to the box. We have seen this on some Macs and LINUX distributions with our AIT1500/AIT2000/AIT3000 products that appear as a USB Modem rather than a USB Serial Port. Make sure you include the full device name for example; /dev/tty.usbmodem1d11
3 – Configure AIS parameters
If you have connected the USB output of an AIS transponder/Receiver or if your AIS is connected to an NMEA to USB adaptor, then you can overlay AIS targets in OpenCPN after having configured the USB connection.
You need to make sure that AIS targets are activated. Go to the top menu bar > AIS and tick the parameters you want.
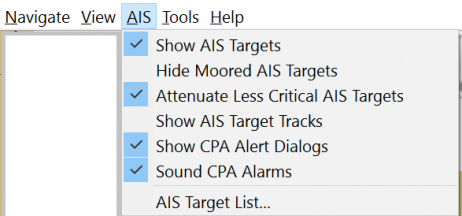
You can also configure others AIS parameters such as CPA/TCPA alarms and the display of AIS targets in the OpenCPN menu. By configuring CPA/TCPA alarms, your PC can trigger an audible alarm.
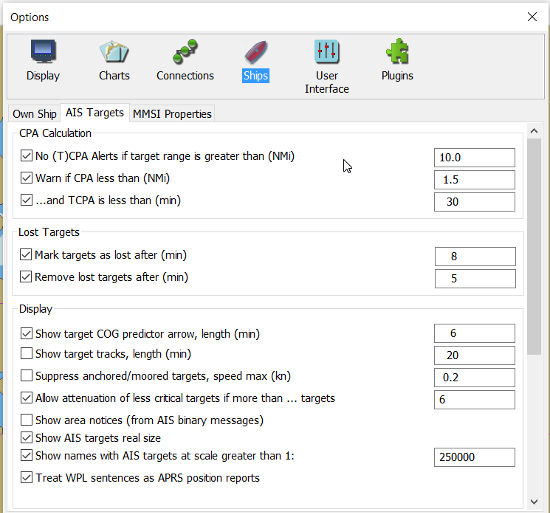
If you want to configure those parameters, go to OpenCPN settings > Ships > ‘AIS Targets’ tab.
AIS targets will now be overlay in your charts.
OpenCPN (WiFi)
OpenCPN is one of the most popular marine navigation software packages and is completely Open Source, meaning that Windows, Mac and LINUX users can install and use the software for free!
This section explains how to receive NMEA data in OpenCPN V3.2 or higher from an NMEA to WiFi server or from an AIS Transponder/Receiver with built-in WiFi.
1- Set up a WiFi NMEA connection
This post assumes that you have already connected your computer wirelessly to one of our wireless NMEA
products. For more information on setting up a wireless connection, please refer to the User Manual for your Digital
Yacht product.
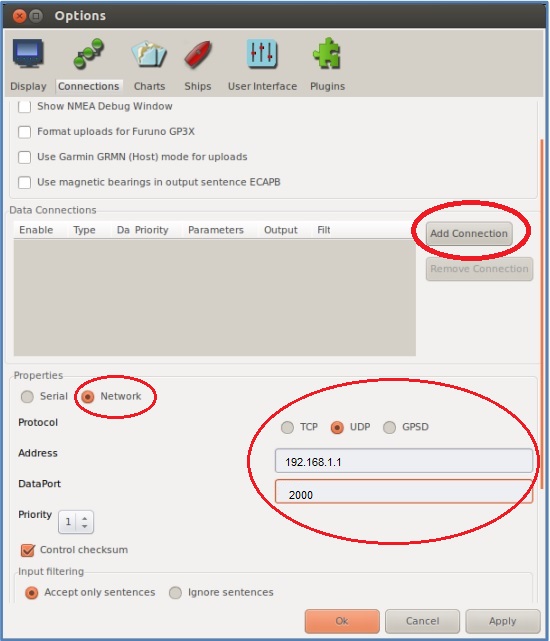
With the latest V3.2 and higher versions of OpenCPN you can have multiple data connections and to create a new connection you must click on the “Settings” icon (spanner) and then click on the “Connections” tab. As you can see below, we currently have no Data Connections setup and so we click on the “Add Connection” button.
Now we select a “Network” Connection by clicking the check box next to the Properties “Network” option. You should now see the window change to the layout shown in below and you need to fill in the following settings:
- Protocol: UDP, TCP or GPSD. TCP protocol is more reliable, allows bi-directional data transfer but only one device to connect at a time, while UDP is a uni- directional, broadcast protocol allowing up to seven devices to all receive the same data.
- Address: 192.168.1.1
- DataPort: 2000
None of the other settings usually need to be changed and once you are happy that everything is correct, click on the “Apply” button to save the settings and you will see the new connection now in the list.
If you wish to test the connection, click on the “Show NMEA Debug Window” tick box and a new window will show raw NMEA data scrolling down the page, with the time it was received and the connection it came in on.
Once you are happy that your new wireless connection is working correctly, click “OK” to exit and return to the Chart screen. You should now see the Boat displayed accurately on the chart, if AIS data is coming through then a series of AIS targets should also be displayed on the chart and if you have the Dashboard Instrument Plugin installed, you should be able to display instrument data as well.

Important Note
We have had some reports of customers having to go in to the Input Filtering “Accept Only” options and clicking the
“Select All” Sentences button. There does not seem to be any rhyme or reason for this and we recommend only changing the Input Filtering if no data is being displayed and you are sure everything else is set and working correctly
2 – Configure AIS parameters
You need to make sure that AIS targets are activated. Go to the top menu bar > AIS and tick the parameters you want.
You can also configure others AIS parameters such as CPA/TCPA alarms and the display of AIS targets in the OpenCPN menu. By configuring CPA/TCPA alarms, your PC can trigger an audible alarm.
If you want to configure those parameters, go to OpenCPN settings > Ships > ‘AIS Targets’ tab.
AIS targets will now be overlay in your charts.
qtVlm
qtVlm
qtVlm is a navigation software and iOS/Android app.
Firstly, connect your PC or tablet/smartphone to the WiFI of our AIS transponder or NMEA to WiFi server.
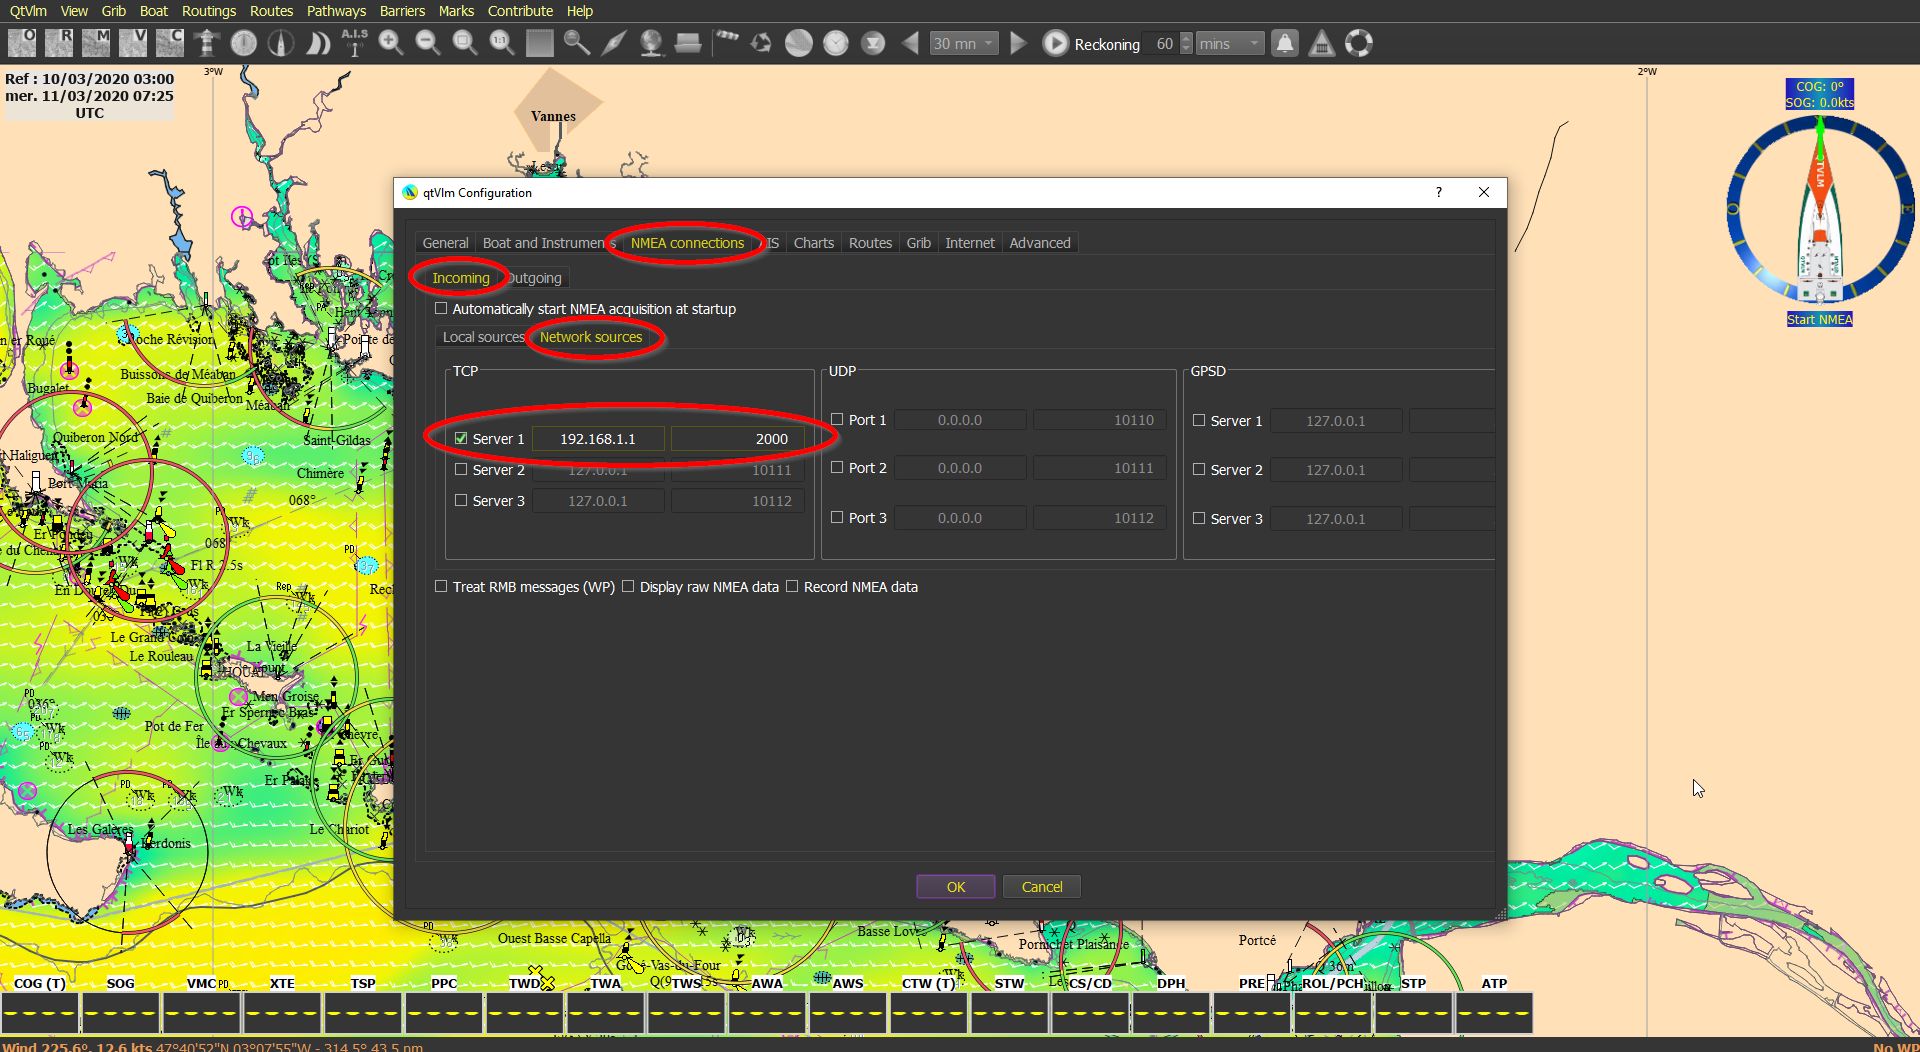
After, you need to set up an NMEA connection with qtVlm. Go to the Configuration page of qtVlm.
Click on the ‘NMEA connections’ tab.
Then click on Incoming and Network sources.
You can either set up a UDP connection or TCP connection. By setting up an UDP connection, you can connect up to 7 devices to our WiFi whereas with a TCP connection, you can only connect one device to the WiFi.
If you set up a TCP connection, you need to fill in the following:
- Server 1: 192.168.1.1 and in the next cell: 2000
If you set up a UDP connection, you need to fill in the following:
- Port 1: 192.168.1.1 and in the next cell: 2000
You can also set up an outgoing connection if you want to send NMEA data from qtVlm to an autopilot for example.
Once the data are configured, you need to tick next to Server 1 (for TCP) or Port 1 (for UDP).
In the ‘AIS’ tab, you can configure all the AIS parameters such as CPA/TCPA alarm, display, etc.
SailGrib
SailGrib
SailGrib WR is a complete navigation, routing and weather app for Android devices. Designed by a sailor, it is used by boaters, cruisers and offshore racers worldwide.
SailGrib WR can receive NMEA data from any Digital Yacht NMEA-WiFi server such as the WLN10 Smart, WLN30, NavLink2, old units as well as AIS transponders with integrated WiFi such as the AIT5000 or the Nomad.
This section explains how to set up an NMEA connection with SailGrib and how to configure the AIS parameters.
Connect your Android tablet or smartphone to the product WiFi network and open the app.
1 – Set up an NMEA connection
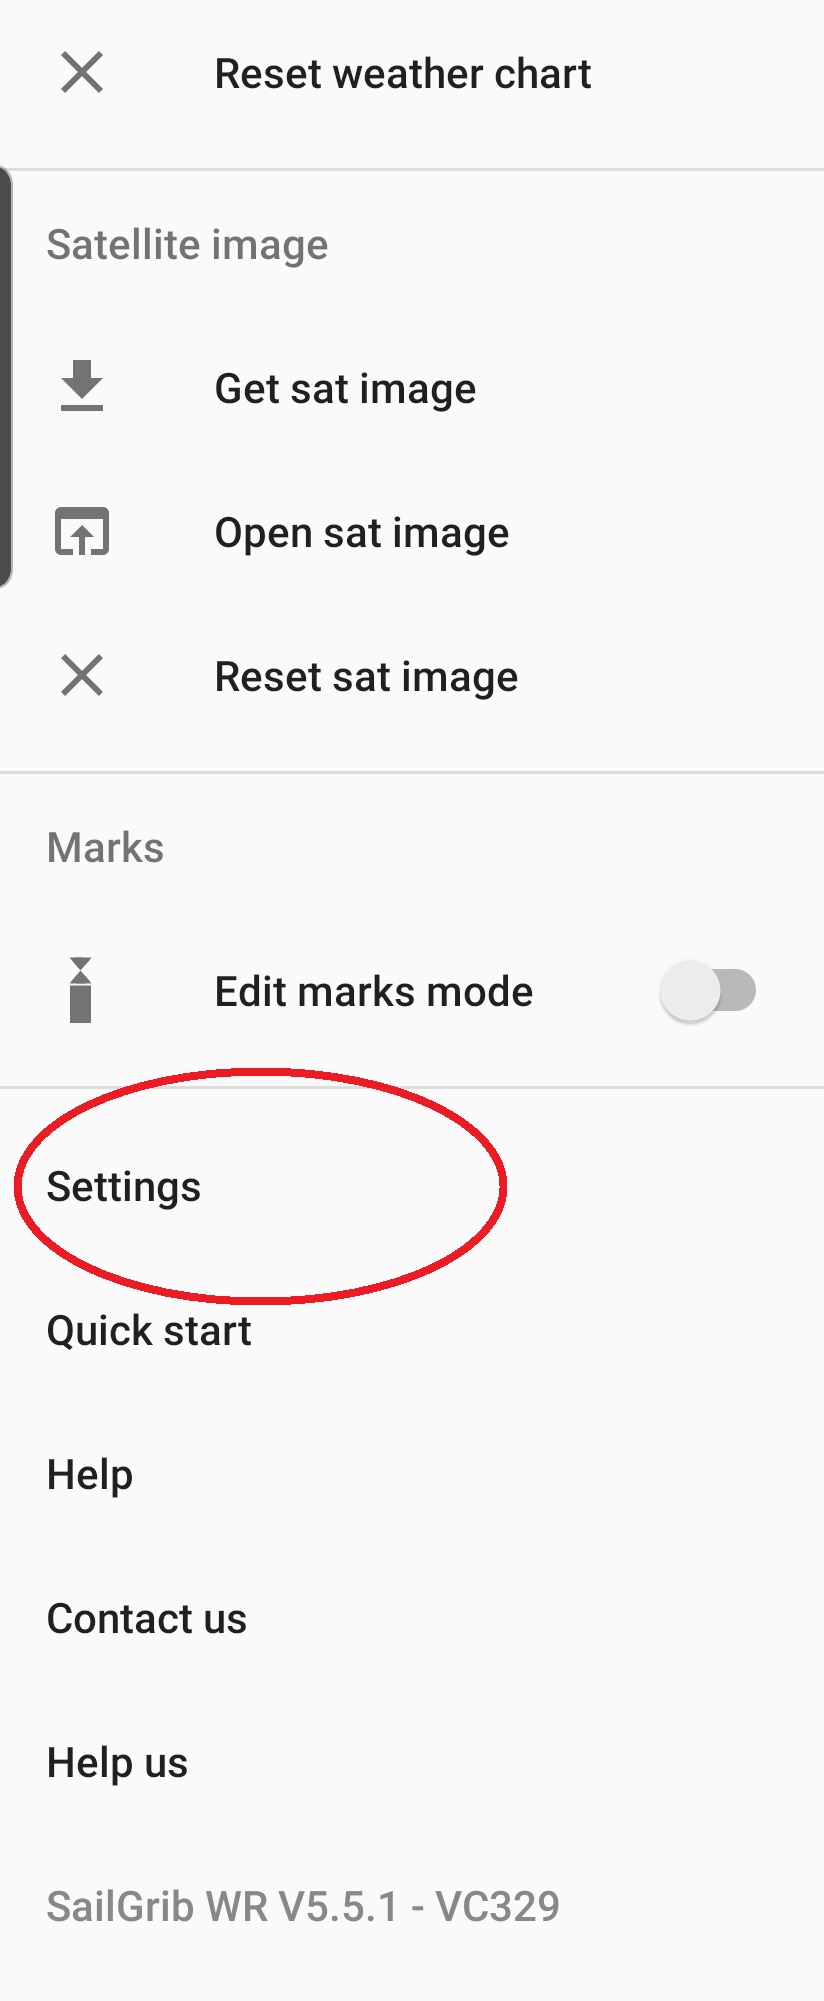
Go to the Menu section, scroll down and click in Settings.
In the setting section, go to GPS NMEA AIS.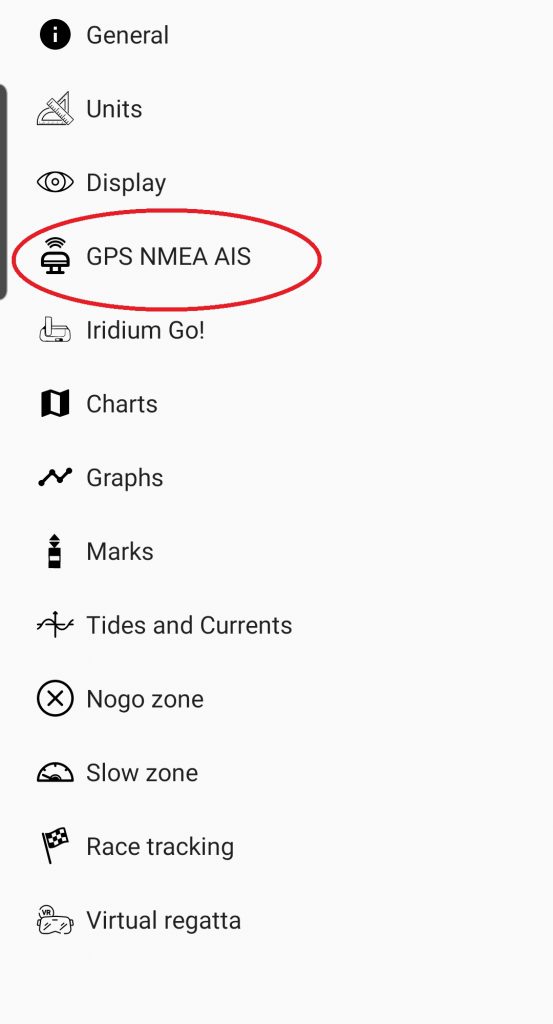
In that menu, you can configure if you want to use the built-in GPS of your tablet/smartphone or want to use the GPS position from an external source (if a GPS antenna is connected to the NMEA to WiFi or if you have an AIS transponder with WiFI). You can also configure the NMEA and AIS settings.
After having selected your GPS source, please go to ‘NMEA Settings’

In that menu, scroll down the NMEA and AIS connection, then tick to activate NMEA and AIS connection then scroll down and click NMEA Source.
A pop up will come up so just select Digital Yacht. After having selected Digital Yacht as your NMEA source, the protocol, server IP address and Server port cases will be filled in.

When you have selected Digital Yacht as a source, some NMEA sentences will be displayed under the NMEA source section.
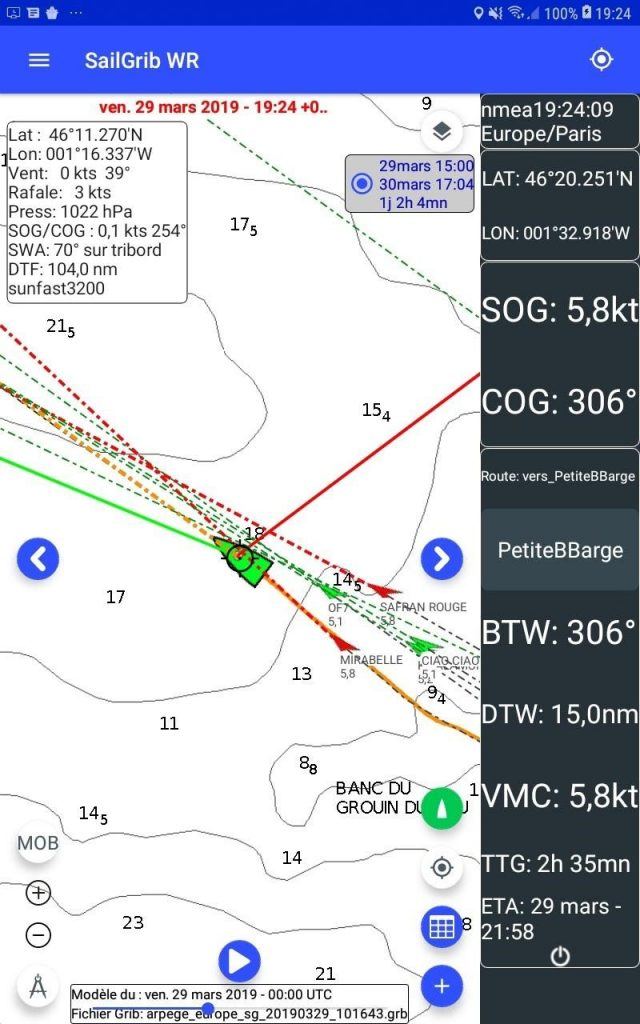
You can also now display NMEA data in the app. In the main menu, make sure you have toggled the GPS button and then in the app, click on the Green boat at the bottom and a panel will appear on the right hand side displaying navigation data in real time.

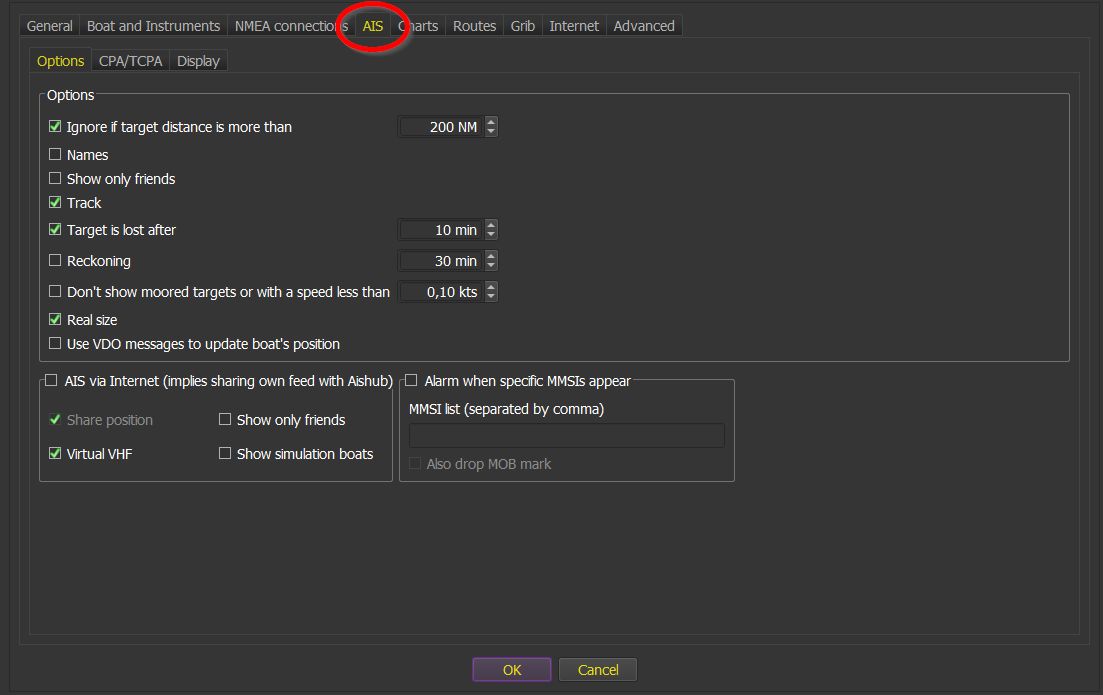
2 – Configure AIS parameters
After having configured an NMEA connection, you can now configure the AIS parameters such as which targets to display, CPA/TCPA alarms, share your own data, etc.
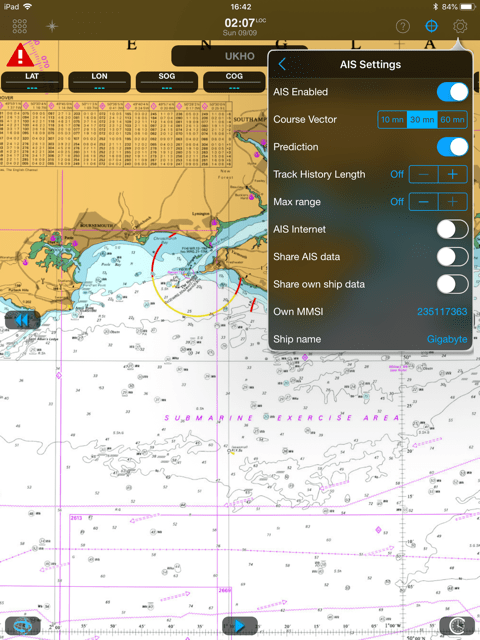
To configure AIS parameters, go to the main menu > Settings > GPS NMEA AIS > AIS Settings
In the first page of this menu, you can choose if you want to receive AIS targets over internet (which we do not recommend). If you have an AIS receiver/transponder and the data are sent over WiFi, then you do not need to tick AIS over internet.
After, you can enter your Own ship MMSI and ship name and you can select to share AIS data and own ship data over the Internet. A device running SailGrib WR or Weather4D, receiving AIS and meteorological data from the boat instruments can publish these data over the Internet. AIS data are shared on AISHub where the boat acts as a mobile AIS base station. Meteorological data are shared with the other users of SailGrib WR and Weather4D.

Afterwards, in the AIS Settings menu, scroll down and you can select if you want to display stopped boats and Class B AIS targets (leisure boating) and the bottom of the menu, you can select if you want to show vessel names or not.
Scroll down to configure the CPA and TCPA alarms. The app alerts you in case of potentially dangerous situations in case CPA and TCPA is under a given threshold. You can active your tablet/android to play sound in case of an alarm.

Go back to the app and AIS targets will be displayed but also CPA and TCPA.
ScanNav
ScanNav
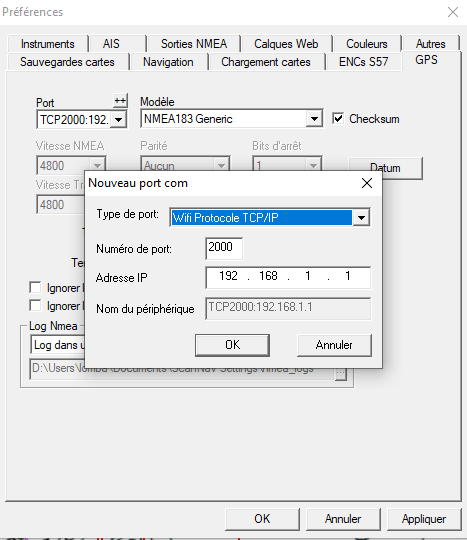
ScanNav is a PC navigation software. Open the software and go the settings.
Click on the GPS tab and push the button “++” just above Port.
Now, enter the following details:
- Choose WiFi Protocole TCP/IP
- Numéro de port: 2000
- Adresse IP: 192.168.1.1
Once this is configured, go the ‘AIS’ tab to make sure that AIS targets are activated.
SeaPilot
SeaPilot
SeaPilot is an Android/iOS app. It is based on the functionality and design of commercial shipping standards for electronic navigation with digital nautical charts. SeaPilot was acquired by Raymarine in 2018 and is a complete navigation app.
To receive external NMEA data and to display real time AIS targets, you need to subscribe to SeaPilot premium.
This post explains how to receive NMEA data and to display real time AIS targets on the SeaPilot app with our NMEA to WiFi server or AIS receiver/transponder with built-in WiFi.
The attached pics are taken from an iPad. The settings for Android are very similar with just some minor differences.
Before opening the app, connect your tablet or smartphone to the WiFi of the AIS unit or NMEA to WiFi server.
1 – Set up an NMEA connection
Open Seapilot and go to Own vessel settings. Bottom bar left end.

Scroll down and go to the NMEA menu.

Click on Use NMEA. If you want to use the built-in GPS of your tablet/smartphone, after having configured the NMEA connection, you need to turn on ‘Use GPS’ in the ‘Own vessel settings’.

Now, you need to enter the following parameters:
- Host: 192.168.1.1
- Port: 2000
- Protocol: TCP or UDP (UDP allows you to use 7 devices with the WiFi whereas one connection only with TCP. However, a TCP connection is more reliable).
Then, click on Connect. The status will now change to “Connected” and the NMEA connection is now set up.
You can now select which data you want to receive such as AIS data, position, depth data, etc. With a GPS compass you will also get Heading presented as an endless heading line beside COG/speed vector. Depth is also possible to receive and it is presented in the instrument window.

2 – Configure AIS parameters
After having set up the NMEA connections, you can now configure AIS parameters such as AIS target name, your own MMSI number, CPA alarm, etc.
Now, please click on the settings button in the bottom right corner.

You can select if you want to display AIS targets from Internet but best is to receive AIS targets from an AIS receiver/transponder.
Scroll down and click on the AIS menu.

In this section, you can choose to display target name, vector, etc. but you can also configure the CPA alarm. Your tablet/smartphone can set up an audible alarm for the CPA alarm.

Go back to the map and AIS targets will now be overlaid on your charts. Touch a target to get detailed information.

SmarterTrack
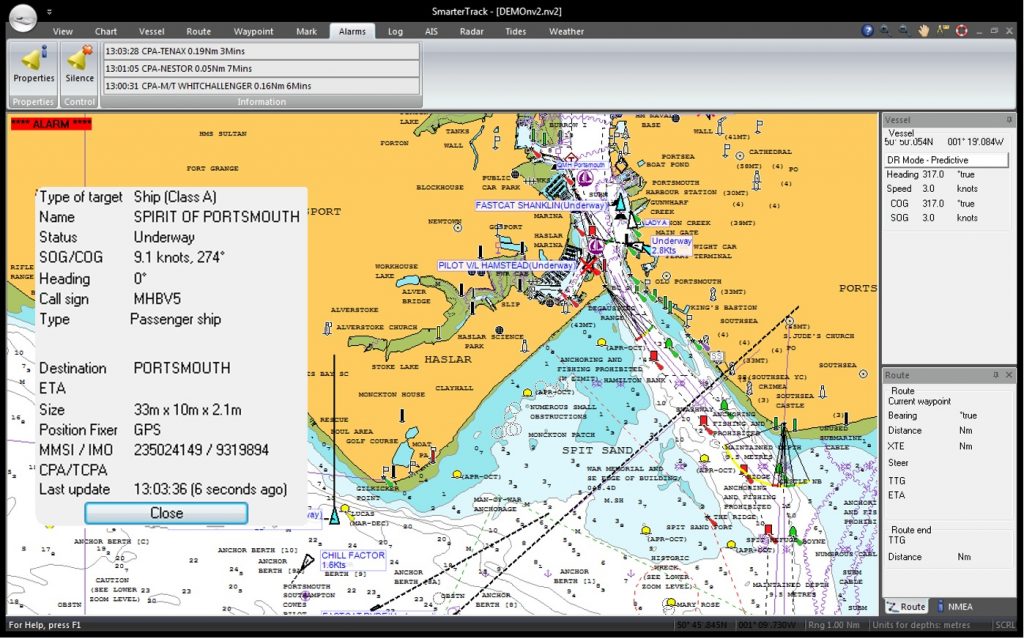
SmarterTrack is the ideal PC marine navigation software for anyone who has a dedicated chart plotter that uses Navionics Gold, Platinum or Platinum+ chart cartridges or who is new to electronic charting and wants simple to use PC navigation software with good AIS support.
You can receive AIS and NMEA data on SmarterTrack from an NMEA to USB converter or from an NMEA to WiFi server. You can set up 2 nmea connections (NMEA 1, NMEA 2) meaning you can connect for example an NMEA to WiFi server to the software and in the meantime a GPS antenna with an USB output.
1 – Set up an NMEA connection
After having plugged your NMEA to USB adaptor to your PC or having connected your PC to your NMEA to WiFi server, open SmarterTrack.
Click on the boat at the top left of the software.
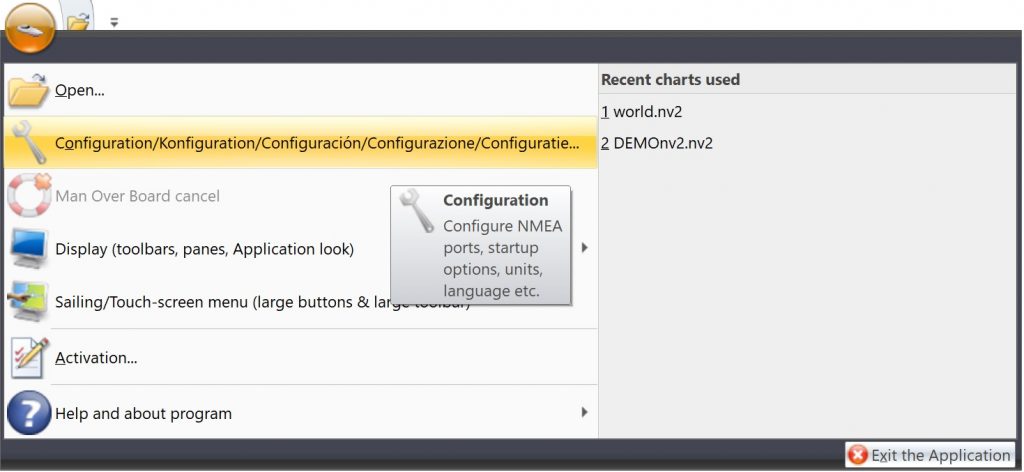
Then click on Configuration and a windows will pop up.
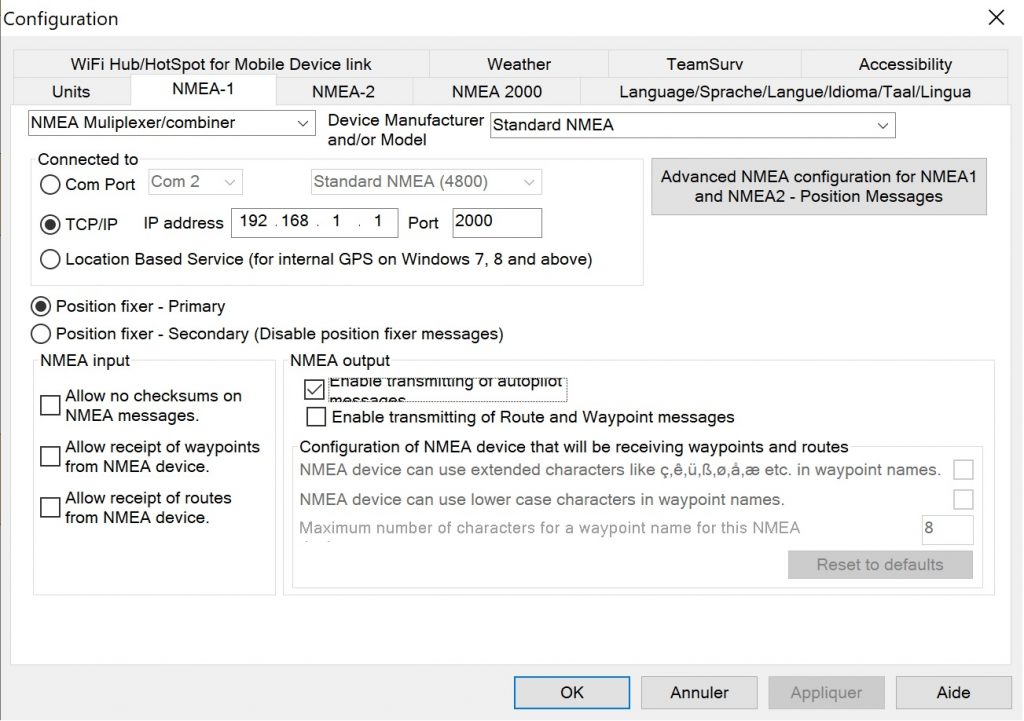
In the configuration windows, click on the ‘NMEA-1’ or ‘NMEA-2’ tab to set up your first or second NMEA connection. In the drop down list, you can choose which devices you have such as an AIS transponder, an NMEA Multiplexer (NMEA to WiFI), etc.
You can also choose if you want to output NMEA data such as sending NMEA data to an autopilot.
In the first example below, we have set up an NMEA connection with our NMEA to WiFi WLN10 and in the second picture below, we have set up an NMEA connection with our NMEA 0183 to USB converter adaptor.
For setting up an NMEA to WiFI connection with an NMEA to WiFI server or an AIS receiver/transponder with built-in WiFi, please add the following parameters:
- TCP/IP: 192.168.1.1
- Port: 2000
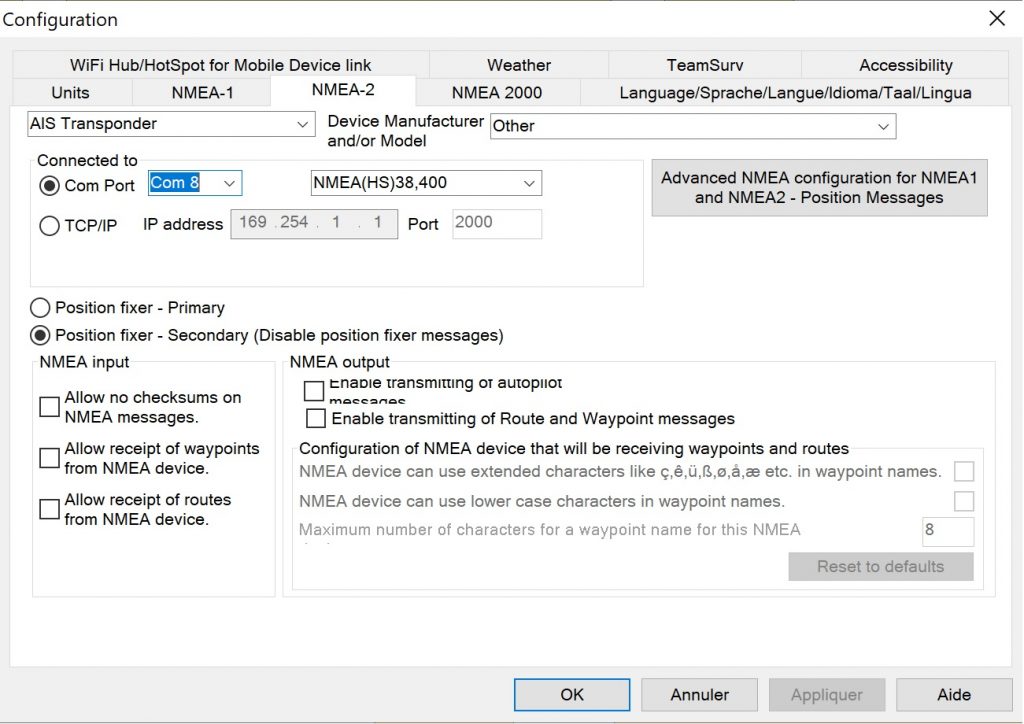
For setting up an NMEA to USB connection, please add the following parameters:
- Com Port: Choose the USB port number which has been allocated by your PC (you can find out the number in the Device manager).
- NMEA Speed: Select either Standard NMEA (4800) if you only receive instrument data or select NMEA(HS) 38,400 if you receive AIS and instrument data.
When you have configured your NMEA connection, please click Apply and reboot the software. It you set up two NMEA connections, you need to make sure that the two sources NMEA1 and NMEA2 should not be set to the same COM port or wireless connection.
If NMEA1 or NMEA2 is not being used set it to COM Port “NONE”.
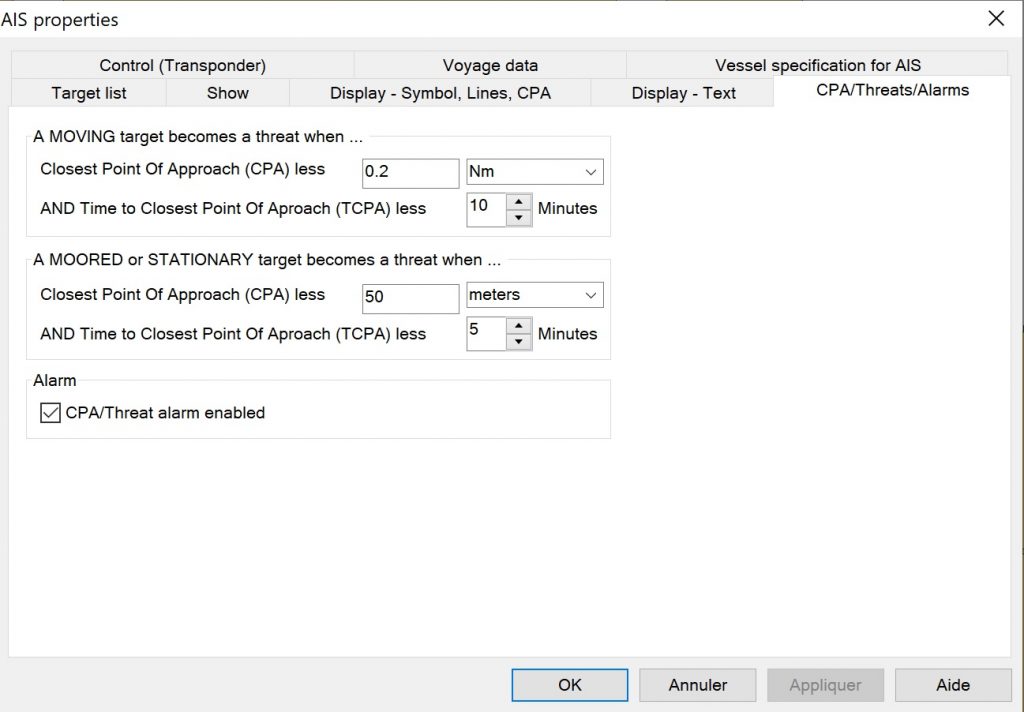
2 – Configure AIS parameters
In the top main menu, go to ‘AIS’. You can choose which targets you want to display such as Class B (leisure boating), Class A (commercial), etc.

If you click on the ‘AIS Properties’ button, you can configure other AIS parameters such as CPA/TCPA alarms, stop the AIS transmission of your AIS transponder, the voyage data if you have connected a Class A AIS Transponder, which data you want to display, etc.
TZ iBoat – MaxSea & TimeZero
TZ iBoat is a powerful app for coastal sailing designed by MaxSea (also design the powerful software TimeZero). This app is only available on iPhone/iPad. If you have a WiFi Furuno radar, you can overlay radar within the app. There are some in-app purchases to display AIS and GPS data but also to use the Radar functionnality.
Before all, you need to connect your iPhone/iPad to your NMEA to WiFi server or AIS receiver/transponder with WiFI.
1 – Set up an NMEA connection
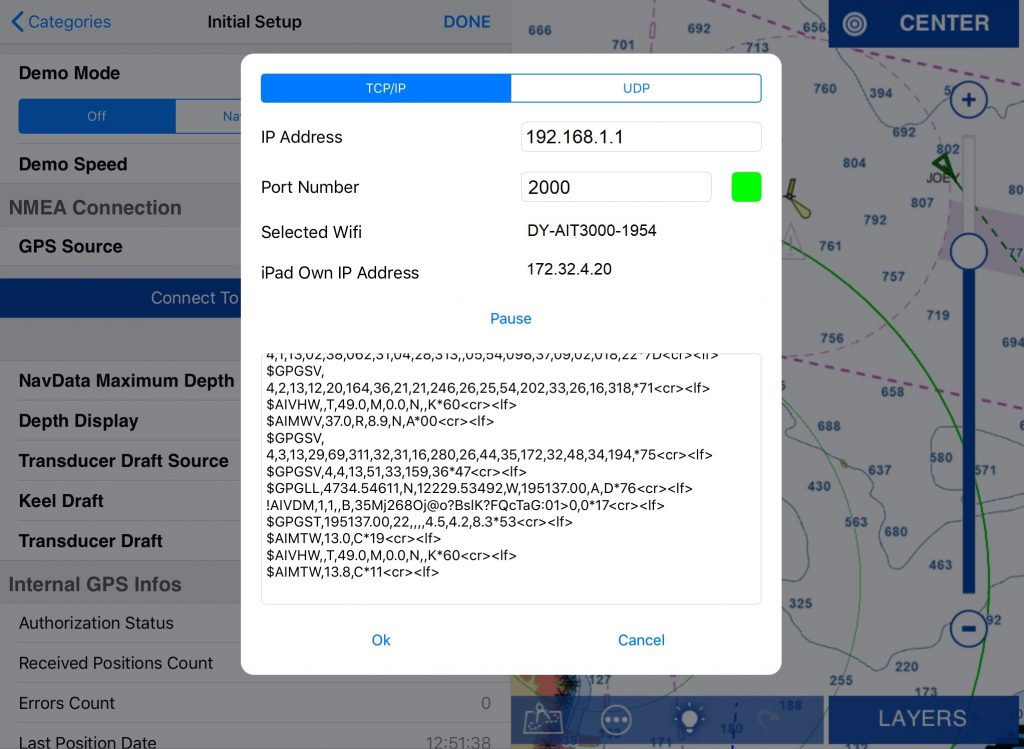
Firstly, select the menu icon on the top left of the TZ iBoat screen. It is three horizontal lines. Then, select “Initial Setup” from the list. Then, select “Connect To NMEA Gateway” which will bring up a network configuration window and type in the information parameters:
- TCP/IP or UDP: TCP protocol is more reliable, allows bi-directional data transfer but only one device to connect at a time, while UDP is a uni- directional, broadcast protocol allowing up to seven devices to all receive the same data. If you using many devices, we recommend you choosing UDP.
- IP Address: 192.168.1.1 (do not need to enter that if you choose UDP).
- Port Number: 2000
After having entered those parameters, you should start to see NMEA data streaming in the square. Click Ok.
In the Initial Setup menu, you can also choose if you want to use the Internal GPS of your iPhone/iPad or an External Source. If you have a GPS antenna connected to the NMEA to WIFI server then you can select NMEA Gateway.
You can now overlay AIS targets in TZ iBoat.
Weather4D
Weather 4D is an iOS iPad/iPhone app best known for its fantastic animated weather displays with the ability to download global weather and present animated, multi day forecasts of pressure, wind, temperature, precipitation, cloud cover etc. This app is mightly impressive and a valuable addition to your app toolbox if you’re a keen sailor.
Weather 4D has a full function NMEA interface compatible with Digital Yacht NMEA to WiFI servers and our wireless AIS systems like the AIT5000 and Nomad.
Set up is easy – Firstly, connect to the Digital Yacht Wi-Fi point and close all your apps in the background and open Weather4D.
1 – Set up an NMEA to WiFI connection
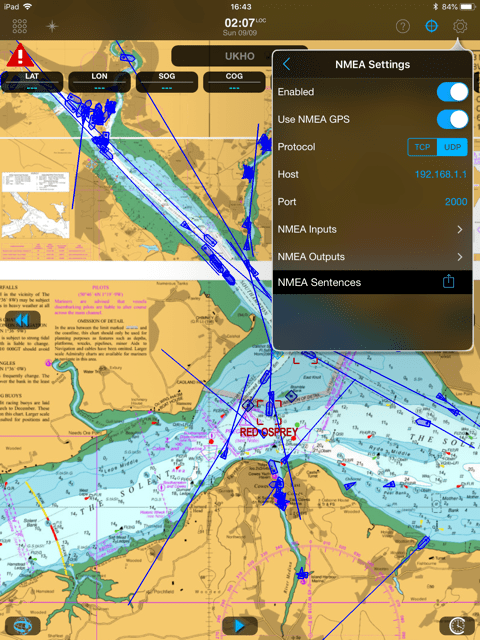
Click on the Settings button in the top hand right corner and then go the NMEA Settings section.
In this section, fill in the following:
- Protocol: UDP or TCP (we recommend UDP)
- Host: 192.168.1.1
- Port: 2000
You can also choose to receive the GPS position from the built-in GPS of your device or from an external source (i.e. a GPS antenna connected to our NMEA to WiFi server). You can also configure the NMEA inputs and outputs if you want to output data to an autopilot for example.
When it is all configured, toggle the button next to Enabled and if the connection is right, some NMEA data will start streaming under NMEA.
2 – Configure AIS parameters
If you go back to the Settings, you can go to the AIS Settings section to configure all the AIS parameters including the ability to overlay internet sourced AIS data. This is dangerous for real-time navigation as there’s often a delay (you’ll see a ship you’ve just passed right in front of you!) or coverage can be poor but it’s fun for use at home looking at other ports or checking on your vessel’s AIS status.
You can also optionally set the iPad to upload your local AIS data to the internet if you want to be part of the crowdsourced data gatherers. This can also include local wind data which will offer real-time data to other users – interesting!
Through the settings, you can also configure MOB and CPA/TCPA alarms. Your iPad/iPhone could trigger an audible alarms.